Double Chocolate Covered Marshmallows

Fancy Marshmallows are kind of becoming my thing. They are easy to make and they are always a hit with the crowd. 

If I have had a busy day and I didn't have time to bake or no bake something, I can whip up a few pretty marshmallows in 5 minutes flat and enjoy the oohs and aahhs from my family when I serve them.

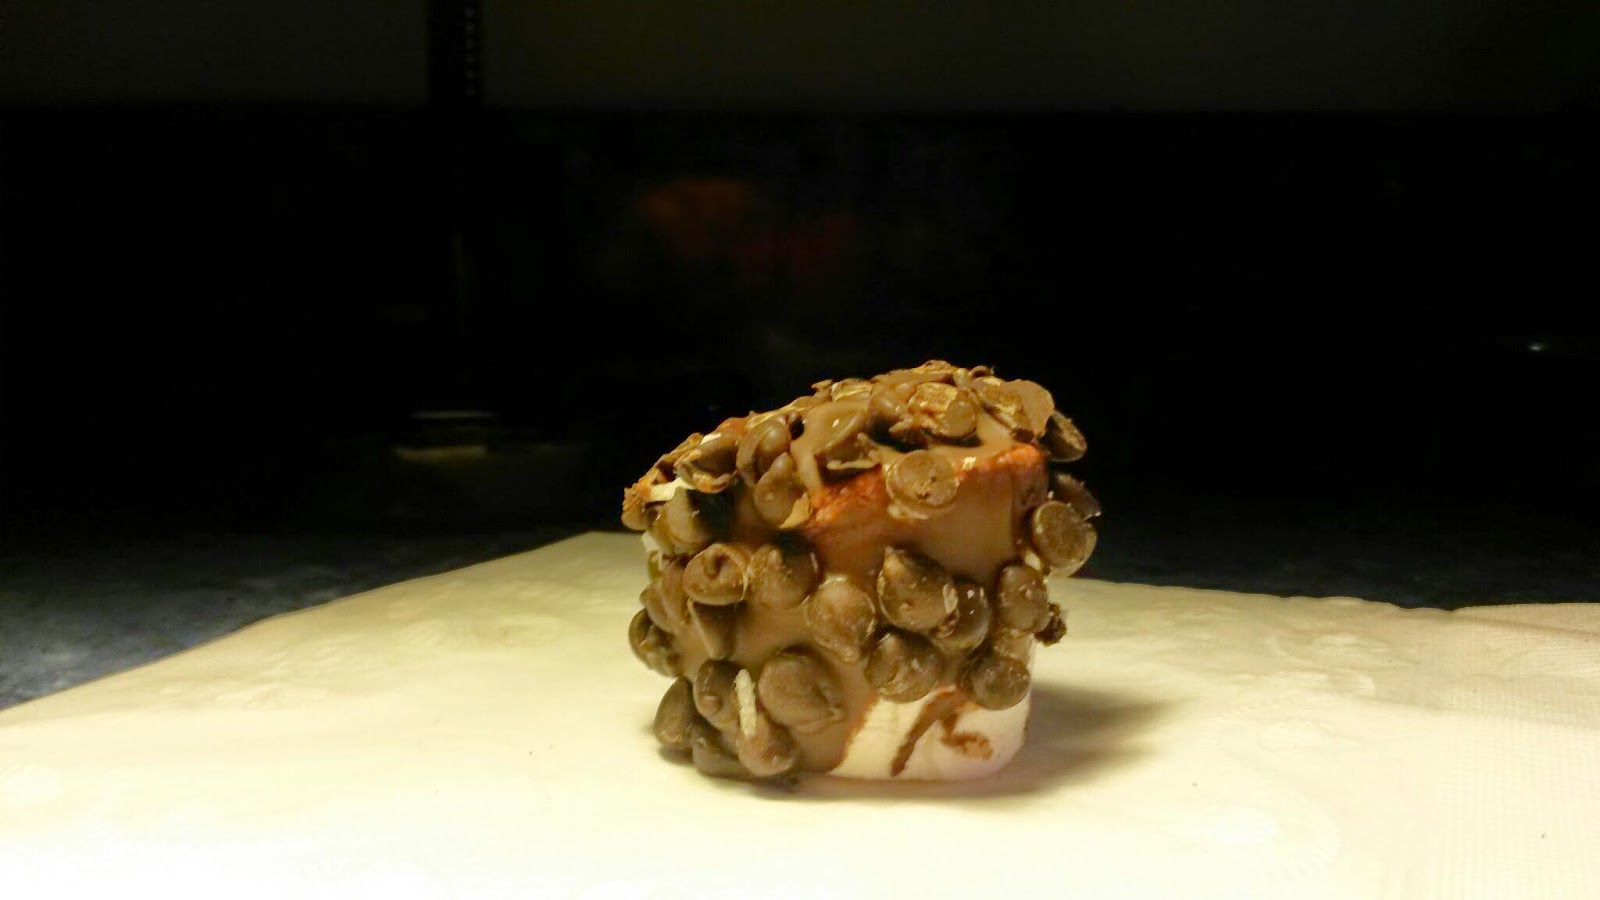
Tonight I made a half dozen of double chocolate covered marshmallows.

This is so easy anyone and I mean anyone can make them.


You will need:

Large Marshmallows
Mini Chocolate Chips

I used 1/4 cup of mini chocolate chips for the first coating and 1/4 cup for the second coating.

Place 1/4 cup of chocolate chips into a small dish, set aside for a moment.

Spray a very small microwave safe dish with cooking spray. Add 1/4 cup of chocolate chips. Microwave for 30 seconds, then stir. Microwave for 30 additional seconds and stir. If the chips blend smooth upon the second stirring it is ready. If not, microwave for 15 seconds and stir, repeating as needed.

Dip your marshmallows into the melted chocolate then into the mini chocolate chips. Place on a plate and repeat until you run out of marshmallows or melted chocolate.

Allow the marshmallows to rest for about 30 minutes until the chocolate has hardened. Serve with a smile, store leftovers, on the odd chance there are any, in a ziploc baggie.

If you like chocolate covered marshmallows, check out my Chocolate Covered Marshmallows With Coconut recipe.

Tell Me About It Tuesday 4/7

Welcome to Tell Me About It Tuesday!
If you are new here we are glad to have you with us! If you are a returning party guest, it is a pleasure to see you again!
As always,
Thanks to our hosts!


Let me tell you about my life since the last party:

Sweet Silly Sara has been a busy lady as of late! Baking, cooking, cleaning, blogging, creating, working and the most important mommying. The kids are great, they are growing, they are healthy, they are gorgeous.


I would love for you to leave me a comment. Tell Me About It, I want to hear about your week!

Okay, now on to the good stuff

The most clicked link was


April's favorite was:


Grocery Store Scavenger Hunt by Play 2 Learn With Sarah

Sara's favorite was:


Banana Blueberry Muffins by Mommy on Demand

Jacqui's favorite was:


Ranch Chicken... by An Everyday Blessing


Thank you for dropping by to link up. I can't wait to see what you have to share this week!
Remember, please follow the hostesses. Link up anything family friendly that you like, except giveaways and etsy shops!

Don't link and run, visit a few links please! Everyone loves comments or shares {hint, hint, wink, nudge}

Please note that by linking up to Tell Me About It Tuesday you are granting the hostesses permission to share your post on our social media accounts and or in round up posts. We may also feature your work in the next party.


Every link in this party will be visited and pinned to our Tell Me About It Tuesday board, so show us what you've got!


In The Sky Sensory Bin

Roo loves waking up to find a new sensory bin waiting on him! I love making something fun for him and knowing he will happily play with this new bin for a few hours. I got a great deal on a Toob from Safari LTD and I couldn't wait to make the In the Sky Sensory Bin.

I started with a base of Easter paper grass stuff and a few cotton balls.

Photo Credit: Sara Lehman.

I pulled the cotton balls apart slightly to fluff them up a bit.

Photo Credit: Sara Lehman.


Gently pull your cotton ball apart until it looks like a fluffy cloud.


Photo Credit: Sara Lehman.

Next add a handful of planes and balloons- or a toob (In the Sky).

Photo Credit: Sara Lehman.

And you have a neat sensory bin for kids that incorporates fun with their senses. The paper Easter grass and the cotton ball clouds offer different textures to feel. The paper grass engages the sense of hearing as it crinkles when touched. The colorful blue base engages the sense of sight with a visually appealing color. The planes open the doors to imaginative play.

Photo Credit: Sara Lehman.

Roo liked this sensory bin. He was amazed at the planes inside and he caught on quickly that the bin was the sky. He excitedly showed me all of the clouds, several planes and the paper grass which he thought was pretty neat stuff. After about an hour of playing planes he smiled and picked out a few dudes and told me it was bubble bath time! The In the Sky Sensory Bin can double as a bubble bath sensory bin in the imagination of a child.

Thanks for reading! I would love to hear about your favorite sensory bin ideas.


Nuts About Cookies Bark

When you have a very busy child underfoot and an infant to contend with the chances of baking a cake from scratch are slim to none. Too often dinner comes from the freezer or sadly it comes home in a brown bag and Styrofoam containers. Dessert? Think stale cake from the bakery. Plastic wrapped cookies. Yeah. I never claimed to be the perfect wife or mother. I seriously lack in the cooking department if you are seeking home cooking or from scratch cooking. Instead of beating myself up about not being June Clever, I realized that I don't have to make everything from scratch. This inspired me so I started playing around with ingredients I had on hand and I came up with a yummy dessert that took less than 5 minutes to create.

I came up with Nuts for Cookies Bark. It was nothing short of awesome! To create Nuts for Cookies Bark you will need:

Photo Credit: Sara Lehman.


10-18 crushed oreo cookies (I broke mine into chunks)
1/2 cup od pecans, crushed
1 bag of semi sweet chocolate chips


Spray a microwave safe bowl with cooking spray. Pour chocolate chips into the bowl and microwave, stirring every 30 seconds until the chips are melted and can be stirred smooth.

Photo Credit: Sara Lehman.

While the chocolate chips are melting, place half of the cookies and nuts into the bottom of a container, you could use a baking dish or a cookie sheet. Pour the melted chocolate over the base. Top with the remaining cookies and nuts.

Photo Credit: Sara Lehman.

Allow to cool at room temperature for about an hour. Then cover with plastic wrap and place in the refrigerator for about 2 hours so that the bark will set and harden properly.

Before serving, allow to set at room temperature for a few moments. Break into chunks and serve.

Find more yummy desserts here:

Chocolate Covered Marshmallow with Coconut

We had another snow storm on Saturday of last week. While I watched the snow blowing from my window I decided to make a dessert that would take no more than 5 minutes to prepare and that would give us a little taste of the tropics to ease the pain of another winter storm.

Photo Credit: Sara Lehman.

To make Chocolate Covered Marshmallows with Coconut you will need:

1/2 a bag of milk chocolate chips
2-4 tablespoons of shredded coconut depending upon your preferences (completely coated, partially coated etc)
10 jumbo marshmallows
Cooking Spray


Start by spraying a microwave safe bowl with cooking spray.
Add chocolate chips to the bowl. 
Place your coconut in another small bowl.
Microwave for 30 seconds, stir and repeat until the chocolate chips are melted and smooth.

Dip a marshmallow in melted chocolate. Roll it in the coconut, set aside on a wax or parchment paper lined plate. Allow to harden, about an hour. You can speed this up by placing the marshmallows in the refrigerator for about 20 minutes.

If you love chocolate and marshmallows- hop over to check out my Double Chocolate Covered Marshmallow Recipe.