Showing posts with label crafts. Show all posts

January DIY Inspo for You and Your Kids

Image credit - Pixabay
January is notorious for its terrible weather. And it isn’t just getting frustrating for the kids who are stuck
inside. For many of us, the daylight hours are short, and it can feel like we’re stuck in perpetual night
time. Below, you’ll find some home DIY ideas to keep both you and the kids occupied while we wait for
spring to come.

While you might be cutting back in January after Christmas and watching the pennies, there’s no reason
not to use January as the opportunity to get some small things done around the house that generally get
put off the rest of the year. Take advantage of staying in and focus on the little things that will make a big
difference.

Framing – So often we are given or pick up beautiful prints and think to ourselves about how beautiful
they will look when framed. And then they sit in our homes for months and months, gathering dust until
we get round to it. Which is sometimes never. When you’re stuck inside for days, it might be the
opportune moment to get out those prints and devote some time to measuring and ordering frames for
them. With a hobby lobby coupon, you won’t even feel the pinch and will soon have new pictures
breathing fresh energy into your home.

Table and chair legs – These get the brunt of household knocks and kicks and can often become
scuffed. There are some easy ways to get rid of surface scratches though – and it’s something you can
enlist the kids’ help with too. Whether it’s getting a small pot of paint to touch up table legs, or using other
great crafting solutions, you’ll soon have furniture that looks good as new.

Soft-furnishing repairs – Again, often so small that they would be overlooked by anyone else, but we all
want our homes to be in tiptop condition and, if you take pride in carefully selecting pieces for your
interior, then it makes sense you want to keep everything well. Accidents do happen though and so
make a day of collecting all the little things that need mending. It might be a cushion cover, a throw or a
pillowcase. Teaching your kids how to mend things like this are great skills to pass on to them and will
serve them well for the rest of their lives. For younger children, how about giving them a sampler, or
even some embroidery thread and cardboard with a thick needle to practice on?

De-clutter – Having a sift through your things at the beginning of the year can make you and your
family feel refreshed and prepared to get stuck into the new year. Start by tackling small areas – you can
even make a de-clutter calendar for a different part of your home to do each week. Talk to your kids
about the importance of passing things on and getting organized. You can even take them with you to
charity stores to donate their old toys and clothes.


With so much to mend and do, January doesn’t have to be boring. Get your kids involved in helping
around the house and you’ll be set for 2020 in no time.

6 Sweet Santa Crafts

He's making a list and checking it twice, and the kids are losing their minds with the excitement of Santa's upcoming visit. To build on the fun of the Christmas festivities, I have found 6 Sweet Santa Crafts for my kids and I can't wait to share these ideas with you!


These are easy and adorable ways to bring the fun of Santa into your craft time this holiday season!
We are a family that loves to create. I am always looking for easy and fun ideas for the kids.


Santa's Sleigh Fingerprint Craft

Santa Handprint Ornaments

Santa Gift Tags

Paper Santa

Mason Jar Santa

Santa's Face Ornaments


Which of these Santa crafts is your favorite? I think they are all as cute as can be, but I am crazy for the Santa Face ornaments! My kid would love to make any of these fun projects.

Find more Christmas Content Here

6 Christmas Tree Inspired Snacks


10+ Christmas Tree Ornaments to Make

I have been making a ton of ornaments this year. The kids think it is a lot of fun to get out the glue and the glitter and get creative! Well, let's be honest, I do too! My oldest has been making lots of cute things at school to bring home and share too!


To keep up with the fun of creating at Christmas, I have 10+ ideas to share with you from some of my favorite bloggers! All 10+ of these are easy and adorable! I hope you get a chance to try them, or any of the ornaments I have made live on the Quirky Momma facebook page.


Favorite craft ideas


Felted Wool Christmas Trees

Sparkly Sequin Ornaments

Essential Oil Diffuser Ornaments

Cinnamon Applesauce Ornaments

Stacked Christmas Tree Ornaments

Craft Stick Trees

Pipe Cleaner Beaded Trees

Glitter Clay Trees

Easy Accordion Trees

Noodle Popsicle Stick Trees

Easy Button Tree Ornaments

Live Video Projects


Etched Glass Jars
Candy Cane Wreaths
Popsicle Stick Ornaments
Christmas Houses
Toilet Roll Snowflakes
Washi Tape Cards
Toddler Christmas Tree Crafts
Tree Ornaments

If you have an idea for a Christmas ornament, I hope you will share it in a comment!

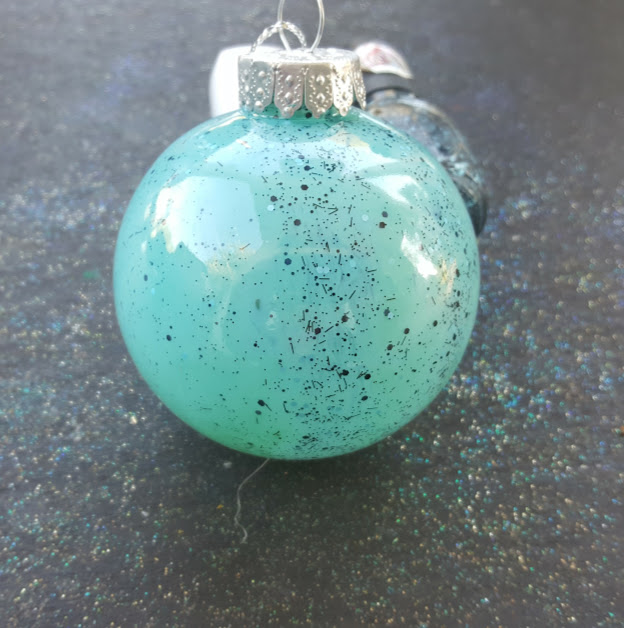
Nail Polish Ornaments

Nail Polish Painted Ornaments are a great way for tweens and teens to craft up something pretty for the Christmas tree! These are easy and economical with supplies from the dollar tree for a fun decoration to share this holiday season.


I have a tendency to hoard nail polish. I can't buy just one color. I am compelled to buy them all. As I was browsing my collection, I realized I could be doing so many things with my nail polish, and I wanted to try using it for decorations!


I picked 2 pretty shades, specifically one with confetti, and grabbed a 2 pack of ornaments from the dollar store.


First, I carefully removed the top.
Then I poured in a touch of each nail polish.

Nail Polish Ornaments

The first attempt at this craft, taught me an important lesson.
You must allow this to dry before replacing the cap, or the nail polish will remain liquid.
To dry the polish, I recommend blow drying on the cool setting for about 2 minutes, but be careful to not place the dryer right up against the ornament!


This is such a great and easy craft. The ornaments turned out lovely and were so much fun to share! We made red and blue ones!


You can find all of our ornament craft ideas here

You might also want to check out these Christmas tree inspired snacks.


10 Projects to Make for Hanukkah


 The holidays are near and it is time to get crafting! I have 10 Projects to Make for Hanukkah that you aren't going to want to miss! These are so fun you are going to light up at the sight of them!

These 10 Projects to Make for Hanukkah are perfect for crafting with the kids and are a great way to add a little festive decor to your home without having to head to the shops to get it!


Hanukkah Party Poppers by Frugal Elegance
Shimmering Star of David by Crafts by Amanda
Hanukkah Stained Glass Craft by Kid World Citizen
Modern Menorah by Delicate Construction
Handprint Menorah by Mom Endeavors
Elegant Menorah by Mod Podge Rocks
Hanukkah Gelt Tree by Yesterday on Tuesday
DIY Menorah by Sugar Bee Crafts
Hanukkah String Art by Delicate Construction

I can't wait to make the party poppers with the kids! They are going to LOVE these!
If you have a fun craft or DIY for Hanukkah please leave a comment to share with us! If you make any of these ideas make sure you share a pic on facebook!

Find all of our holiday posts here


Easy Ombre Painted Pumpkins

This easy pumpkin painting idea brings the style of ombre to your fall decor.


I love to decorate pumpkins! In years past I usually carved them, but we painted a lot of pumpkins on our facebook live show on Quirky Momma and I have to admit, I was hooked on the options painting brings to pumpkin decorating!

This was one of my favorite pumpkins! The pumpkin was a tiny one, and the technique was simple. With a brush, 3 colors of pink paint and some mod podge, this little beauty came together in just a few moments time and was admired by all who saw it in our yard!


Supplies needed:
A Paint brush
A Pumpkin
Mod Podge to seal
3 shades of paint (I used 3 shades of pink)

Directions:
Begin by painting the bottom the darkest shade of paint you want to use.
Use the second paint in a shade a little lighter than the bottom shade
Paint the top portion in the lightest shade.
After the paint has dried, use the mod podge to seal your pumpkin so that the wildlife is disinterested in eating it, and the weather doesn't wash your efforts away!

There you have an easy ombre pumpkin for fall decorating!

You can find all of my Halloween ideas here.
Favorites include:


Witch Window Cling

It is hard not to get in the spirit of things this Halloween with his hands on witch window cling craft!


This window cling was so much fun to make with the kids. I love that it gives them a chance to use their fine motor skills and practice scissor skills while making something so cute for your windows!

Supplies

Scissors
Clear Transparent Contact Paper
Green, Black, White, Purple Construction Paper
A scrap of pink or red paper


Have the kids tear and cut up the black, green and purple paper into small bits.
Make 2 small circles from a black square of paper.


Cut out small white circles for eyes and a small smile from the red or pink paper.


Begin by placing the small black circles on the contact paper, sticky side up.
Cover those with the white circles for eyes


Next form the nose, mouth and hat of the witch


Begin filling in the face with green bits of paper.


Fill in the remaining areas with purple.

Leave just a few areas uncovered so that the contact paper will stick to your window.


We thought these were really cute. They were fun to make and offered the kids a little challenge as the contact paper is sticky. 

You can find all of my Halloween ideas here.

Paper Plate Witch

Glam Pumpkin Makeover


13 Ghostly Crafts to Make for Halloween

Halloween is near and we are crafting up all things spooktacular! I found 13 awesome ghost crafts that the kids and I can't wait to make! These are too fun! To say the least, they are a step up from our efforts so far this season of a simple ghost decoration.


Ping Pong Ball Ghost Lights by Unoriginal Mom

Lollipop Ghosts by Mom Dot

Toilet Paper Ghosts by Ginger Snap Crafts

Plastic Bottle Ghosts by In the Playroom

Halloween Footprint Craft by Where the Smiles Have Been

Ghosts Under Glass by Yesterday on Tuesday

Tin Can Ghosts with FREE Printable by Ginger Snap Crafts

Ghost Mobile Kids Craft by Sugar Bee Crafts

Halloween Ghost Windsock by Real Coake

Giant Hanging Ghost by A Girl and a Glue Gun

Pillowcase Ghost Dress by Sugar Bee Crafts

Spooky Cheesecloth Ghosts by Yesterday on Tuesday

Gourd Ghosts by House of Hawthornes

Which of these ideas will you try first?


Which of these 13 ghostly crafts to leave you aghast do you think your family would have the most fun with? I love the ghostly gourds! I have an obsession with gourds and love the idea of creating something more than a centerpiece with them.

If you are in the mood for more Halloween crafts check these ideas out!


If you make any of these fun ideas make sure you hop over and share a pic with me on facebook!


You might also like

 Paper Plate Witch Project.
Glam Pumpkin Makeover
Handprint Monster Puppets


DIY Easel Photo Stands

This easy straw easel diy is the perfect solution to displaying photos and works of art on the cheap.
All you will need is a few straws and some hot glue to create these fun and functional easel photo stands.


My kids love to draw pictures and my husband loves to take photos. I usually have an abundance of things to display on any given day. Considering how artistic my family is, I regularly rotate the display!
These easy easel photo stands are the perfect solution for displaying notes, photos or works of art.
They come together in moments and are just the right size.


To make straw easel photo stands you will need 4 paper straws and a hot glue gun.
Begin by forming an upside down V with 2 straws and glue them together.


Next, cut one straw in half, place this on the two straws to form an A shape. For larger photos, add the cut straw a little lower to allow more room to stand a photo.

Now glue the last straw on the back of the A shape.  Glue from the top to give the stand its support.


Allow to dry for a moment then place a photo or work of art on the stand to display.


I love this idea for the office, a dorm room, or around the house.


I have a video on facebook for this project.
I would love to have you check it out and give it a thumbs up!


You might also like this Time Out Jar project.

Easy Dyed Rice

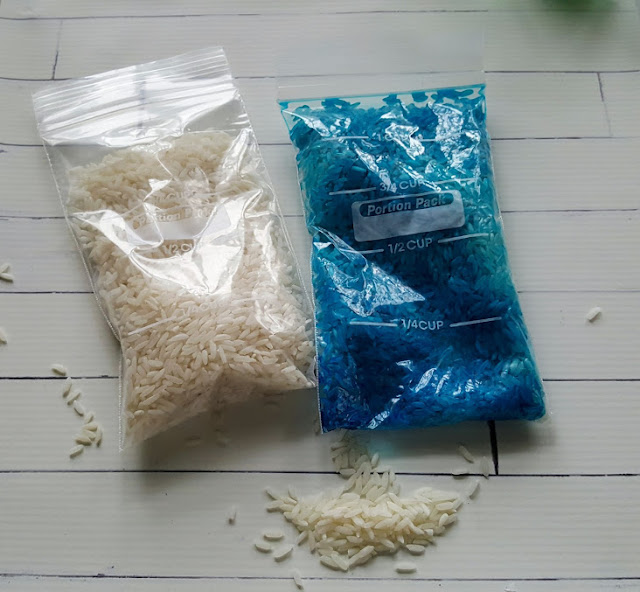
Dyed rice for sensory bins has never been easier! This 3 ingredient method dries super fast and provides vibrant results!


I love to make sensory bins, almost as much as the kids love to play in them! They still love the sushi sensory bin we made ages ago and it inspired me to try dying rice for more sensory fun. 

To make this dyed rice you will need:
  • Rice
  • Food Coloring
  • Hand Sanitizer


 Place the uncooked white rice in a zipper seal baggie. I used 3/4 cup per color.
Add a tablespoon of hand sanitizer.


Add 3-5 drops of food coloring (I used the cheap stuff from dollar tree FYI).


Release the air from the baggie to avoid popping it. The shake it, squish it, wiggle the rice around until it is coated completely. The pour the rice on a paper plate and let it dry for about 45 minutes.


Repeat with additional colors as desired.


Naturally, we did all of the colors of the rainbow!

You can find all of our sensory play ideas here


DIY Barbie Serving Tray

My daughter is really into all things Barbie. So I made her this cute little rustic serving tray for her Dreamhouse play sessions. It took me less than 5 minutes and is pretty cute and you can personalize it if you wish!


We have all but given up on Barbie accessories. My kids lose them, the dog chews them and it seems like a big waste of money. I won't buy any more, but I will DIY some!


 I made this Rustic Barbie Serving Tray happen in moments with 3 supplies. It is pretty cute and it cost me $0 to make.


Supplies

6 small craft sticks 
Scissors
Glue Gun


Directions

Glue 3 craft sticks together
Trim the rounded edges off of 3 craft sticks then glue 2 of them to the longest sides of the base.
Cut the remaining craft stick in half
Glue this to the other ends


 Now you have a rustic serving tray for Barbie and her friends. Can you believe how easy that was?

We are already planning to make a version of this with taller sides to flip over as a coffee table for Barbie. You can paint the serving tray, or cover it with washi tape for a unique look if your daughter isn't into Farmhouse style decor yet.

Find all of my craft stick projects here

Handprint Fish Puppets

Monster Handprint Puppets


DIY Superhero Cuffs


My daughter is all about Wonder Woman these days, so we made a cute and easy craft to keep her Superhero dreams coming! 


This is such an easy craft. All you need to make it is duct tape, toilet paper rolls and scissors!


Cut two toilet paper rolls in half.
Then cover them with duck tape in your favorite print. Make sure to fold the edges over to avoid paper cuts and rubbing! 

That is all it takes to make these crazy easy and cute Superhero cuffs for the kids! This is one of my favorite rainy day projects because after craft time ends they can engage in some dramatic play!

You can check out the short video below 


Find more crafts here

Cupcake Liner Crafts are perfect for preschoolers


12 Mermaid Craft Tutorials

If your kids are crazy about mermaids you are going to love these 12 Mermaid Craft Tutorials! From adorable bags to upcycled crayons, this list has so many ideas you will want to make!

Mermaid craft tutorials

Spring is here, so my family is day dreaming of the beach, the pool and all of the fun we will have this summer. My daughter wanted to make our mermaid tail craft again last week and we had so much fun with it! I searched some of my favorite blogs and found 12 more ideas for our crafty fun. I know you will love this collection of crafts too!


Mermaid Shell Necklace by Moms and Crafters

Ombre Mermaid Tail Crayons by The Crafty Guru

Mermaid Bath Bombs by Buggy and Buddy

Easy Mermaid Tail Craft by Stylish Cravings

Clothespin Mermaid Dolls by Create Craft Cook

Mermaid Succulent Garden by Creative Green Living

Mermaid Suncatchers by Sugar, Spice and Glitter

Paper Plate Mermaid Twirlers by Red Ted Art

Beach Towel Mermaid Tails by Somewhat Simple

Mermaid Mailbox Playset by Hello Wonderful

Mermaid Wall Art by Resin Crafts Blog

Mermaid Iron On Tote Bag by Sew What Alicia


You might also want to check out my easy mermaid tail craft for preschoolers.

You can find all of our easy craft ideas here


9 Cards to Make for Father's Day

Father's Day will be here soon and I have 9 fun card ideas that your kids can make for their Dad to let him know they think he is a Super Dad!

Father's Day Cards to DIY

There is no better way to tell someone that you think they are amazing than a handmade card! The detail and sentiment in something made uniquely by you simply cannot be found in a printed card!

That's why I rounded up these 9 card ideas to let Dad know how you feel! He will love these fun-tastic expressions of adoration on his special day, and I bet he will savor them long after Father's Day has passed!


Fingerprint Monkey Card
High Five Card
You're the Vest Card
Tie Card
Fingerprint Golf Ball Card
True Grit Card
Shirt and Tie Card
Dad's Tools Card
Popsicle Card

I have a few ideas that you can use to make Father's Day super special.

  1. Let him sleep in! 
  2. Offer to take over one his chores for the day so he can rest.
  3. Give him a new magazine or book to read while he is relaxing.
  4. Offer him a special treat! 
  5. Tell him that you appreciate his devotion to your family.


Which of these cards do you think your kids would like to make first? My kids think the Vest Card is pretty awesome! We plan to make one soon!

Find all of my fun crafts here

Glowing Night Lights (No Electric!)

These glow in the dark jars are a fun diy to make with the kids. They are perfect for a night light that comes together in one minute or less, with only 2 supplies!


 My son Rolf is 9 now. He is so curious and eager to learn. One night last week it was storming and he was worried about losing power, and how he could sleep in the dark. So we took to the kitchen to whip up some super simple glowing jars which were perfect for a night light!


This post contains affiliate or sponsored links.

I used tonic water and glow in the dark powder to create this jar. It couldn't be easier to make!
If you have a black light fixture, you can skip the glow in the dark powder as tonic water naturally glows under a black light. 

Tonic water contains quinine which absorbs ultraviolet light, causing it to glow.

Directions:
Fill a mason jar with tonic water
Add 1 teaspoon of glow in the dark powder
Stir
Replace the lid.
Allow to charge under a light for a moment and watch it glow!


Find more cool DIY Ideas here

You might also like this easy glow in the dark necklace.

Birthday Cake Sensory Bin

This easy birthday cake sensory bin is perfect for any little aspiring chef! Made with homemade playdough and complete with loads of sprinkles and fake candles, this bin keeps preschoolers happily baking up something good!

birthday cake play doh sensory bin

After many years of mothering, I have learned that it is a good idea to have an activity planned for the afternoon. I usually have something set up for Harp like a paper craft or something she can get creative with, but lately we have been LOVING sensory bins

birthday cake play doh sensory activity


Harper loves to bake, so the idea for this birthday cake sensory bin came around. I thought she would love the chance to play with sprinkles, and I was right. When she came home from preschool, she was ready to get her hands into this bin! I have a feeling your little one will want to do the same should you recreate this project.


This was easy to assemble and super economical. You likely have all of the supplies on hand!

sprinkles in hand


This post contains affiliate links. If you make a purchase I will earn a small commission at no cost to you.

birthday sensory bin


Supplies:
1/2 cup of shampoo (any kind will do, including something from the dollar store!)
 2 tablespoons of water
1 cup of flour
Silicone cupcake molds, small cake pans, small dishes for forming cakes. Your childs play food collection is a great place to find materials to use in this bin.
Washi Tape
A battery operated votive candle
Tissue Paper in orange, yellow or red
A baking dish or a bin with a lid


To make the birthday cake dough:
Add one cup of flour, 2 tablespoons of water and 1/2 cup of shampoo together in a medium bowl. 


Begin to stir, as the ingredients start to bind together, finishing mixing with your hands.
 If the dough feels sticky, you will add a little more flour, no more than 1/4 cup.


Test for stickiness. If the dough is still sticky, add a little more flour and continue to mix until it doesn't stick to your hands.


To make fake candles:
You will need a length of washi tape that can cover a craft stick on both sides.


Allow the tape to slightly overlap the craft stick and place small squares of tissue paper on the top of the stick. I layered orange and yellow tissue paper to resemble a flame.
Fold the tape up to cover the other side of the craft stick.


Trim the edges of the tape on the sides of the craft stick.
Trim your tissue paper to resemble a flame.


To assemble the birthday cake activity bin:
Pour a bottle of sprinkles in the bottom of the dish or storage container you plan to use.
Add the dough.
Add small dishes like play food dishes, silicone cupcake molds, small baking dishes.
Add the fake candles and a battery operated votive candle, if you have one.


Invite your child to explore the activity. They will form cakes, decorate with sprinkles and add candles to serve birthday cake!

birthday cake sensory play