Showing posts with label diy. Show all posts

Nail Polish Ornaments

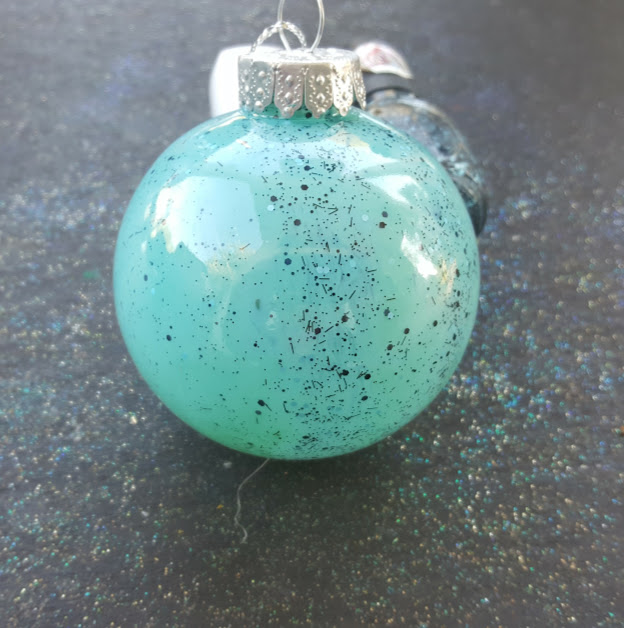
Nail Polish Painted Ornaments are a great way for tweens and teens to craft up something pretty for the Christmas tree! These are easy and economical with supplies from the dollar tree for a fun decoration to share this holiday season.


I have a tendency to hoard nail polish. I can't buy just one color. I am compelled to buy them all. As I was browsing my collection, I realized I could be doing so many things with my nail polish, and I wanted to try using it for decorations!


I picked 2 pretty shades, specifically one with confetti, and grabbed a 2 pack of ornaments from the dollar store.


First, I carefully removed the top.
Then I poured in a touch of each nail polish.

Nail Polish Ornaments

The first attempt at this craft, taught me an important lesson.
You must allow this to dry before replacing the cap, or the nail polish will remain liquid.
To dry the polish, I recommend blow drying on the cool setting for about 2 minutes, but be careful to not place the dryer right up against the ornament!


This is such a great and easy craft. The ornaments turned out lovely and were so much fun to share! We made red and blue ones!


You can find all of our ornament craft ideas here

You might also want to check out these Christmas tree inspired snacks.


Spooky Pallet Sign

Need a last minute Halloween decoration? These spooky pallet signs are perfect for a quick craft that adds a lot of character to your space.


I have been making lots of stuff with pallets. From my cute reclaimed black cats, to some sweet serving trays to share with friends. I also made a slew of these spooky signs and shared them with a few neighbors.


These are so easy to make.  You need no skills and no special tools.  You can truly create them completely from scrap materials. If you are able to find scrap wood in a 12-18" size, that would ideal. If not, a hand saw or circular saw will be useful  in cutting down a pallet to the size you want to use.

Supplies:
An MFD board
Paint in several colors
A small paint brush
A soda tab
A screw
A screwdriver.


Directions:
Place a soda tab in the center of the board, line it up so it is even with the board at the top.
Screw it in.
Flip the board over and paint it the color you desire. I went with a light orange.
Allow to dry.
When the base coat is dry, paint Spooky on the board. I did this by hand, but you can use a stencil to get perfect letters. I was going for a creepy look, and perfection wasn't needed.
When the spooky letters have dried, dip a paint brush in another color, like green, or purple.
Extending an index finger, tap the paint brush against the finger to create splatters on the sign below.
Repeat as desired.
Allow to dry before displaying.
If you are displaying outside, spray with a sealant.


Make a few in a variety of creepy phrases and decorate your space in spooktacular, splendor without spending a cent! You can make this sign in only about 15 minutes, asides from the waiting for the paint to dry. 


If you liked this easy pallet project you might want to check out more of my favorite DIYS!

Reader favorites include:


Easy Ghost Window Cling

Halloween is near, and this cute little ghost will add a touch of fun to your windows without spooking your wallet! This is economical, adorable and easy to make!


We can't get enough Halloween crafts. Both of the kids and I enjoy creating frighteningly fun projects to get us even more excited about any holiday!

We were short on time one afternoon and wanted to make a cute and easy craft. This is what we came up with, a fun ghost for the window! This only took a few moments to complete and we loved it for a few reasons. The kids got to practice their scissor skills, which is an important skill for all kids, and they got to experiment with textures.


You will need {per 1 ghost}
 one square of white paper
4 small circles of black paper
2 slightly larger circles of black paper
A section of contact paper, transparent, to accommodate the size of the ghost you wish to make
Scissors
3 glue dots, school glue etc


Begin by placing your contact paper sticky side up
Add 2 black dots to the contact paper for eyes
Add one larger black circle of paper for a mouth
Cut the white paper to look like a ghost
Add the ghost shape over top of the eyes
Add 2 remaining eyes and mouth to the ghost
Stick it on a window for a spooky fun addition!

And there you have a super economical, fun and easy ghost craft for kids!

Find more Halloween DIYS here
Reader favorites include:
Glam Pumpkin Make Over

11 Apple Crafts to Make with the Kids

I can't help but get excited about the end of summer, because it means that fall is near! Trips to the orchard with the family; lots of action in the kitchen, the temps are finally cool enough for baking! And of course, the crafting with the kids! How could I not get excited for fall!? 

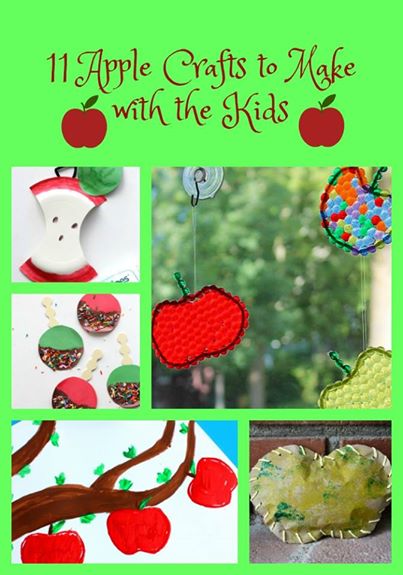
This year I have 11 apple craft to make with the kids to share with you that I know you will have fun making with your little ones!

 Apple Crafts to Make with the Kids


Toilet Paper Roll Apple Stamp
Paper Plate Apple Craft
Caramel Apple Fall Craft
Apple Suncatchers
Take a Bite Out of Fall Craft
Apple Playdough
Button Apple Trees
Fruit Loop Fall Tree
Apple Tree Craft
Toilet Roll Apples
Stuffed Paper Apples


I love all of these ideas! I am hoping to make them all with the kids! We are planning to make these Apple Tree Window Clings again this year but we might make it a crafting marathon with these great ideas!

You can find my Halloween posts here

You might also like this easy homemade play dough recipe

How to be a Boss at Renovating Your Own Home


Renovating your own home can seem like a daunting task. Learning how to do some basic DIY, woodwork, and interior decorating is no mean feat, particularly when you’re completing it on your own. While many of us would love to have the budget to hire someone else to do our renovation for us, we don’t always have the budget to do so.

Get creative with paint
It’s no secret that a brand new lick of paint can do wonders for any room. If you’re worried that your bedroom, living room or kitchen is looking a little tired, then it could be time to get out the rollers and drop cloths. If you really want to paint in style, it’s time to get creative. Taking your time to look through swatches and experiment with color could see you creating something truly unique. Pairing deep slate greys with pale yellows or bright creams with vibrant furniture could give you a home that looks as if it belongs in a brochure.

Make the most of small rooms
Small rooms often feel like the most difficult to renovate in many ways. While there’s less space to conquer, you often run the risk of accidentally cluttering the room. There are a few gospel rules when it comes to smaller rooms, and those include:

No dark paint
No busy patterns
No dark curtains

These focus on getting as much light into the room as possible, which is always a wise approach. You can also use clever tricks of the light to make it feel like a much bigger room. Adding mirrors is just one way of doing this, as they give a slight illusion of extra space, as well as bouncing light around the room.

Don’t be afraid of cosmetic changes
Cosmetic changes to a home can include changing the tiles in a room, re-painting a room, or adding wallpaper. While these jobs might require a bit of elbow grease, they are well within most people’s capabilities. There also some unique hacks you can try to spruce up some features in your home. Did you know, for example, that if you unscrew the doorknobs in your house and boil them with baking soda you’ll be able to get rid of any accidental paint spills? Don’t be afraid, either, to switch up some of those smaller features. Purchasing quirky and artistic doorknobs to fit in your home will give it a stylish boutique feel.

Be bold with your front door
It’s surprising how small aspects of a renovation can make it feel like a much bigger one. For example, changing your front door can have a surprisingly large effect on the overall appearance of your abode. If you can’t afford an entirely new front door, then why not paint it? Opting for a bold and vibrant color such as yellow will give your home an immediate sense of character.

Go bargain hunting
As you may have already surmised, renovating can be an expensive project. Cans of paint, new artwork, and new furniture can all come to quite an expensive price. This is where sales become your friend. Bargain hunting for materials way in advance could save you plenty of money. Take trips out to DIY stories and browse through online retailers’ stock until you find the best possible bargain. While there are some features that shouldn’t be scrimped on, items such as paint can be affordably purchased at a much cheaper price with very little consequence.
Leave the tough work to the professionals
If you find yourself wondering if it’s possible to fit a toilet by yourself or maybe do the re-wiring in your kitchen – don’t risk it. Some jobs are best left to professionals, particularly when the condition of your home is at stake. It might end up costing you a fortune to repair the damage caused. By searching “plumbers in my area” online you can find tradespeople to get the big jobs executed successfully.


The easiest way to be a boss at home renovation is to be brave. Get creative with your color use and accept the challenges that learning DIY can bring. While some bigger tasks are best left to professionals (plumbing and wiring, for example) there are still plenty of home improvements you can complete yourself. Start hunting around for inspiration and DIY sales; you never know what you might come up with.

12 Dog Beds to DIY

Charles Schulz said "Happiness is a warm puppy." And he couldn't have been more spot on. Dogs bring so much joy to our lives and make such wonderful additions to the family!


At our house, the dogs have added a layer to family life. Wagging tails, long walks, enthusiastic friendship are a few of the perks. But there is a downside, the dogs are couch, bed and chair hogs! They are happiest curled up someplace cushy for a nap.


Yea, we need a big doggy bed! So I rounded up 12 of my favorite ideas to share with you for dog beds to diy! I love how simple yet stunning these are!


Elegant Upcycled Small Breed Bed by Diva of DIY
Princess Pet Bed by Morena's Corner
Pillow Pet Bed by Designers Sweet Spot
End Table Dog Bed by Domestic Imperfection
Packing Fabric Dog Bed by DIY Danielle
Recycled Tire Dog Bed by Practically Functional
Doll Dog Bed by My Repurposed Life
Basket Bed by My Pinterventures
Crate Bed for Small Dogs by The Inspired Hive
Drawer Dog Bed by My Repurposed Life
Envelope Pet Bed by Susy's Sitcom
Table Dog Bed by Diva of DIY

If you have an idea for a DIY dog bed, I would love to hear about it in a comment!

Find more DIY Ideas Here

Cement Spoon Garden Markers

This easy cement spoon garden marker project is perfect for beginners and adds a nice touch to your outdoor area.


I love to make things with cement. From coasters to mushrooms and even a cake stand! I ran across a silicone spoon mold and I knew exactly what I wanted to make. Garden Markers. 

This post contains affiliate links.


While working with cement seems like it might be hard, it is surprisingly easy to work with and there are so many possibilities for what you can do with concrete mix. 

I am not much of a gardener. I have tried in the past, but usually bite off more than I can chew and reduce the rate of success for my garden. This year I decided to give it a go and try to grow a small garden that mixed flowers and vegetables. I got some of these little plaques to label my plants, but they were ugly.

These cement spoon markers were just what I needed to add some character to the scene.

Supplies:

Silicone molds
1/2 cup of cement mix; I prefer portland cement.
1/3 cup of water
Chalkboard Paint


Directions:

Mix the cement and water until it is smooth.
Pour the cement into the silicone mold.
Place in the sun and allow to dry for 6 hours.
Remove the spoons from the mold carefully to avoid breaking them.
Paint with chalkboard paint and allow to dry.


I used a chalk paint pen to label the cement spoon garden markers.


You can find all of my DIY projects here

DIY Easel Photo Stands

This easy straw easel diy is the perfect solution to displaying photos and works of art on the cheap.
All you will need is a few straws and some hot glue to create these fun and functional easel photo stands.


My kids love to draw pictures and my husband loves to take photos. I usually have an abundance of things to display on any given day. Considering how artistic my family is, I regularly rotate the display!
These easy easel photo stands are the perfect solution for displaying notes, photos or works of art.
They come together in moments and are just the right size.


To make straw easel photo stands you will need 4 paper straws and a hot glue gun.
Begin by forming an upside down V with 2 straws and glue them together.


Next, cut one straw in half, place this on the two straws to form an A shape. For larger photos, add the cut straw a little lower to allow more room to stand a photo.

Now glue the last straw on the back of the A shape.  Glue from the top to give the stand its support.


Allow to dry for a moment then place a photo or work of art on the stand to display.


I love this idea for the office, a dorm room, or around the house.


I have a video on facebook for this project.
I would love to have you check it out and give it a thumbs up!


You might also like this Time Out Jar project.

DIY Barbie Serving Tray

My daughter is really into all things Barbie. So I made her this cute little rustic serving tray for her Dreamhouse play sessions. It took me less than 5 minutes and is pretty cute and you can personalize it if you wish!


We have all but given up on Barbie accessories. My kids lose them, the dog chews them and it seems like a big waste of money. I won't buy any more, but I will DIY some!


 I made this Rustic Barbie Serving Tray happen in moments with 3 supplies. It is pretty cute and it cost me $0 to make.


Supplies

6 small craft sticks 
Scissors
Glue Gun


Directions

Glue 3 craft sticks together
Trim the rounded edges off of 3 craft sticks then glue 2 of them to the longest sides of the base.
Cut the remaining craft stick in half
Glue this to the other ends


 Now you have a rustic serving tray for Barbie and her friends. Can you believe how easy that was?

We are already planning to make a version of this with taller sides to flip over as a coffee table for Barbie. You can paint the serving tray, or cover it with washi tape for a unique look if your daughter isn't into Farmhouse style decor yet.

Find all of my craft stick projects here

Handprint Fish Puppets

Monster Handprint Puppets


Grass Imprinted Concrete Garden Art


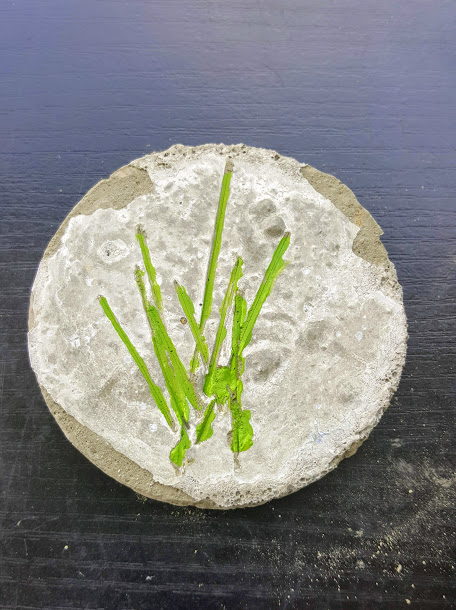
Easy Grass Imprinted Concrete Coasters are functional art. These are so easy to make; give them as a gift or use them at home for an eye catching accessory. You could also use these as garden art if you like.


This is such an easy project. When I got my first bag of concrete I wanted to start small. I wanted to use items I found around the house instead of purchasing supplies.

The first place I looked was our recycling bin, and BOOM! There was a lid, that was just the right size for making a coaster. Inspiration hit, and I was ready to create.


Supplies:

1/2 cup of portland cement
1/4 cup of water
A plastic lid, like from a chip canister
Some grass
Cooking Spray

Instructions:


Spray a plastic lid with non stick cooking spray.
Mix cement.


Pour cement into the lid, this mixture makes enough for 2, or 3 depending upon the size of the lid you use.


Add a few blades of grass.
Tap out air bubbles by tapping the sides.
Allow to dry in the sun for an afternoon.


Pop the cement out when dry. This should be pretty easy to do.


You can peel the grass out easily, or use an old toothbrush if needed to get any remaining grass out.
Paint the grass imprints.

These are great for outdoor use, if you have a really lovely table, you might wish to add 3 or 4 foam or felt pads to the bottom to protect the table, but these have not damaged my glass topped table.

Find more DIY Projects here


9 Cards to Make for Father's Day

Father's Day will be here soon and I have 9 fun card ideas that your kids can make for their Dad to let him know they think he is a Super Dad!

Father's Day Cards to DIY

There is no better way to tell someone that you think they are amazing than a handmade card! The detail and sentiment in something made uniquely by you simply cannot be found in a printed card!

That's why I rounded up these 9 card ideas to let Dad know how you feel! He will love these fun-tastic expressions of adoration on his special day, and I bet he will savor them long after Father's Day has passed!


Fingerprint Monkey Card
High Five Card
You're the Vest Card
Tie Card
Fingerprint Golf Ball Card
True Grit Card
Shirt and Tie Card
Dad's Tools Card
Popsicle Card

I have a few ideas that you can use to make Father's Day super special.

  1. Let him sleep in! 
  2. Offer to take over one his chores for the day so he can rest.
  3. Give him a new magazine or book to read while he is relaxing.
  4. Offer him a special treat! 
  5. Tell him that you appreciate his devotion to your family.


Which of these cards do you think your kids would like to make first? My kids think the Vest Card is pretty awesome! We plan to make one soon!

Find all of my fun crafts here

Glowing Night Lights (No Electric!)

These glow in the dark jars are a fun diy to make with the kids. They are perfect for a night light that comes together in one minute or less, with only 2 supplies!


 My son Rolf is 9 now. He is so curious and eager to learn. One night last week it was storming and he was worried about losing power, and how he could sleep in the dark. So we took to the kitchen to whip up some super simple glowing jars which were perfect for a night light!


This post contains affiliate or sponsored links.

I used tonic water and glow in the dark powder to create this jar. It couldn't be easier to make!
If you have a black light fixture, you can skip the glow in the dark powder as tonic water naturally glows under a black light. 

Tonic water contains quinine which absorbs ultraviolet light, causing it to glow.

Directions:
Fill a mason jar with tonic water
Add 1 teaspoon of glow in the dark powder
Stir
Replace the lid.
Allow to charge under a light for a moment and watch it glow!


Find more cool DIY Ideas here

You might also like this easy glow in the dark necklace.

Sock Roses for Teacher Appreciation Week

If you are looking for a cute way to give an inexpensive token of appreciation to a special teacher this year, this sock rose craft is the perfect way to gift something fun and functional in a unique way.


This project is so easy! It comes together in matter of moments and really adds a lot to the presentation of a simple pair of socks! All you need is:

 a pair of socks
 a rubber band
 a 9" section of ribbon 
 and a wooden dowel rod or maybe a pencil for the stem


Begin by stacking your socks together and folding up the toe section.


Next, begin rolling from the top. Roll tightly! 

As you get to the folded top section, keep rolling in, this will be your outer petal.

As the socks are tightly rolled, secure them with your rubber band. I knotted it, then knotted it again, on the other side for a really snug hold.

Remove the rubberband.

Gently insert the pencil or wooden dowel into the "bottom" of the sock roses.


Make a single sock rose, or a dozen for a fun way to gift a special teacher something different this year as school comes to a close. 


I added some leftover Easter grass to a mason jar to make the presentation even sweeter!


These easy DIY photo puzzles are also a great homemade gift idea.