Showing posts with label play doh. Show all posts

Play Doh Pre-Writing Activity


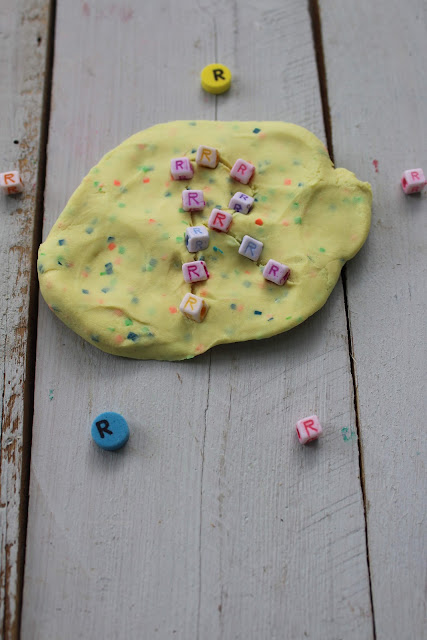
This play doh pre-writing activity is a fun way for preschoolers to work on letter recognition and writing while using their developing fine motor skills.

As we prepared for kindergarten, I wanted to make the process of learning the letters fun for Harper. We turned to our local discount store to find supplies. I came up with a really cute and easy way for her to practice her letters and see them printed too.

I am a participant in the amazon affiliate program. If you make a purchase I will earn a small advertising fee.

Supplies:


Directions:

Invite your child to flatten a can of play doh .
Ask your child to pick on letter bead from the bag of beads.
Encourage your child to write the letter in play doh using a pencil or play doh tool.
Instruct your child to find more beads in the same letter and place them around the letter they wrote in the play doh.
Repeat with more letters.


This was a fun hands on way to practice letter recognition, letter formation and fine motor skills. It was the perfect way to mix play time with learning.

You can find all of my play doh recipes and ideas here.
Favorites include:


Design Your Own Play Doh Ornaments

Kids of all ages are sure to love this Design Your Own Play Doh Ornaments project. It is perfect for holiday crafting and turns out so cute everyone will love to display these!


I am crazy for all things play doh, so naturally I had to make something for Christmas from my favorite craft material. These ornaments are so easy! They will have you saying, who knew you could not only draw on play doh but you can bake it too?!

This post contains affiliate links. Making a purchase means I will earn a small advertising fee, at no cost to you.


These easy ornaments give kids a chance to design their own addition to the Christmas tree! Made with basic supplies this is the perfect project to do with the kids for minimal mess this holiday. 


You can make your own white play doh, like in my super soft play dough recipe, just leave the food color out, or to make this activity really easy during a generally already packed holiday season, just buy cans of white play doh.


To make these design your own play doh ornaments you will need
Supplies
white play doh
washable markers
cookie cutters
bakers twine
A pen or stick to poke a hole with


Directions
Roll the play doh out to be about 1/8" thick.
With your cookie cutter of choice cut shapes of doh.


Poke a hole in each ornament so that it can be hung after completion. I used an ink pen to make my holes.


Use washable markers to draw on the designs.
Bake at 350 degrees for about 30 minutes.
Allow to cool.
Thread bakers twine through the hole and display on your tree.


Find all of my Christmas crafts here
Reader favorites include:
Button Tree Ornaments
Mickey Mouse Jingle Bell Ornaments


Mickey Mouse Christmas Ornaments

These play doh Mickey Mouse ornaments are perfect for adding a handmade touch to your tree!
These are easy enough for kids to make and are so much fun to display and share!


I don't know who likes play doh more; my kids or me. We always have a few cans on hand and we always have a next up recipe to try for a homemade variety. I think it is safe to say that it is our preferred vehicle for creative expression. Bringing that fun to Christmas is a natural!

I came up with these so easy play doh Mickey Mouse ornaments and my kids loved them. We decided they are perfect for the Christmas tree.


This post contains affiliate links. 

Supplies:
An ink pen

Directions:
Form 2 small balls of play doh. One ball should be the size of a nickle, while one ball should be the size of a dime.
Flatten the ball the size of a nickle into a flat circle.
Tear the dime size ball in half.
 Roll into 2 smaller balls.
Flatten these smaller balls into flat circles. These are your ears.
Attach them to the top of the larger circle. 
Leave just a small space between the ears.
Poke a hole in the large circle with an ink pen, poke through.
Bake at 350 degrees for 30 minutes.
Allow to cool.
Thread bakers twine and hang on the tree.

Find more Christmas fun here.
Reader favorites include:

Play Doh Pumpkin Faces

Play Doh Pumpkin Faces are perfect for hands on play on a fall day.


My kids want to carve a pumpkin or two every day. It becomes a whole thing. From the face, to the roasting of the seeds and then displaying. They really take things seriously at Halloween.
While I love to do pumpkins with them, I don't always have time to carve a pumpkin a day. This year I found a way to give them what they want anytime they want it with these play doh pumpkin faces!

This post contains affiliate links. I will earn an advertiser fee if you make a purchase. Thanks!

This is such an easy activity! All you need are 2 cans of play doh and a sheet of black paper and you are in business.


First, invite your child to cut out various shapes for the pumpkin face. Ovals, triangles, squares and creepy teeth are perfect.

Then invite your child to smash the orange play doh into the shape of a pumpkin.
Use green play doh if you desire a stem.

Now, let your child make as many faces as they want.
This is a fun way to keep them busy and happily making pumpkin faces for hours.


If you liked this Halloween activity, check out all of my Halloween ideas.


Play Doh Pie Counting Activity

Play doh pies are the perfect way to make learning a hands on activity. Little learners will love getting a good grasp on counting and number recognition.


Harper is my go to girl for all things to make or bake. She loves to get involved in all of my projects.
We made a chocolate chip cookie pie a few weeks ago and she was hooked on pie making! She asked me everyday for a week if we could make another pie.


Finally, I came up with an idea that thrilled her and satisfied her desires to make a whole bunch of pies.
Play doh pies are great for fine motor play, rolling the dough into little balls is fun!
Adding a few wooden numbers turned the activity into a counting lesson too.
This post contains affiliate links. Making a purchase helps to keep my site running!
Supplies:
A mason jar lid
play doh tool for cutting


Directions:
Roll out a can of yellow play doh
Cut the doh to fit a mason jar lid to form your pie shell.
Use any leftover doh to cut strips. These will form your lattice crust.
Encourage your child to roll a can of play doh into small balls.
Select a number you want to work on counting to.
We decided on number 6.
Have your child count the selected number play doh balls to the pie shell.
Now have your child count the number of leftover crust strips.
Have your child add the selected number of lattice strips to the top of the pie.

Repeat with other numbers.


We loved this activity, it was easy to set up, encouraged learning and hands on play, and kept Harper busy for several afternoons. Play doh is our favorite learning tool these days!


If you are looking for more play doh ideas here are a few reader favorites:


Seashell Towers STEM Activity

Beach fun meets play doh for a hands on early engineering activity. My 5 year old loved playing with this Seashell Towers STEM Activity.


This is such a simple activity, but it is also challenging and ideal for little learners. It combines fine motor skills and problem solving to create a recipe for hands on fun.

This post contains affiliate links. If you make a purchase I do earn a small advertisers fee at no added expense to you.


The smallest things can bring hours of entertainment to kids. This seashell tower stem activity is a perfect example. This gives little hands a chance to build and begin discovering the magical world of engineering. Best of all, you might have the supplies you need on hand. I LOVE activities that I don't have to buy anything to do with my kids.


Supplies:
Seashells


Directions:
Invite your child to roll a can of play doh into small balls.
Encourage your child to use the doh and the shells to make a tower.
Talk about how to make the tower taller, larger, wider without it falling over.


This activity is so much fun and was so easy to set up for Harper. She was engaged with building what she called mermaid towers.


After about an hour of building we put the play doh back in the can and added the seashells to our busy bag collection. We will be revisiting this play doh activity many times! I have a feeling my 9 year old would enjoy this one too!


Check out my favorite play doh projects here