Showing posts sorted by date for query play doh. Sort by relevance Show all posts

Button Tower STEM Activity

Button Towers are an awesome way to spend the afternoon for stem loving kids! This activity comes together with only two supplies to keep the kids entertained and building all day long.


Now more than ever, creative exploration is important for kids.  Mine have been out of school for over 3 months already and we are not sure what the new year will hold. We have been staying at home, and seeing what we can do with the things we have on hand. This Button Tower Stem Activity has been a big hit with both of my kids, and all of the other kids in the neighborhood too! 

You only need 2 supplies to pull this off. Kids will love seeing who can build the biggest tower and what methods work, as well as which ones don't work!

Supplies:
Buttons in assorted sizes
Play Doh


Directions:
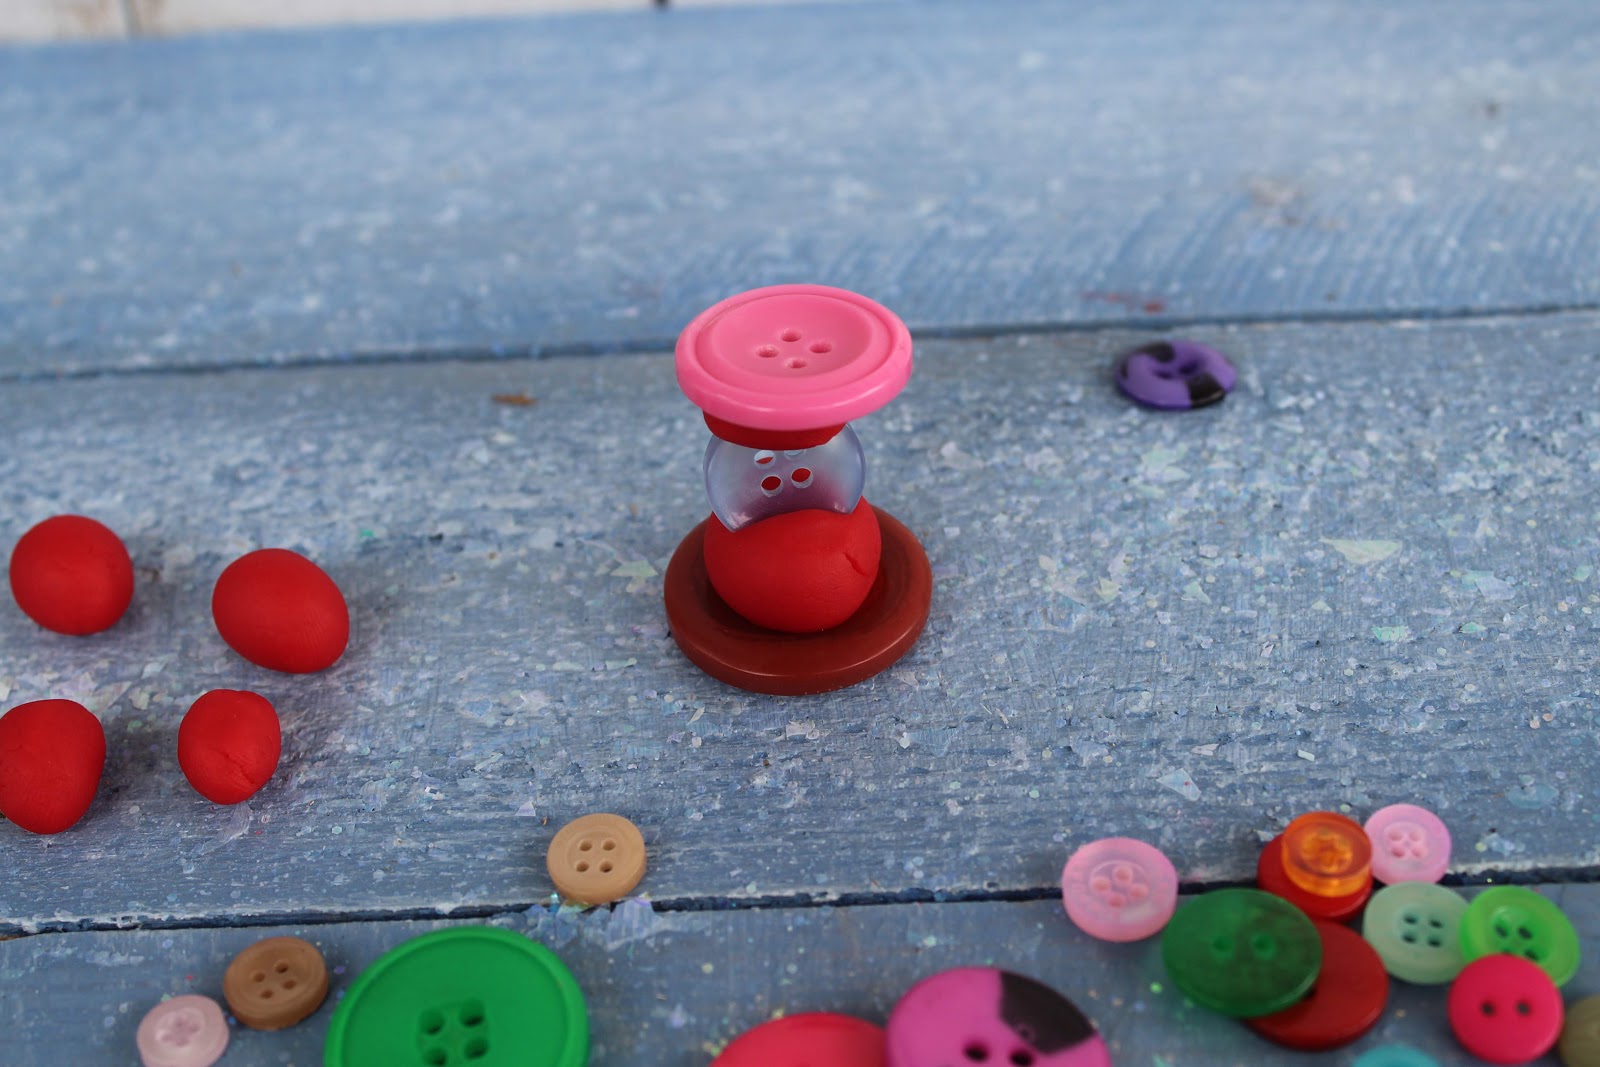
Roll an assortment of play doh balls in various sizes.
Offer an assortment of buttons and instruct the children to build a tower.
My kids opted to alternate balls of doh and buttons to stack them up.


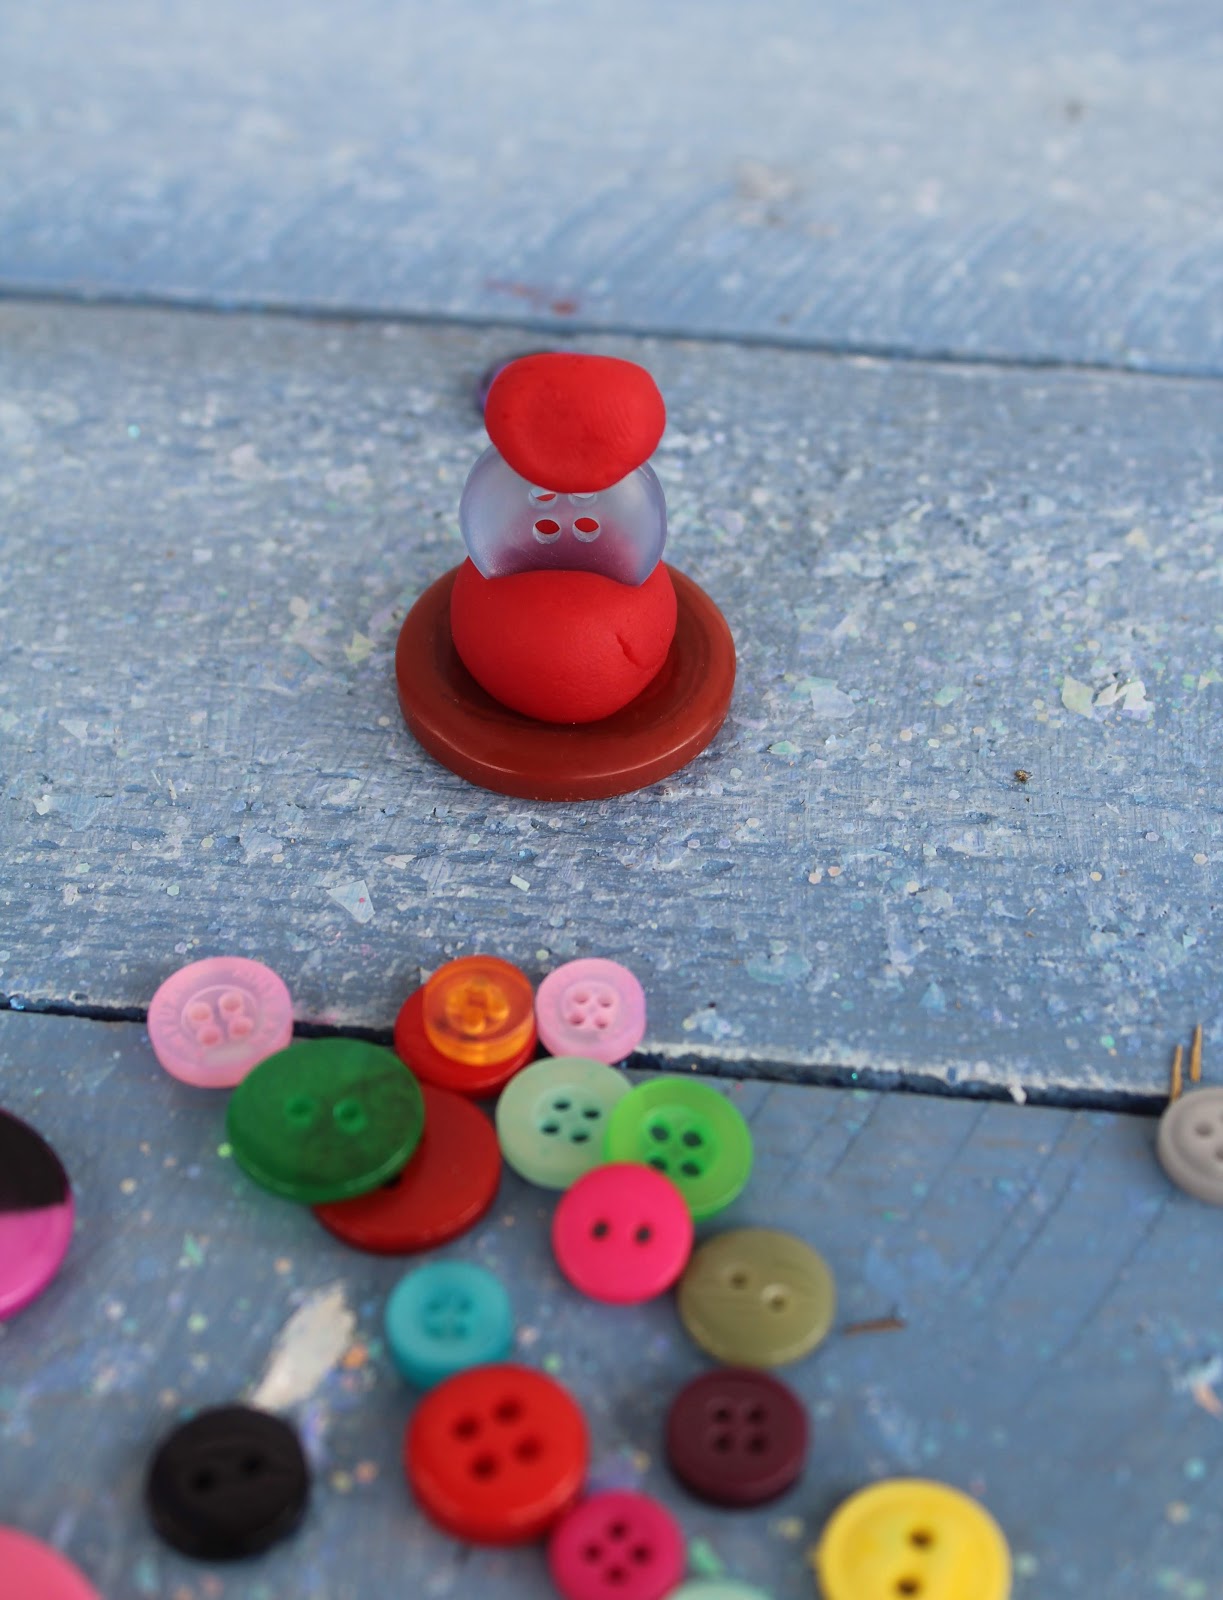
They said the key to making them stand was how you press the button into the doh.


Sometimes the towers tumble over on the second or third button; sometimes they stack easily. Either way it goes; it is loads of fun and presents an enjoyable challenge that kids of all ages will love.


I love that this was as simple to set up as digging around in my craft supplies. Some of the best activities really are simple in design.


Be sure to supervise little ones with this, as buttons can pose a choking hazard.

Reader favorites include:

Button Stacking Fine Motor Activity

This button stacking activity is easy to set up and is really fun for little hands. With basic household supplies you can set up an activity that will challenge fine motor skills in your kids while giving them a fuss free boredom buster.


Summer is here, but, really, it feels like summer has been here for months already with the school year going as it did. My kids have been getting a little restless.  I have been finding easy ways to entertain them, and give them the quiet play options like this button stacking activity.


Kids of all ages will love this activity. It is perfect for preschoolers and kindergartners as it works their fine motor and pincer grip.  It is just as fun and beneficial for elementary aged kids because it gives them a chance to practice working with fragile materials like brittle spaghetti. My kids like to challenge each other to see who can build the tallest tower the fastest.


This post uses affiliate links, if you make a purchase I will earn a small commission.

Supplies:
Dry spaghetti
Play doh
Buttons


Directions:
Flatten a can of play doh.
Insert two dry spaghetti noodles into the play doh.
Offer your child a pile of buttons.

Encourage them to thread the buttons on the pasta. See how many they can stack up without breaking the pasta.
Or encourage them to make a pattern of colors for variety.


Or encourage them to race!
See who can make the tallest stack of buttons without breaking the pasta!


Find all of our fine motor activities here
Veggie Garden Sensory Bin

Fine Motor Counting


Play Doh Food Themed Puzzles

Do you need an easy way to keep the kids entertained? This play doh puzzle idea is perfect for challenging them with items you already have on hand!


It is no secret that we LOVE play doh! Homemade versions, ideas to play with it, and just the joy of squishing it in your hands! No matter how you do it, it is fun with play doh.

The kids have been out of school for a long time now; 6 weeks and counting. Keeping them learning, playing and happy has been a challenge. I have had to get creative in my efforts, but some of the best ideas are born out of idle time and basic supplies.

This play doh puzzle can be as challenging or easy you want it to be. We used play food because we have a lot of that.

Affiliate links are used in this post. If you make a purchase, I will earn a small advertising fee at no cost to you.


Supplies:


Directions:
Roll a can of play doh out until it covers about a 6 to 8" area
Press assorted play food into the play doh, leaving a little room in between the food to create impressions that you can match up.


After you have filled the play doh with imprints of play food, lay all play food around the play doh and invite your child to match up the play food to the imprint that the food left.


Repeat with more play food, or even other objects from around the house.
Make more imprints for more challenging puzzles, or fewer for an easier play experience.
We loved that we could make this fun for both kids without having to buy anything!

You can find all of my play doh ideas here

Reader favorites include:

Play Doh Lollipop Counting

Give early math lessons a sweet spin with this play dough lollipop counting activity. It  combines counting, fine motor skills and a touch of creativity to provide lots of hands on educational fun.


Play doh is my go to tool for hands on learning fun. There are so many ways to use it to learn. This play doh lollipop counting activity is fantastic because it uses basic supplies like craft sticks and play doh to create a math lesson little kids will love!


Supplies:
Assorted colors of play doh
Craft Sticks
Numbers or dice


Directions:
Invite your child to form the lollipops with a small bit of play doh and the craft sticks.
Encourage your child to pick a number from the pile or roll a dice.
Whichever number they come up with, encourage them to roll out that many itty bitty tiny balls of play doh in a different color.
Decorate the lollipops with the small balls of doh.
Repeat with more numbers for a hands on math lesson that works in fine motor skill work too!


You can find all of my play doh ideas here
Reader favorites include:
Play Doh Pie Counting
Play Doh Pre-writing
Play Doh Stamping

Play Doh Flower Counting Activity

Make counting and learning early math tons of fun for little ones with this hands on activity that combines early math with hands on tactile play. 


Play doh is the ultimate tool for play or learning at my house. We love to squish, mold and create with it, plus there are so many ways to learn with it. Adding it into our math lessons was a natural choice.

I was looking for a way to get Harper excited about early math, but it is hard to focus in the spring. There are so many colors, sights and smells to take in after months of indoor confinement.
As I took in the sights of spring, my inspiration was blooming all around me. 

This post contains affiliate links. If you make a purchase I will earn an advertisers fee at no additional cost to you.


Supplies:
Play Doh; green and any 2 other colors
Number Stamps


Directions:
With green play doh, form 2 flower stems
With any other color of play doh form the flower body
Tear off 10 pinches of play doh and shape it to look like petals.
Select two numbers.
Stamp them on the flowers.
Offer your child buttons and the petals of play doh you formed.
Encourage your child to say the number stamped on the doh.
Now, add the coordinating number of buttons to one flower.
Add the coordinating number of petals to the other flower.
Repeat with other numbers.

Find more play doh ideas here Reader favorites include:
Sunscreen Play Dough


Play Dough Multiplication Activity


This play doh multiplication activity is perfect for an introduction to multiplying for eager little mathematicians.


Rolf has been working really hard on his multiplication in the 3rd grade. During the 1st quarter of the year, he was struggling with the concepts. We tried flash cards, which are not at all fun. We tried making tables, which was also a snore. Then it dawned on me, why not true School House Rock?

That did the trick and made it a little more fun for him. Harp was learning too, so we decided to make the process a hands on fun way to learn to multiply. We do use affiliate links in this post. If you have a purchase I will earn an advertising fee.

We started with ones and twos to keep it simple; while Harp was only 5 at the time of this activity (yes! I sat on these photos for almost a year!) I knew that forming these math facts in her mind was a great way to start her off on the right foot.

Supplies:
Play Doh in Brown and Green
Pony Beads 
Wooden Numbers


Directions:
Roll the brown play doh to resemble a tree trunk
Flatten out a can of green play doh for the leaves
Select two wooden numbers and press them into the top.
Use the edge of a number to make the x symbol
Offer your child a selection of pony beads.
Have them press the correct number of pony beads into the dough.
To explain the concept to my girl I told her to count out the first number of the problem in beads, then to do it again and press them in.

Reader favorites include:

Play Doh Stamping Activity

Put your old scrap booking stamps to good use with this preschool play doh stamping activity.


It is no secret that we love play doh. From  using it as an early math tool, to making one of a kind Christmas ornaments. Play Doh is one of my favorite tools for preschoolers to learn with!

This activity was inspired by cleaning out my office, where I had a stash of scrap booking stamps collecting dust. I thought about tossing them in the Yard Sale box we keep going year round, but I had a better idea, they make a perfect play doh tool.


Supplies:
Play Doh
Scrap-booking stamps

Directions:
Invite your child to smash or roll a can of play doh out.
Offer an assortment of stamps and encourage them to stamp a scene.


This activity has kept Harper happily creating for weeks. She keeps a few stamps with her play doh collection and loves to pull them out and make unique scenes.

You can find all of my play doh ideas here.
Reader favorites include:


Fine Motor Counting Activity

This easy activity is perfect for practicing early math while developing fine motor skills.


Before I was a mom, I was a developmental psychology major. In my studies, I was intrigued by sensory and fine motor development then. Now that I am a mom, I love setting up activities for my own kids that give them hands on fun and learning opportunities without spending a ton of money to do it.


This fine motor counting activity is perfect for preschoolers.They can work on their fine motor skills while practicing counting. You might have all the materials at home to do this, making it fuss free and frugal. If not, I have included some affiliate links you can use to get your supplies.

Supplies:
Rainbow Bands
Large Craft Sticks
Sharpies


Directions:
Write numbers on large craft sticks with sharpies.
Use the largest craft sticks you can find to make the activity challenging.
Offer your child small rubber bands, like the rainbow loom style of bands and encourage your child to count the number of bands that need to go on each craft stick and slide that number of bands on to each craft stick.


If you are looking for more fine motor activities for kids, check out these posts:
Unicorn Fine Motor Bin
Play Doh Pre Writing

Play Doh Pre-Writing Activity


This play doh pre-writing activity is a fun way for preschoolers to work on letter recognition and writing while using their developing fine motor skills.

As we prepared for kindergarten, I wanted to make the process of learning the letters fun for Harper. We turned to our local discount store to find supplies. I came up with a really cute and easy way for her to practice her letters and see them printed too.

I am a participant in the amazon affiliate program. If you make a purchase I will earn a small advertising fee.

Supplies:


Directions:

Invite your child to flatten a can of play doh .
Ask your child to pick on letter bead from the bag of beads.
Encourage your child to write the letter in play doh using a pencil or play doh tool.
Instruct your child to find more beads in the same letter and place them around the letter they wrote in the play doh.
Repeat with more letters.


This was a fun hands on way to practice letter recognition, letter formation and fine motor skills. It was the perfect way to mix play time with learning.

You can find all of my play doh recipes and ideas here.
Favorites include:


Design Your Own Play Doh Ornaments

Kids of all ages are sure to love this Design Your Own Play Doh Ornaments project. It is perfect for holiday crafting and turns out so cute everyone will love to display these!


I am crazy for all things play doh, so naturally I had to make something for Christmas from my favorite craft material. These ornaments are so easy! They will have you saying, who knew you could not only draw on play doh but you can bake it too?!

This post contains affiliate links. Making a purchase means I will earn a small advertising fee, at no cost to you.


These easy ornaments give kids a chance to design their own addition to the Christmas tree! Made with basic supplies this is the perfect project to do with the kids for minimal mess this holiday. 


You can make your own white play doh, like in my super soft play dough recipe, just leave the food color out, or to make this activity really easy during a generally already packed holiday season, just buy cans of white play doh.


To make these design your own play doh ornaments you will need
Supplies
white play doh
washable markers
cookie cutters
bakers twine
A pen or stick to poke a hole with


Directions
Roll the play doh out to be about 1/8" thick.
With your cookie cutter of choice cut shapes of doh.


Poke a hole in each ornament so that it can be hung after completion. I used an ink pen to make my holes.


Use washable markers to draw on the designs.
Bake at 350 degrees for about 30 minutes.
Allow to cool.
Thread bakers twine through the hole and display on your tree.


Find all of my Christmas crafts here
Reader favorites include:
Button Tree Ornaments
Mickey Mouse Jingle Bell Ornaments


Mickey Mouse Gift Tag Ornaments

Add a special touch to all of your gifts this holiday season with the help of play doh! These easy Mickey Mouse gift tags can be used as a one of a kind ornament after the gifts have been opened.


My family loves to play in play doh. We have used it for fun and learning, but now we are looking at ways to make it giftable for all ages. I found the perfect way with these easy as can be gift tags. 

I went with a Mickey Mouse style because all of my wrapping paper is in Disney prints this year. Plus, this is such an easy design that anyone can make it. Even the kids!

You only need a few supplies to make these easy Mickey Mouse Gift Tags:
Play Doh
Bakers Twine
A Straw
Sharpie


Directions:

Form a play doh ball that is the size of a nickle.
Form a dime size play doh ball. Tear it in half.
Flatten the balls into small flat circles.
Press the smaller circles into the larger one, leaving a small space between them, like Mickey's ears.
With a sharpie, or washable marker, write the name of your gift recipient. 
With a straw, punch out a hole in the large circle of doh.
Bake for 30 minutes at 350 degrees.
Allow to cool.
Thread the twine through the hole.
Attach to your gift.

Find more Christmas crafts here
Button Tree Ornaments


Mickey Mouse Christmas Ornaments

These play doh Mickey Mouse ornaments are perfect for adding a handmade touch to your tree!
These are easy enough for kids to make and are so much fun to display and share!


I don't know who likes play doh more; my kids or me. We always have a few cans on hand and we always have a next up recipe to try for a homemade variety. I think it is safe to say that it is our preferred vehicle for creative expression. Bringing that fun to Christmas is a natural!

I came up with these so easy play doh Mickey Mouse ornaments and my kids loved them. We decided they are perfect for the Christmas tree.


This post contains affiliate links. 

Supplies:
An ink pen

Directions:
Form 2 small balls of play doh. One ball should be the size of a nickle, while one ball should be the size of a dime.
Flatten the ball the size of a nickle into a flat circle.
Tear the dime size ball in half.
 Roll into 2 smaller balls.
Flatten these smaller balls into flat circles. These are your ears.
Attach them to the top of the larger circle. 
Leave just a small space between the ears.
Poke a hole in the large circle with an ink pen, poke through.
Bake at 350 degrees for 30 minutes.
Allow to cool.
Thread bakers twine and hang on the tree.

Find more Christmas fun here.
Reader favorites include: