Showing posts with label craft. Show all posts

Giraffe Button Art

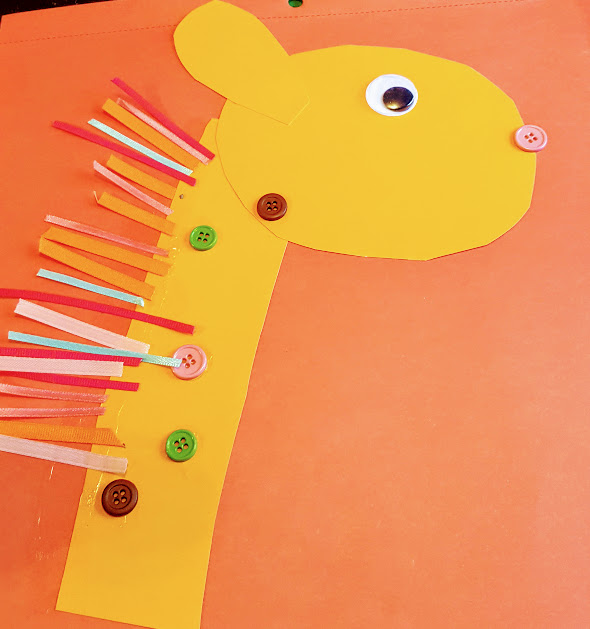
This baby and mama Giraffe craft is easy to create and it adds an adorable handmade touch to any room in your home. I think it is especially cute in a child's bedroom!

This came together so easily, you guys! Within moments, I had created something fantastic for Harper's room and it helped me pass time constructively while I watched hours and hours of the Mama Giraffe in labor live feed.

All you need to make this cute art project is:
Cardstock; 2 sheets. 1 yellow or orange, 1 color of your choice
Assorted Ribbons
Glue
Craft Eyes
Buttons 

Instructions:
From the yellow or orange cardstock:
Cut 2 circles for the heads; 1 smaller than the other
Cut 2 tear drop shapes for the ears; 1 smaller than the other
Cut 2 long strips for the necks; 1 shorter than the other

Glue the neck, head and ear on for each giraffe. I think making them face each other is a cute idea!
Next, give your giraffes an eye each, and a button for a nose.
Then glue a few buttons on for the spots.


Finish by adding strips of ribbon for the mane.


Paper Plate Spider Craft

This cute craft is perfect for Halloween, it is easy to make and the results are so cute you will want to display the finished project so everyone can see how creative your little crafter is!


We are big on holidays! We get excited about them all; Easter, Valentine's Day, Memorial Day, of course Halloween is a big one too!

This year we started crafting up Halloween fun maybe a little too early, but we couldn't resist! This is one of the first ones we made and it was so easy and cute!!


This post contains affiliate links.

All you will need is:
A paper plate
A piece of black construction paper
8 googly eyes
A black kwik stik
school glue
Scissors


Paint your paper plate black with a Kwik Stik.
Cut 8 strips of paper for legs and glue them on, 4 to a side
Add 8 eyes
Give your spider a smile and you are done!


Find more of our favorite halloween ideas here
Favorites include

Mermaid Tail Craft

This easy mermaid craft requires basic supplies and creates a cute craft in under 5 minutes. Your mermaid fans will flip a fin for this easy craft!


My 3 year old has recently discovered the Little Mermaid. Mermaids are a frequent topic of conversation, as are unicorns, kittens, and Minnie Mouse. I had an idea to make a fun little craft with Harper that would keep her day dreams flowing like the tide. We were thrilled with how cute it turned out and how easy it was to make.


I loved this craft for my preschooler because it used her fine motor skills, she got to use her scissor skills and it involved glitter glue! Who doesn't like glitter glue!?


Supplies:
3 craft sticks
1 triangle of construction paper in any color
A heart shape of green or blue construction paper
8-12 circles of blue and green paper
Glitter Glue

Instructions:
Glue the craft sticks into a triangle shape.
Glue the triangle shaped paper onto the craft sticks.
Begin layering the circles of paper on the triangle to form the scales.
Add the heart shaped paper with the point in.


This was such an easy craft that was a lot of fun for my 3 year old!  It was easy, but it offered a little challenge to her with the layering of the scales.

You might also like this glitter rain drop craft.

You can check out the Mermaid Tail video on youtube to see me make this craft.


Easy Butterfly Craft


This easy butterfly craft is perfect for toddlers and preschoolers. It makes good use of common household items for a fun craft that really takes flight!


This post contains affiliate links.

Harper and I love to craft together! We try to make something every day. It is good for her development as a preschooler, and it is a great way to spend time together, expressing creativity.

This is one we came up with simple supplies that we had at home. I love crafts that don't need special supplies! This easy butterfly craft is a great example of gathering inspiration from the world around you.


To make this cute craft you will need:
Scissors
A Paper Plate
Glue
Paint {We used Kwik Stix }
An empty toilet paper roll
2 squiggly eyes

Have your child cut the paper plate to become wings. Use scissors your child is comfortable with. They are never too young to develop scissor skills which are so super important when it comes time for school!

Next paint the toilet paper roll as a body. We used Kwik Stix because they are easy to handle and clean up. They are also super fast drying!

Paint the paper plate.

Glue the painted toilet paper roll in the center.

Add the eyes and paint on a small smile.


This was easy and fun to make with Harper. She liked getting to cut the wings and paint. I helped with the hearts at her request.

You might also enjoy this easy paper plate lion craft.

Making Sandwiches with Harper {Kids Craft}

A few days ago, Little Miss Harper wanted to help me make lunch. I love her eagerness to help and her interest in learning. But, on this particular day, I wanted to keep her busy and out of the kitchen, as I was in the middle of a project.

I asked her if she wanted to make paper sandwiches while I made lunch, it sounded appealing to her! I had a collection of paper sandwich fixings ready for an occasion like this. I found a yellow glue stick to imitate mustard. Harper was all set to make sandwiches!

To prepare for this activity I had previously cut the following shapes from construction paper

bread shapes  white paper
red circles for tomatoes
squiggly green leaves for lettuce
yellow squares for cheese
brown circles for meat

You will need a glue stick. Red or Yellow is fun with this paper food craft, like ketchup and mustard!


As you can see, this activity is completely basic. Construction paper and glue. I offered Harper ample supplies for building sandwiches. To keep her busy and having a lot of fun!


She began by adding mustard to the bread and adding tomatoes.


Next up was cheese! 


Harper was completely into this craft. She loved making sandwiches. She added layer upon layer, happily crafting while I made lunch!


My kids both love a good paper food craft! If I find myself with a few extra moments and a pack of construction paper I make little craft bags for occasions like this day.  They are always a huge hit with my kids. They have enjoyed making paper cookies, paper pizzas and paper jam sandwiches. These are the best kind of kid food crafts in my opinion because they are virtually mess free and they are really a lot of fun!

Upcycle Coffee Can Project

I have a big serious love of contact paper! You guys! This stuff is amazing! I have to stop myself when I get on a kick to buy contact paper because I want it ALL! I see different colors and prints and I think about all of the possibilities of projects I could work on.

You might remember that I made a DIY Blanket Box for under my daughter's crib a few months ago. That got me on a contact paper craft craze! Nothing was safe from my stash of contact paper! I created a few decorative containers that can be used for so many things!

I used mine to store markers in, as well as a really cute and simple way to organize kitchen things like wooden spoons and glass straws.

Materials needed to Upcycle a Coffee Can into a decorative storage container:
Contact Paper in your choice of prints.
Scissors
A clean coffee can or two
A utility knife


This project was so easy to do!

First, clean the interior of the coffee can to be sure there are not coffee grounds there!

Next make a measurement on how long and wide to cut your paper based on the size of the can. This is what I love about contact paper... it is so easy to measure, cut and work with!

Peel a small strip of the backing off of the contact paper and place it on your coffee can. Slowly, peel the paper back while smooting the adhesive paper to the surface.


As you cover the can, you are likely to have a little excess around the rims. No biggie, this is so easily remedied! You can use your utility knife to trim around the rims really easily! Just be careful, as those things are crazy sharp!

Everyone that sees my upcycled coffee can says "Where did you get them?" They are really cute, they used to match my kitchen perfectly before our move, and they have been surprisingly easy to keep clean {use a baby wipe}!

This upcycle project really didn't cost me anything to complete as I had materials on hand already, but I would say a thrifty shopper could find contact paper at Dollar Tree and make 4 of these {estimate} for $1.


Do you ever reuse a coffee can? I would love to hear how!

Paper Cookies A Preschool Food Craft

My kids are so cute! They always want to help in the kitchen! When I do dishes, my daughter Harper will push a chair into the kitchen and climb up to the sink. She will say "I can do this Mom!" or she will want to help make coffee and push all of the buttons. If there is cooking involved my son dashes in, ready to help! I welcome their company in the kitchen 90% of the time. But, as any mom will tell you, there are times when having small kids in the kitchen is not the best idea.

On those rare times, I feel bad to deny their help, so I came up with a few fun food crafts that the kids can make while I am occupied with a complicated recipe.  The first one we did as you might recall was a pizza craft. The kids had so much fun making pizzas! We have made several of these since the post!

Tonight I was frying chicken, a rare thing that I admit, I am not so great at. I didn't want the kids to get splashed with hot oil so I entertained them with a paper cookie craft. It was a huge hit!


This was incredibly easy for the kids to make, the materials were super simple making preparation a breeze for me, and best of all- this craft does not require anything special. Seriously, you are going to have the supplies in your house!


Materials Needed to Make Paper Cookies

Several Brown Paper Bags or brown or yellow construction paper
Glue
Sprinkles
A Paper Plate

Instructions

To begin, cut circle shapes in the brown bags or construction paper as your cookie base.
{I cut about 30 circles at a time so that we can do this craft multiple times}.


Place as many circle cookie shapes as you like on the paper plate.
Drizzle glue onto the circle 'cookies'
Decorate with sprinkles
Allow to dry.

This was so fun for the kids! We will be making these again soon I am sure! Do you like to do paper crafts with your kids? I would love to hear about your favorites!

DIY Photo Puzzle

My kids and I are really into crafting right now. On cold, rainy and yucky days like we have been having a lot of in Ohio, there is nothing better than digging into my craft cabinet and pulling out a few projects to entertain us when the weather is keeping us inside.

On one particular day, we ended up with a stack of duplicate photos and I knew that these should be put to good use instead of sitting in a photo box or ending up in the trash. After a few moments of careful consideration, I realized that a few craft sticks and some glue would take these double photos from miscellaneous junk into a treasure for the kids.

We came up with these DIY Photo Puzzles. We had so much fun gluing them together that we made a few to share with Grandparents and Daddy, as well as a stack for the kids to tinker with.

To make a DIY photo puzzle all you need is:

A photo
craft sticks
your favorite adhesive {we used glue sticks}
A utility knife

This project is so easy to make! All you need to do is:

Lay the picture side of the photo down and add glue to the back liberally.


Line up craft sticks across the back on the glued side of the picture.


Press firmly to allow the glue to bond to the craft sticks.

Flip the photo over

This step should be completed by an adult as utility knives are crazy sharp.

Carefully cut the photo between the sticks, continuing until the photo is cut into strips backed with a craft stick.

Allow the glue to dry.

Mix up the pieces and assemble the photo puzzle.

These are so much fun to give to people and they are a great challenge for my preschooler. My toddler finds them too difficult as of now, so we are going to make a few easier ones from cards we received over the 2015 holidays for her.

If you are looking for a last minute DIY gift idea or just a fun surprise for the kids, this one takes about 5 minutes tops to complete and is sure to bring a smile or two! Best of all, you likely have materials on hand to complete this project making it very frugal!


DIY Sorting Toy {Fine Motor Activity}

One of the things I love about being a mom is that somehow, my kids think I am magical when I come up with a fun way to play out of the blue. No matter how simple the activity, they are always interested and amazed. I know I complain sometimes about how hard parenting is, but you know, the tough moments are so worth it. Little kids are so fun and so sweetly simple in what it takes to get them interested in learning new skills and practicing their existing ones.


One of our favorite upcycled activities was completely simple to create and both of my kids played with it for hours! If you have toddlers or preschoolers in your home, this DIY Sorting Toy is a must make. It offers kids a simple fine motor activity as well as a chance to practice sorting, counting, differentiating between sizes and identifying  colors.

You will need:
a clean an empty egg carton
assorted pom poms {use different colors and sizes for additional sorting challenges}
Tongs or Tweezers for Children 


As you can see all I did was dump a handful of pom poms into a clean and dry egg carton. I laid a pair of rubber tongs for kids down and let Roo explore this option on his own. 

He sorted and sorted! He worked on his fine motor skills, his colors and sorting by size. 
This was an upcycle project that was super easy to put together and that my kids had a lot of fun learning and playing with!


DIY Blanket Box

I had this really great box. I had been holding on to it for several months because I have a cardboard hoarding problem. Ha! It is true, I will say "Ohhh! I am going to make a cardboard bed with that box..." and my husband will nod his head and say "Great idea!" or maybe "Interesting." He is patient and will give me a few days. If the box remains untouched, he sweetly breaks it down and recycles it to keep my hoarding to a minimum.

This box however I had managed to keep stashed out of the way in a closet used for coats. We haven't needed jackets in months now, so no one has been in that closet. Until one day. I saw him open the door. His eyes locked on the box.

He asked "What are you doing with this box?"
I knew my time was limited. It was a great box... I couldn't lose it! My mind went to work and I came up with a great way to use it and make it look pretty too!

From a swifter box to a blanket box in under 5 minutes. This project cost me about 50 cents to complete which makes this not only an upcycle, but also a frugal organization project in one.


I purchased my contact paper for $1 at Dollar General. I have enough to do another box about the same size.

First I unrolled enough paper to cover the top.


I peeled a small section of the paper off of the contact paper to carefully begin applying it to the lid of the box.

Then I did the same for the sides and the bottom.


I took a hard plastic case and smoothed out the bubbles and wrinkles in the contact paper the best I could.

My edges were a touch uneven, but that is okay. I highly doubt anyone is going to inspect my blanket box for perfection.


This box is great for storing baby blankets and it fits perfectly under Harp's crib.

This project only took a few minutes (5) and it created a really useful organizational tool for my daughters room!

Lava Jars {Hands on Science}

Last fall my son and I made a fun project together, we called them lava jars as they were inspired by lava lamps and we had a ton of baby food jars on hand. Harp was emptying out at least 6 a day back then.

I first filled the jar with half water, half baby oil. We added a few drops of food  coloring to the mixture, closed the lids tightly and watched to see what would happen.

We decided that this jar was the ocean based on color and the imagination
of a 4 year old

There was some slight bubbling, but nothing major.

We agreed the jars were neat... but what could we do to make them react differently?


We both liked the color of this jar the best.


We went inside and looked around. We found some antacid tablets and decided to introduce them into the mix to see how the oil/water jar reacted.


We started to notice bubbles forming right away. It definitely simulated a lava lamp!


I made a really short little video demonstration of the reaction of adding the antacid to the oil/water mixture.


My son had fun with this project. It was a fun challenge to see what we could do with common household products, and it was even more fun to engage him in a science project.  We think these would be fun with glow in the dark stuff inside. We hope to try this again in a few months with that idea.