Showing posts sorted by date for query paper plate. Sort by relevance Show all posts

DIY Pallet Halloween Tree

 I have developed a serious affection for pallet projects. I love how many ways you can re-purpose them! I came up with this easy DIY Pallet Halloween Tree using materials I had a home. 


This is such an easy last minute DIY project to add a little creepy decor to your or yard. You can use the things you have around the house to come up with something creep-tastic! I am already planning ahead to next year and how I will make this cuter with clearance Halloween goodies!


Supplies used:

A few pallet boards

A hand saw and or a circular saw

E6000 glue

Halloween ribbon

Halloween trinkets

Black paint


Directions:

Saw down your pallet boards so that you can form a tree shape. I used a 1", 3",  6",  8",  10" boards and a 18" board for the back.

Paint your boards black, allow to dry.

Glue your short boards to the longest board, black side out.

Place something heavy or use a vice to secure the boards to the wood and allow to cure and dry.

Now, you can start decorating!

I glued Halloween ribbon to the tree and then placed the "ornaments". I used bugs, spiders and creepy eyes as decorations.

Allow to dry again and place it in the yard or in the house.


You can find all of my Halloween crafts here.

Reader favorites include:

Paper Plate Witches

Paper Plate Spiders


Play Dough Ghost Ornaments

This easy Halloween craft is perfect for anyone who wants to add a little boo to the holiday without having to spend any cash! You already have the ingredients to make the Play Dough Ghost Ornaments in your pantry! 


With the kids being at home this year, it feels like old times, we have time to craft in the afternoons again, and I LOVE it! With Halloween coming up, we decided to add a little boo to our decor with this easy homemade play doh ghost ornament craft. This is such an easy craft to make! It is perfect for all ages, from kids to adults.  You can make about a dozen of these (or more depending on your cookie cutter size) from a batch of dough.


Ingredients:
1 cup water
1 cup salt
2 cup flour


Directions:
Mix dry ingredients in a bowl.


Slowly add water, a few spoons at a time, until dough is smooth.
You will know you haven't added to much water if your dough is easy to handle and isn't sticking to your hands messily.


Knead by hand for 5 minutes and let rest for 10 minutes.


Roll out the dough until it is about 1/2 an inch thck.
I used a cookie cutter to cut the shape of ghosts.
Next, poke a hole thru the top of the ghost so you can hang it up.
I used a BBQ skewer.

After cutting my shapes, I used a black crayola marker to make the face of the ghost, on the raw dough.

Place  the dough on a cookie sheet and place it in a cold oven, turning up the temp to 200 degrees. Allow your ornaments to bake for about 90 minutes. Check them frequently to make sure they are not browning (if they are pull them out.)

Allow the ornaments to cool then feed a section of bakers twine or a string into the hole and hang.


Add a variety of faces to your ornaments for a boo-tiful variety of economical and adorable DIY Halloween decorations.


You can find all of my Halloween crafts here.
Reader favorites include:

10+ Tasty Sheet Pan Meals to Make

If you are looking for a delicious dinner idea that will dirty very few dishes, then you are going to want to check these ideas out! I found 10+ Tasty Sheet Pan Meals to Make that you are going to want to try! These are all totally delicious dinners and they are so easy to clean up for the win!


Guys, I love my family. Like I love these people more than life itself. But, I am tired of washing their dishes and I have cooked a million meals since quarantine started. And I am over it all. I miss restaurants so much.  While they are open with limited seating here, I am still not taking my kids out just yet.


Sheet Pan Dinners have become my saving grace. They are so easy to make and there is basically no clean up.I have found some amazing options. From pork chops to salmon, these dinner ideas are perfect for feeding a family without the fuss. If you use a paper plate to make things even easier, there will be no judgment on my part. Make sure you click through the links to visit the posts. Share your favorites to show some love to the bloggers.


Pork Chops with Broccoli by Lynchburg Mama
Sheet Pan Breakfast Bake by Delicious on a Dime
One Sheet Asian Chicken by Domestic Superhero
One Pan Chicken Shawarma  by Spend with Pennies
Sheet Pan Chicken Nachos by We Dish It Up
Cajun Shrimp Sheet Pan Meal by Taste Galaxy
Sheet Pan Chicken Fajitas by Love Bakes Good Cakes
Chicken and Apple Sheet Pan Dinner by Tastes of Lizzy T
Sheet Pan Chicken Sausage and Veggies by Live Laugh Rowe
Lemon Garlic Salmon by Love Bakes Good Cakes

Looking for more tasty stuff?
Don't miss these reader favorites:
Copycat Cracker Barrel Chicken and Dumplings
Blackberry Cheesecake Floats


10+ Crafts for Chinese New Year

Chinese New Year is coming up on January 25th, and these fun crafts are perfect for creating with the kids to celebrate in style!


We love Chinese New Year because it happens in the winter, and it gives us something to celebrate and learn about at a pretty dull time of the year for us. My husband is down because I will naturally make something awesome for dinner like egg rolls or peanut butter chicken over fried rice.


This list has something for everyone; literally! From the cute and easy paper fortune cookie to a stunning mason jar lantern; there is something for every skill level in this collection! I can't wait to hear which is your favorite craft!


Mason Jar Lanterns by Mod Podge Rocks
Chinese New Year Tangrams by My Craftily Ever After
Paper Plate Chinese Lanterns by In the Playroom
Rooster Craft by Crafts n Coffee
Egg Carton Dragons by Happiness is Homemade
Homemade Chinese Gong by Kid World Citizen
Chinese Take Out Box Craft by Create Craft Love
Chinese New Year Shakers by In the Playroom
Chinese Dragon Puppets by Crafts n Coffee
Paper Fortune Cookies by Mad in Crafts

If you have a fun idea for Chinese New Year, I hope you will leave a comment to share it!


You might also like this paper fortune cookie craft.


Reclaimed Wood Black Cats

These reclaimed wood black cats are so cute! Best of all they are easy to make too! 

Over the summer I stopped by my local recycling center to drop of plastics and guess what they had? Stacks and stacks of pallets! For Free! I brought as many as could fit in the back of the SUV home and have been going back a few times a month to get more. I am loving the crafts I can make without having to spend any money with a pallet board!

I was inspired to make some cute black cats from my reclaimed wood because I need new decor. To make a long and sad story short, all of my holiday decor was ruined in a wet basement. I am starting from scratch this year.

So, instead of getting super stressed or pulling out a credit card to replace right away, I asked my husband to cut a few pallets down for me. I started creating some fun little things. I love that I have one of a kind unique decor now. I can't wait to make more. But, we will get into all of that in another post. For now, let's get to how I made these.

Supplies for Reclaimed Wood Black Cats

I am an amazon affiliate. Making a purchase earns me a small ad fee at no cost to you.

Pallet boards in assorted sizes
A wood saw
Black Plaid Paint
White Paint
Halloween Ribbon
Fake Flies, Spiders, Bugs
e6000 adhesive
a small paint brush and a medium paint brush

Directions for Reclaimed Wood Black Cats


Cut down the pallets to desired size. I used 12",10" and 5" boards.


I used a small hand saw to cut a v into the end of each board.


Paint the boards with black paint and allow to dry.


Using the end of a  small paint brush (not the brush end) dipped in white paint, create the eyes.


Dot black into the center of the eye and push up then down to create the pupils.
Allow to dry.
Cut a length of ribbon to wrap around the board. Glue this on as the collar.
Glue a fly, bug or spider to the collar where the ribbon meets.
Allow to dry.
If you plan to display outdoors it would be a good idea to seal these with a clear coat .


If you are ready for more Spooky Fun 15+ Halloween Books for PreschoolersPaper Plate Spiders

Shop the supplies for Reclaimed Wood Black Cats:
I am an amazon affiliate. If you make a purchase, I earn a small advertising fee.


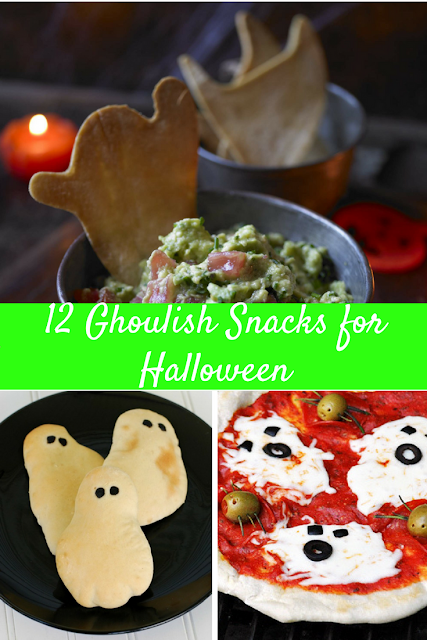
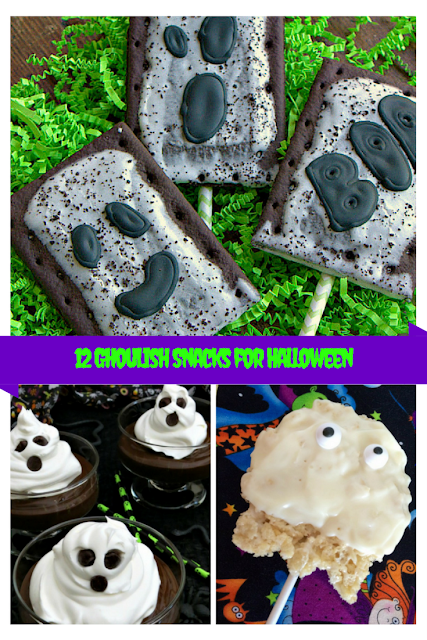
12 Ghoulish Snacks for Halloween

Fun food for Halloween is here! Your friends and family will love these 12 ghoulish snacks for Halloween!

Ghoulish Halloween Snacks


Halloween is near and I am busy making treats to share! I love to be in my kitchen in the fall! This year I am patting myself on the back, just a little, over a genius idea I had to get my kids to eat more bananas in the spirit of Halloween! Check out the video to get the scoop on how to make a healthier treat that is loaded with fresh banana!


This made me want to make all kinds of ghostly treats! I visited some of my favorite blogs and gathered some spooktacular treats to share with you! These are perfect for a Halloween party or just a special treat for a spooky night at home!
Ghoulish Snacks for Halloween

Ghostly Guacamole by In the Playroom

Whipped Cream Ghosts by She Saved

Haunted Halloween Pizza by Cherished Bliss

Ghostly Fruits by Mom Endeavors

Ghost Bananas by Sweet Silly Sara

Halloween Rolls by Creations by Kara

Ghostly Sandwich by Mom Endeavors

Pop Tart Ghost Pops by This Silly Girl's Life

Milano Ghost Cookies by Dollar Store Crafts

Ghost Rice Krispie Treats by Who Needs a Cape

Pudding Cup Ghosts and Ghouls by Craving Some Creativity

Ghosts on a Boat by Thirty Something Super Mom

These fun recipes are so addictive to make and eat I couldn't stop myself from taking dessert to a new level of yummy. You can check this Twinkie Ghost idea in the facebook video below.


You might also like this Paper Plate Witch Craft.


If you have a ghost themed food idea please give me the details in a comment!

Easy Ombre Painted Pumpkins

This easy pumpkin painting idea brings the style of ombre to your fall decor.


I love to decorate pumpkins! In years past I usually carved them, but we painted a lot of pumpkins on our facebook live show on Quirky Momma and I have to admit, I was hooked on the options painting brings to pumpkin decorating!

This was one of my favorite pumpkins! The pumpkin was a tiny one, and the technique was simple. With a brush, 3 colors of pink paint and some mod podge, this little beauty came together in just a few moments time and was admired by all who saw it in our yard!


Supplies needed:
A Paint brush
A Pumpkin
Mod Podge to seal
3 shades of paint (I used 3 shades of pink)

Directions:
Begin by painting the bottom the darkest shade of paint you want to use.
Use the second paint in a shade a little lighter than the bottom shade
Paint the top portion in the lightest shade.
After the paint has dried, use the mod podge to seal your pumpkin so that the wildlife is disinterested in eating it, and the weather doesn't wash your efforts away!

There you have an easy ombre pumpkin for fall decorating!

You can find all of my Halloween ideas here.
Favorites include:


Witch Window Cling

It is hard not to get in the spirit of things this Halloween with his hands on witch window cling craft!


This window cling was so much fun to make with the kids. I love that it gives them a chance to use their fine motor skills and practice scissor skills while making something so cute for your windows!

Supplies

Scissors
Clear Transparent Contact Paper
Green, Black, White, Purple Construction Paper
A scrap of pink or red paper


Have the kids tear and cut up the black, green and purple paper into small bits.
Make 2 small circles from a black square of paper.


Cut out small white circles for eyes and a small smile from the red or pink paper.


Begin by placing the small black circles on the contact paper, sticky side up.
Cover those with the white circles for eyes


Next form the nose, mouth and hat of the witch


Begin filling in the face with green bits of paper.


Fill in the remaining areas with purple.

Leave just a few areas uncovered so that the contact paper will stick to your window.


We thought these were really cute. They were fun to make and offered the kids a little challenge as the contact paper is sticky. 

You can find all of my Halloween ideas here.

Paper Plate Witch

Glam Pumpkin Makeover


13 Ghostly Crafts to Make for Halloween

Halloween is near and we are crafting up all things spooktacular! I found 13 awesome ghost crafts that the kids and I can't wait to make! These are too fun! To say the least, they are a step up from our efforts so far this season of a simple ghost decoration.


Ping Pong Ball Ghost Lights by Unoriginal Mom

Lollipop Ghosts by Mom Dot

Toilet Paper Ghosts by Ginger Snap Crafts

Plastic Bottle Ghosts by In the Playroom

Halloween Footprint Craft by Where the Smiles Have Been

Ghosts Under Glass by Yesterday on Tuesday

Tin Can Ghosts with FREE Printable by Ginger Snap Crafts

Ghost Mobile Kids Craft by Sugar Bee Crafts

Halloween Ghost Windsock by Real Coake

Giant Hanging Ghost by A Girl and a Glue Gun

Pillowcase Ghost Dress by Sugar Bee Crafts

Spooky Cheesecloth Ghosts by Yesterday on Tuesday

Gourd Ghosts by House of Hawthornes

Which of these ideas will you try first?


Which of these 13 ghostly crafts to leave you aghast do you think your family would have the most fun with? I love the ghostly gourds! I have an obsession with gourds and love the idea of creating something more than a centerpiece with them.

If you are in the mood for more Halloween crafts check these ideas out!


If you make any of these fun ideas make sure you hop over and share a pic with me on facebook!


You might also like

 Paper Plate Witch Project.
Glam Pumpkin Makeover
Handprint Monster Puppets


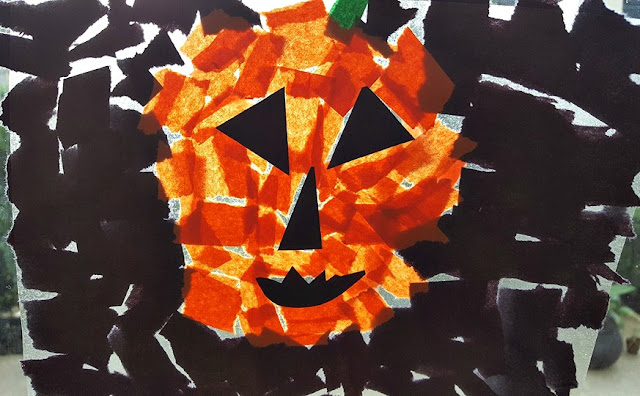
DIY Pumpkin Window Cling

We love to decorate for holidays and Halloween is no exception. This DIY idea makes fun window clings with simple ingredients for a one of a kind look this season!


The kids are excited about Halloween this year! As soon as they saw Halloween decor popping up in stores, they were ready to buy something! Seeing how cute they are, I couldn't deny them their wish. But, I did draw the line at 2 items. We placed a cute ghost on our door in mid-August...

Luckily, the fun of Halloween is still going strong here! The kids and I made some adorable window clings that I can't wait to share with you guys! Today we will go over how we made these cute and easy Pumpkin Window Clings!


Supplies

Transparent Contact Paper
Scissors
Black, Orange and Green Construction Paper


Have the kids tear the orange paper into little strips and bits.


Then cut the pumpkins face out of the black paper. Tear whatever black remains into small bits and strips.

Peel the backing off of your contact paper and lay it sticky side up.

Place the face of the pumpkin on the sticky side of the paper.


 Next outline the shape of your pumpkin in orange.


Then fill the outline in with orange paper.


Next tear one small bit of green paper for a stem and add it to the top of the pumpkin. Begin to fill in the rest of the area with black paper.


Then you can stick this right to your window. The little areas that aren't covered with paper will adhere to the window, but not so much that it makes peeling it off a bother. You can reinforce the edges with tape if you need to or desire.


And there you have a really easy, fun and cheap way to make a window cling! My kids had a lot of fun with this idea and I think yours will too!


You can find all of my Halloween crafts here

Glam Pumpkin Makeover

Paper Plate Witch