When in Bakersfield: You Gotta Eat Here

The first thing I noticed about Bakersfield, is how lovely it was! I guess I had associated the city with country music and expected something other than what awaited me. The drive in from Los Angeles was breath taking.

After a long day of travel, going literally from coast to coast, I was pretty weary. I kept a smile on my face and I made an effort to live in the moment. I wanted to fully enjoy my short time in this new to me place.


Upon arriving to my dinner destination at The Mark, all of my exhaustion fell away. I was greeted by a gracious staff. A Gin Refresher perked me up and prepped me for a completely decadent dinner.


Spinach Artichoke Dip and Fresh Baked Bread gave me a glimpse of what was in store for me. When my Shrimp Alexandria Arrived I was nearly salivating. Served with a superb baked potato and fresh green beans and carrots, this was hands down the best after travel meal I have ever had. 


Reluctantly I left the gorgeous restaurant behind, as I left, the magical voice from the live entertainment carried me away from the scene. It was a dreamy experience. When in Bakersfield, ya need to go here.


Another great little spot in Bakersfield is Mimi's Cafe. I enjoyed an evening nibble with a new friend there. We drank Mimosas {The Triple Berry is fantastic!} and shared the Baked Brie. It was ah-mazing. 
The menu offered tons of tantalizing dishes and looking back I should have ordered something awesome like a burger or something.


Mimi's offers several mimosas!


If you stay at The Hampton Inn, they have a nice {FREE} hot breakfast as well. This was like the best hotel breakfast I have had in a very long time!


They had waffles with whipped cream, cereal, fruit, yogurt, juice, cheese omelets, tons of yummy breads and turkey sausage. Yum. It was a great start to my day!


No compensation was offered to me to write this travel piece. These are my personal experiences!

The Scoop on Dining in Richland County

Richland County, Ohio has a ton of great options for family friendly dining. From chains to family owned, there are some fantastic options for dining in Richland County!

One of our favorite places to visit is Two Cousins Pizza, in downtown Mansfield. The pizza is awesome and the lunch specials are great. My son is happy with a slice of pepperoni pizza and a drink, while my husband and I can't pass up their mini pizzas or pepperoni rolls.

The prices are unbeatable and the pizza is really good!


My son really loves the Der Dutchman in Bellville, Ohio. The buffet features several things he might eat on a day he isn't demanding pancakes. Fried chicken, clam strips, potatoes, fish, tons of veggies, salads and other yummy things are ready to tantalize your tastebuds.


My favorite little spot in Richland County right now is the Blueberry Patch. Picking berries and dining in their cute cafe is the best summer activity!


 Tomato Basil soup that is ah-mazing!


Monte Cristo sandwich with blueberry? Phenomenal!


 The Quiche and Fruit Salad? Divine!


Roo loves their flatbread pizza! It is yummy!


If you are traveling to Richland County, I hope these suggestions are helpful to you for finding a great spot to dine!

Cupcake Liner Crafts

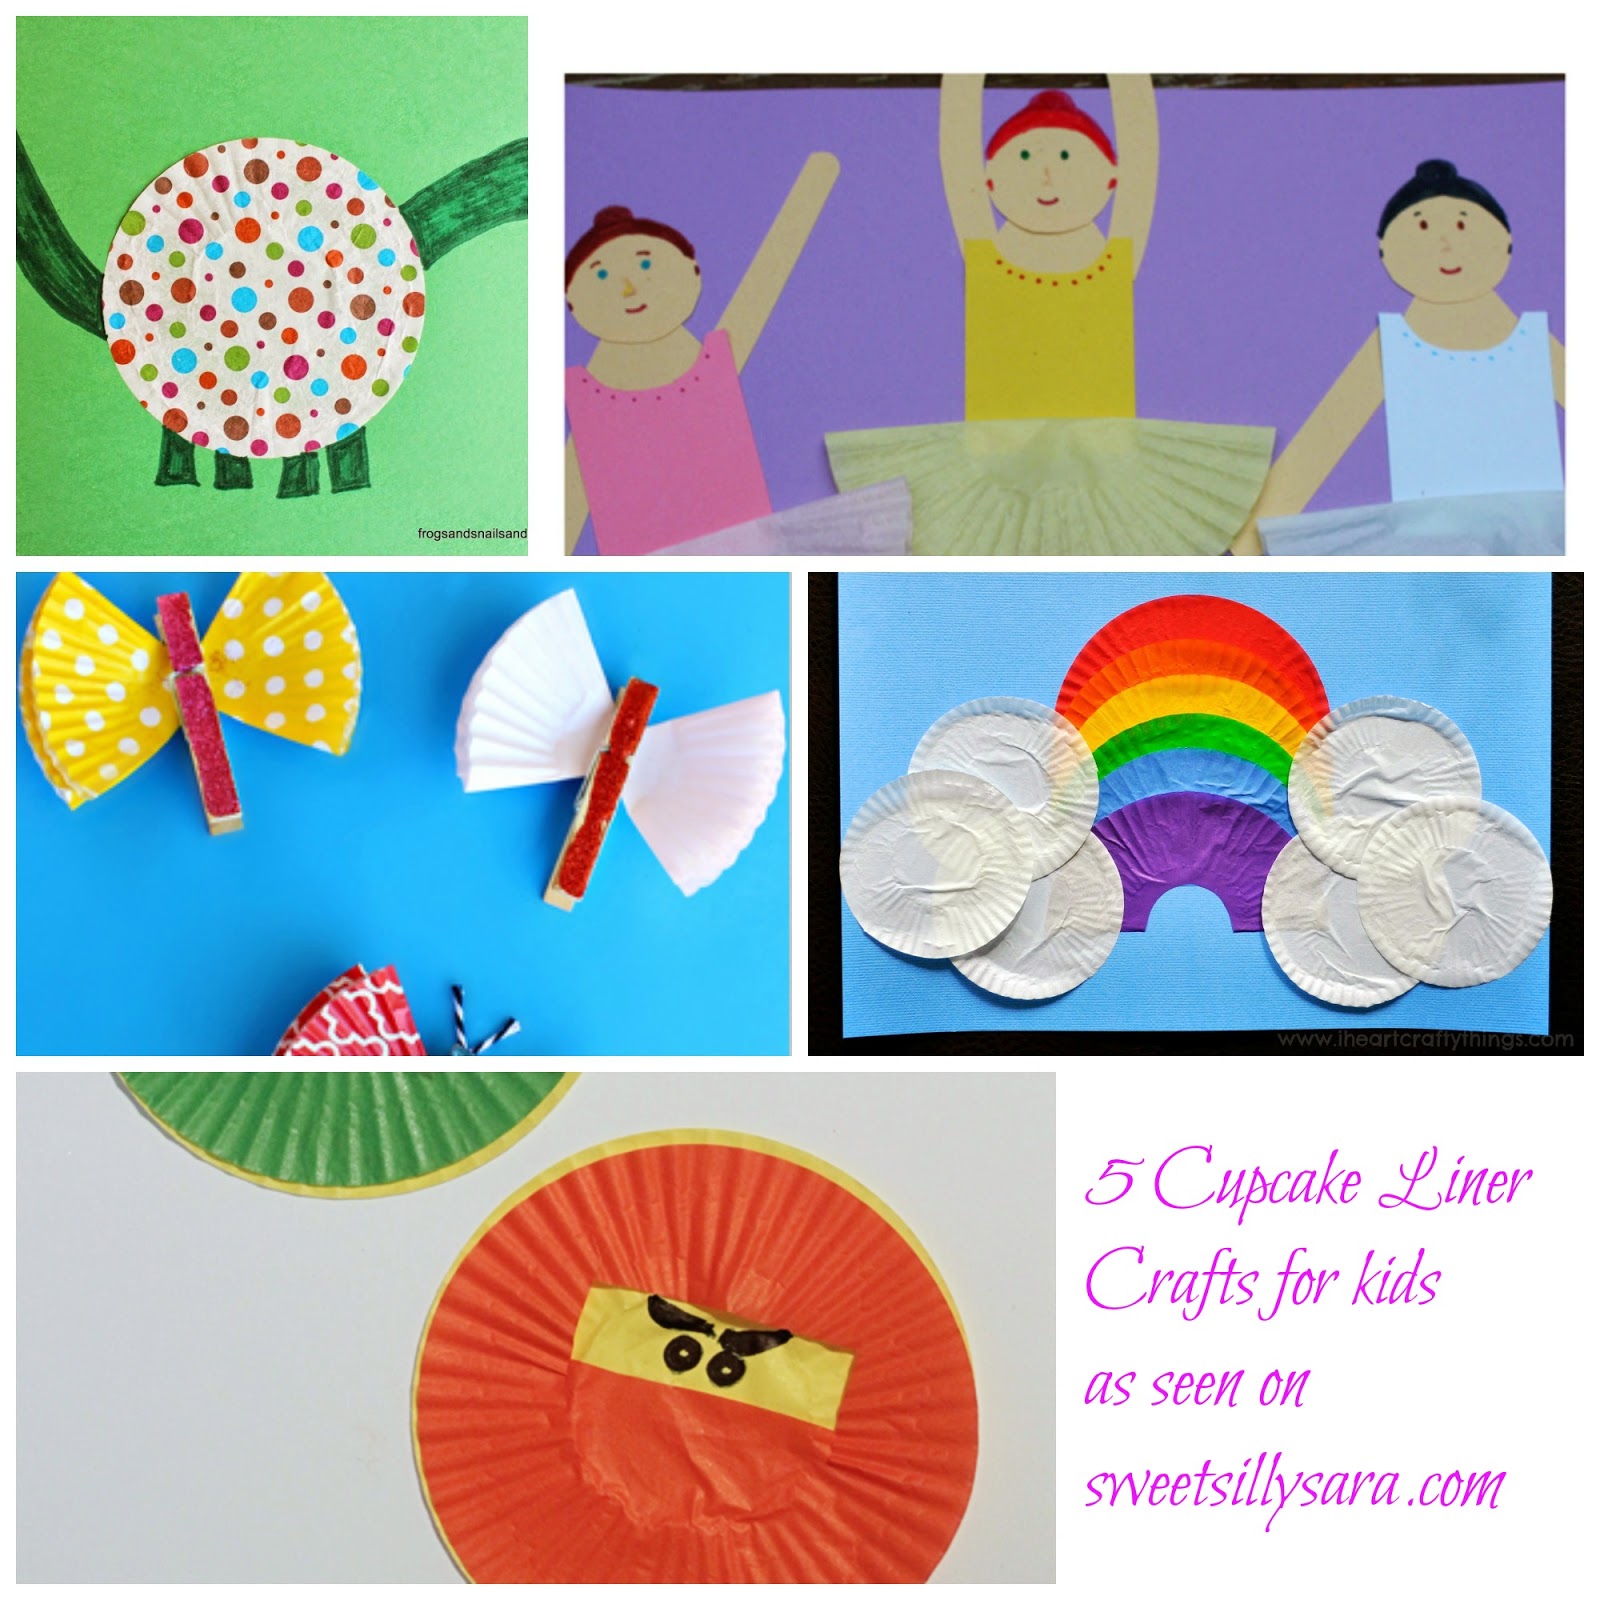
We are always looking for fun crafts to make! When I saw these ideas for cupcake liner crafts the wheels in my head started to spin. These ideas are adorable and easy enough for your toddler or preschooler to make!
I hope this collection inspires you to pull out your cupcake liners and start creating!


Your little princess will love making these Tutu Princesses from Well Nourished Nest.


On a rainy day you might want to try your hand at this Cupcake Liner Rainbow from I Heart Crafty Things.


These Cupcake Liner Butterflies from Crafty Morning might flutter their way into your heart!


If your little one likes Ninjago, don't miss this super cute and simple Ninjago Craft from Love and Marriage Blog.


If your little one loves all things Dino, you can't go wrong with this Cupcake Liner Dinosaur from Frogs, Snails and Puppydog Tails.


Do you have an idea for a fun cupcake liner craft? I would love to hear from you!

Washer and Dryer Update

Once upon a time I had a washer/dryer set. It was a cute little matching number, white, basic. Exactly what I needed. I can be no frills about some things, ya know.

Then the dryer bit the dust. It wasn't worth fixing when the parts and labor were added up. Lucky for me, my neighbor had an extra one in her basement and she said "Here, just take this one!" Then my washer followed suit and I bought a new one.

Well, I am thrilled to just have a washer and dryer! I had to use the laundromat for a week-ish when I waited on the washer and that is just not cool. Doing 10 loads of laundry or so at once is not how I like to spend a day! But, to be honest. I  was feeling a slight tinge of embarrassment over my blah washer and dryer.


That materialistic part of me debated getting a new set, I had justified it to myself, but the realist in me knew I wasn't really going to get a new set because they don't match. I live in the real world, have kids, bills and all of that, like everyone else.

Then an idea hit me.

I had a slew of cute decals that I have hesitated to put up in my house, knowing we hope to move in the near future. These were perfect for adding a little something to my washer and dryer that made them look like a pair, despite being different years and brands.

My son is really interested in cats, he thinks they are awesome. So while he was at school I did this.


My washer and dryer are pretty cute now, my kids got a huge thrill out of noticing the kitties in the laundry room and our cat gave us the purr of approval over our choice of decals.

How do you use decals in home decorating? I would love to hear ideas from you!


Lava Jars {Hands on Science}

Last fall my son and I made a fun project together, we called them lava jars as they were inspired by lava lamps and we had a ton of baby food jars on hand. Harp was emptying out at least 6 a day back then.

I first filled the jar with half water, half baby oil. We added a few drops of food  coloring to the mixture, closed the lids tightly and watched to see what would happen.

We decided that this jar was the ocean based on color and the imagination
of a 4 year old

There was some slight bubbling, but nothing major.

We agreed the jars were neat... but what could we do to make them react differently?


We both liked the color of this jar the best.


We went inside and looked around. We found some antacid tablets and decided to introduce them into the mix to see how the oil/water jar reacted.


We started to notice bubbles forming right away. It definitely simulated a lava lamp!


I made a really short little video demonstration of the reaction of adding the antacid to the oil/water mixture.


My son had fun with this project. It was a fun challenge to see what we could do with common household products, and it was even more fun to engage him in a science project.  We think these would be fun with glow in the dark stuff inside. We hope to try this again in a few months with that idea.

Coconut Rice Krispie Treats Recipe {Dairy Free}

Earlier this week I needed to make a snack to share with little boys. I thought I would go with a standard favorite and make Fruity Pebble Treats until I realized margarine has milk in it and I needed a snack that was free of milk and chocolate.

I started a batch of a nutella type Rice Krispie Treats... then I realized after adding the Jif version of Nutella that oops this has chocolate in it... It was irrelevant anyways because the recipe was a total flop. 

I scanned my pantry and came up with coconut oil as an ingredient a little more digging searching produced a bag of coconut flakes...

So, I created a recipe that is free of milk and chocolate for my dears that face food allergies. I wasn't sure how they would turn out so I used {Mr.} Adam as a guinea pig. He said they were good but that they were too adult for kids. I shrugged my shoulders and said "I am okay with that because I tried."

Imagine how thrilled I was to hear from the Moms a few days later that the Coconut Rice Krispie Treats were a hit and that several Moms thought they were lovely! So here is the recipe, I hope you like it too!


print recipe

Coconut Rice Krispie Treats {Dairy Free}
Dairy Free Rice Krispie Treats with a delicious coconut flavor!
Ingredients
  • 4 1/2 cup Rice Krispies
  • 10 ounces Marshmallows
  • 2 tablespoons Coconut Oil
  • 1/3 cup Coconut Flakes
  • as desired Sprinkles
Instructions
Spray a baking dish with coconut oil spray as well as a pan.Add 2 tablespoons of coconut oil and 10 ounces of marshmallows to the sprayed pan. On medium/low heat melt the oil and marshmallow. (This took about 3 minutes, be sure to stir frequently)
When the marshmallows and coconut oil melt add 4/1/2 cups of Rice Krispies and 1/3 cup of coconut flakes to the pan, stirring until the cereal is well coatedSpread the mixture into the prepared baking dish.Add sprinkles.Allow to cool for one hour.Cut into squares and serve.
Details
Prep time: Cook time: Total time: Yield: 16 servings


If you liked this easy recipe you might want to check out my Pretty Pebble Marshmallow recipe or My Nuts About Cookies Bark recipe. Thanks for dropping by today!


Sushi Sensory Bin

A few weeks ago while shopping at my Kroger I saw these adorable erasers- sushi style- in the clearance section. At 69 cents they were a steal. I couldn't pass them up! My husband said "What are you going to do with them?".

What am I going to do with them? Make a sensory bin of course! A Sushi themed sensory bin sounded like fun to me!

I picked up a bag of long grain white rice, one pound was on sale for $1.09. I used this as my base.


My son was intrigued. He couldn't wait to get his hands in the bin of rice!

Next we added our Sushi Erasers.


Again, Eager Hands were grasping to get involved. Not that I can blame him!

Finally, we finished the bin off with a pair of chopsticks.


And there you have our under $2 sensory bin! It was easy to make and fun for Roo to play with.

I liked that we could enjoy the feeling of rice when we touched the bin, the rice was fun for roo to dig around in. He likes the way it sounds when he picks up a handful and drops it in the bin. The chopsticks are great for his fine motor skill development.

When he grew tired of picking up the erasers with the chopsticks he fed rice to an assortment of dinosaurs. Then he decided to toss handfuls of rice into his barnyard toy for the other animals to eat... and yes, it got messy. But, I went with it! After all this was my big idea of fun and dried rice is pretty easy to sweep up.

Do you engage in sensory play with your kids? I would love to hear about your favorite sensory bins.


Double Chocolate Covered Marshmallows

Fancy Marshmallows are kind of becoming my thing. They are easy to make and they are always a hit with the crowd. 

If I have had a busy day and I didn't have time to bake or no bake something, I can whip up a few pretty marshmallows in 5 minutes flat and enjoy the oohs and aahhs from my family when I serve them.

Tonight I made a half dozen of double chocolate covered marshmallows.

This is so easy anyone and I mean anyone can make them.


You will need:

Large Marshmallows
Mini Chocolate Chips

I used 1/4 cup of mini chocolate chips for the first coating and 1/4 cup for the second coating.

Place 1/4 cup of chocolate chips into a small dish, set aside for a moment.

Spray a very small microwave safe dish with cooking spray. Add 1/4 cup of chocolate chips. Microwave for 30 seconds, then stir. Microwave for 30 additional seconds and stir. If the chips blend smooth upon the second stirring it is ready. If not, microwave for 15 seconds and stir, repeating as needed.

Dip your marshmallows into the melted chocolate then into the mini chocolate chips. Place on a plate and repeat until you run out of marshmallows or melted chocolate.

Allow the marshmallows to rest for about 30 minutes until the chocolate has hardened. Serve with a smile, store leftovers, on the odd chance there are any, in a ziploc baggie.

If you like chocolate covered marshmallows, check out my Chocolate Covered Marshmallows With Coconut recipe.

Tell Me About It Tuesday 4/7

Welcome to Tell Me About It Tuesday!
If you are new here we are glad to have you with us! If you are a returning party guest, it is a pleasure to see you again!
As always,
Thanks to our hosts!


Let me tell you about my life since the last party:

Sweet Silly Sara has been a busy lady as of late! Baking, cooking, cleaning, blogging, creating, working and the most important mommying. The kids are great, they are growing, they are healthy, they are gorgeous.


I would love for you to leave me a comment. Tell Me About It, I want to hear about your week!

Okay, now on to the good stuff

The most clicked link was


April's favorite was:


Grocery Store Scavenger Hunt by Play 2 Learn With Sarah

Sara's favorite was:


Banana Blueberry Muffins by Mommy on Demand

Jacqui's favorite was:


Ranch Chicken... by An Everyday Blessing


Thank you for dropping by to link up. I can't wait to see what you have to share this week!
Remember, please follow the hostesses. Link up anything family friendly that you like, except giveaways and etsy shops!

Don't link and run, visit a few links please! Everyone loves comments or shares {hint, hint, wink, nudge}

Please note that by linking up to Tell Me About It Tuesday you are granting the hostesses permission to share your post on our social media accounts and or in round up posts. We may also feature your work in the next party.


Every link in this party will be visited and pinned to our Tell Me About It Tuesday board, so show us what you've got!


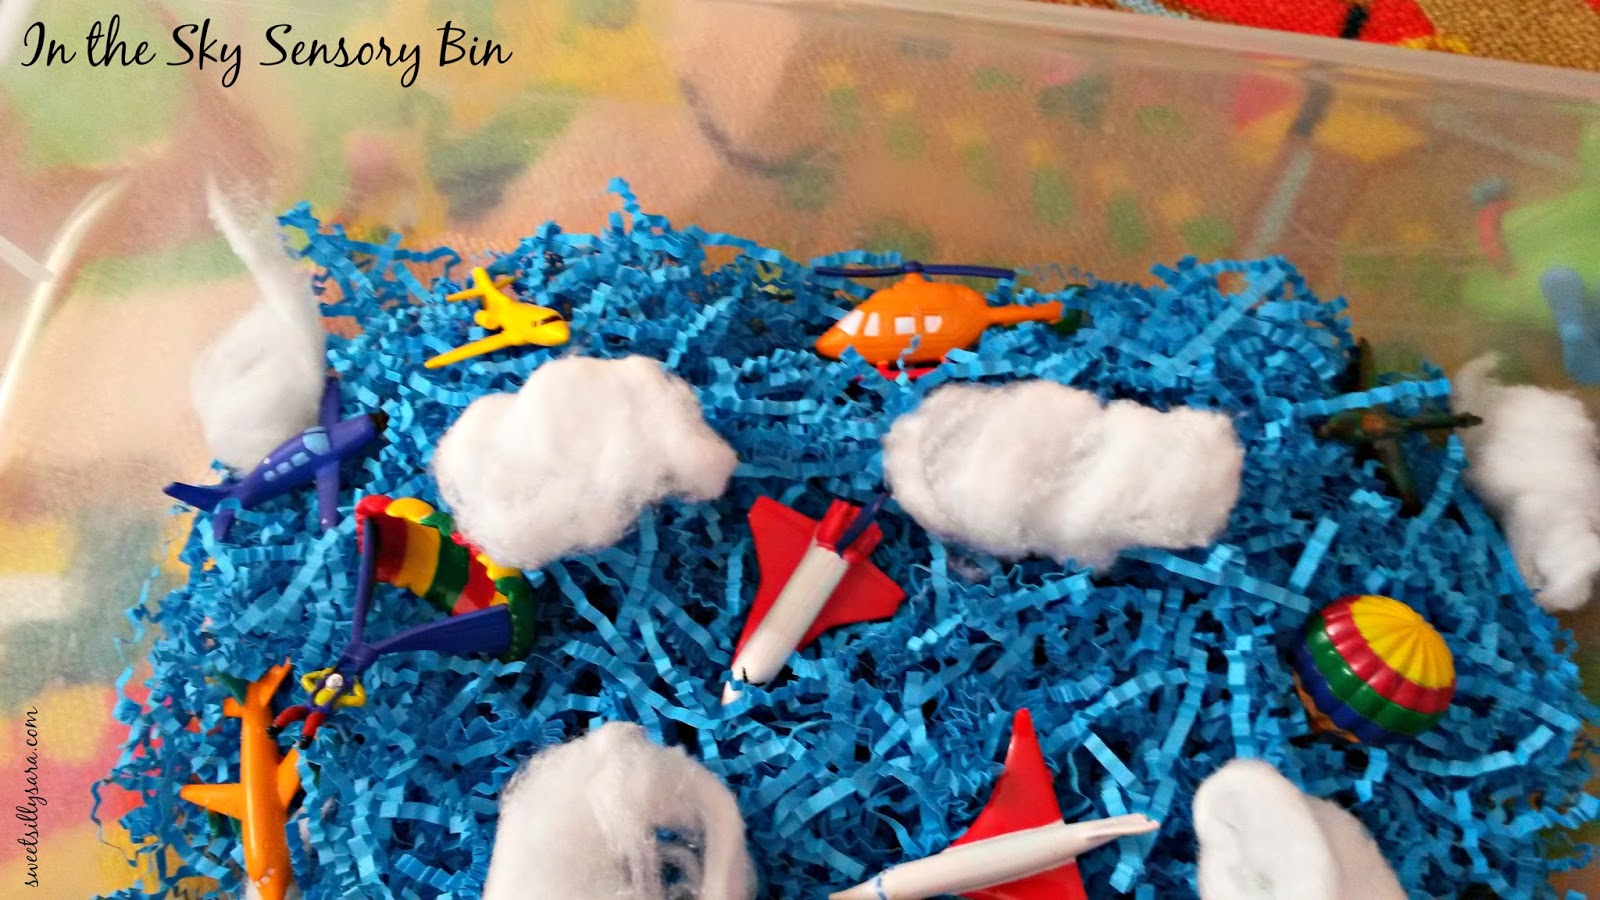
In The Sky Sensory Bin

Roo loves waking up to find a new sensory bin waiting on him! I love making something fun for him and knowing he will happily play with this new bin for a few hours. I got a great deal on a Toob from Safari LTD and I couldn't wait to make the In the Sky Sensory Bin.

I started with a base of Easter paper grass stuff and a few cotton balls.

Photo Credit: Sara Lehman.

I pulled the cotton balls apart slightly to fluff them up a bit.

Photo Credit: Sara Lehman.


Gently pull your cotton ball apart until it looks like a fluffy cloud.


Photo Credit: Sara Lehman.

Next add a handful of planes and balloons- or a toob (In the Sky).

Photo Credit: Sara Lehman.

And you have a neat sensory bin for kids that incorporates fun with their senses. The paper Easter grass and the cotton ball clouds offer different textures to feel. The paper grass engages the sense of hearing as it crinkles when touched. The colorful blue base engages the sense of sight with a visually appealing color. The planes open the doors to imaginative play.

Photo Credit: Sara Lehman.

Roo liked this sensory bin. He was amazed at the planes inside and he caught on quickly that the bin was the sky. He excitedly showed me all of the clouds, several planes and the paper grass which he thought was pretty neat stuff. After about an hour of playing planes he smiled and picked out a few dudes and told me it was bubble bath time! The In the Sky Sensory Bin can double as a bubble bath sensory bin in the imagination of a child.

Thanks for reading! I would love to hear about your favorite sensory bin ideas.


Nuts About Cookies Bark

When you have a very busy child underfoot and an infant to contend with the chances of baking a cake from scratch are slim to none. Too often dinner comes from the freezer or sadly it comes home in a brown bag and Styrofoam containers. Dessert? Think stale cake from the bakery. Plastic wrapped cookies. Yeah. I never claimed to be the perfect wife or mother. I seriously lack in the cooking department if you are seeking home cooking or from scratch cooking. Instead of beating myself up about not being June Clever, I realized that I don't have to make everything from scratch. This inspired me so I started playing around with ingredients I had on hand and I came up with a yummy dessert that took less than 5 minutes to create.

I came up with Nuts for Cookies Bark. It was nothing short of awesome! To create Nuts for Cookies Bark you will need:

Photo Credit: Sara Lehman.


10-18 crushed oreo cookies (I broke mine into chunks)
1/2 cup od pecans, crushed
1 bag of semi sweet chocolate chips


Spray a microwave safe bowl with cooking spray. Pour chocolate chips into the bowl and microwave, stirring every 30 seconds until the chips are melted and can be stirred smooth.

Photo Credit: Sara Lehman.

While the chocolate chips are melting, place half of the cookies and nuts into the bottom of a container, you could use a baking dish or a cookie sheet. Pour the melted chocolate over the base. Top with the remaining cookies and nuts.

Photo Credit: Sara Lehman.

Allow to cool at room temperature for about an hour. Then cover with plastic wrap and place in the refrigerator for about 2 hours so that the bark will set and harden properly.

Before serving, allow to set at room temperature for a few moments. Break into chunks and serve.

Find more yummy desserts here:

Chocolate Covered Marshmallow with Coconut

We had another snow storm on Saturday of last week. While I watched the snow blowing from my window I decided to make a dessert that would take no more than 5 minutes to prepare and that would give us a little taste of the tropics to ease the pain of another winter storm.

Photo Credit: Sara Lehman.

To make Chocolate Covered Marshmallows with Coconut you will need:

1/2 a bag of milk chocolate chips
2-4 tablespoons of shredded coconut depending upon your preferences (completely coated, partially coated etc)
10 jumbo marshmallows
Cooking Spray


Start by spraying a microwave safe bowl with cooking spray.
Add chocolate chips to the bowl. 
Place your coconut in another small bowl.
Microwave for 30 seconds, stir and repeat until the chocolate chips are melted and smooth.

Dip a marshmallow in melted chocolate. Roll it in the coconut, set aside on a wax or parchment paper lined plate. Allow to harden, about an hour. You can speed this up by placing the marshmallows in the refrigerator for about 20 minutes.

If you love chocolate and marshmallows- hop over to check out my Double Chocolate Covered Marshmallow Recipe.


5 Minute Cardboard Craft

I might get a little silly about wanting to hoard cardboard, but I seriously see possibilities and an invitation to play when I see cardboard.

My son has toys on top of toys to play with, but I like it when I can inspire his imagination. It is interesting to see how he plays when presented new options.

We had an empty Similac box and I decided it would be a fun to see what I could do with it as a  5 minute project.
Photo Credit: Sara Lehman.

 I started with an empty box.  I carefully opened it up along the seam.

Photo Credit: Sara Lehman.


Then I put it back together, printed side in, brown side out. I tore of the flaps on one side so we had an opening. and I used a few strips of tape to secure the box.


Photo Credit: Sara Lehman.

I grabbed a handful of crayons and asked Roo what he wanted me to make.

Photo Credit: Sara Lehman.

He said "The Library!"

Now, don't you dare laugh at my art work!

Photo Credit: Sara Lehman.

I colored the building red and made simple windows with stick people and books.
He got the hint.


Photo Credit: Sara Lehman.

He stopped playing cars for a moment and kissed his sister. Then he realized I had in fact made the library.

Photo Credit: Sara Lehman.

 He dashed over and got the Mickey Mouse gang and took them to story time. This project took me less than 5 minutes. My son had a blast with his library and he played with it for 2 and a half days. It doubled as school and a garage for cars, then a cave for dinos.

How do you create fun activities with your kids with items you would otherwise throw away or hopefully recycle?

Find more easy kids crafts here: