Easy Popcorn Gift Idea

This cute idea dresses up an economical treat like microwave popcorn and makes it gift worthy!

There are so many people that make our lives extra special, from the volunteers at school to the bus driver; the delivery people to the trash company. There are so many great community helpers that we want to say thank you to around the holidays that fitting them all into our budget can be tricky.

This year we decided to dress up some everyday snacks and share them with our nice list, and we had a ton of fun creating these treats!

The first one we want to share with you came together so easily!

I cut a stack of simple tree shapes on green cardstock with my Silhouette portrait.

Next, I took a sharpie and included a handwritten message:

"Have a pop-sitively wonderful Christmas"


This post contains affiliate links.

I next punched a hole in the tree and threaded Christmas ribbon {about 18 inches worth} through the hole then tied the popcorn to the card.

We shared these with a handful of community helpers in our lives. We loved gifting this simple token because it cost less than 40 cents to make, and allowed us to show appreciation and spread holiday cheer on a budget.

As the holidays approach we will be sharing a few fun and affordable gift ideas with you! If you have ideas please be sure to share them in a comment, as we love to make cute and inexpensive gifts!

You might also like this DIY Christmas Ornament Collection.

Melted Snowman Bark


Melted Snowman Bark is an incredibly easy and adorable treat to make and share this holiday season! Perfect for sharing with friends and family, it comes together in a flash. This is a snack that melts the hearts of all who see and taste it!


This is such an easy recipe, you guys! It takes easy to find ingredients and creates an unforgettable treat with less than 10 minutes of prep!

Ingredients:
This post contains affiliate links or sponsored content.

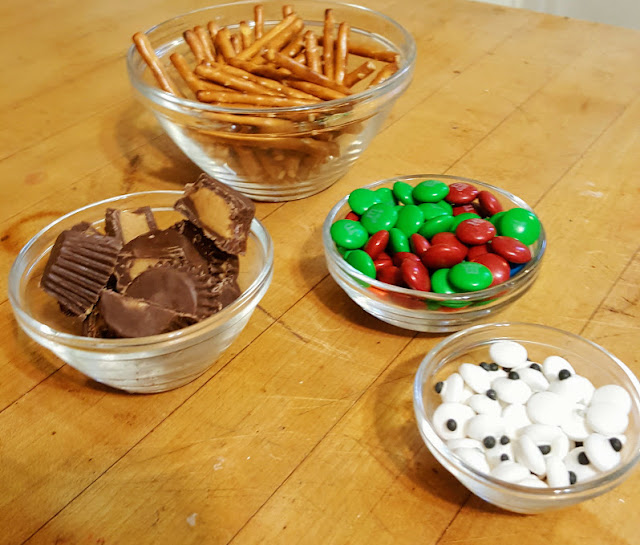
1 lb package of candy quick coating, in white chocolate or vanilla flavor.
Pretzel Sticks
M&Ms
Orange Food Coloring
Edible Eye Decorations
Mini Reese's cups, cut in half

                       
Directions:

Line a cookie sheet with parchment paper or foil.

Melt your candy coating in the microwave. Stir every 30 seconds until it is smooth.

Take about 2 spoonfuls of the melted white coating and place it in a baggie with one drop of food coloring. Make a tiny cut in the corner of the baggie and make tiny little carrots for the noses.

Spread the melted white candy coating on the lined cookie sheet.

Add Reese's halves to make hats, adding eyes below them, an orange 'carrot' nose, stick pretzel arms, and add M&M's for buttons.


Keep spacing in mind as you make these, as after it hardens, you will break them into chunks.
This should set in the refrigerator for an hour to harden, maybe longer depending on how thick you spread the white candy base.

You might also like this 10+ Tasty Sheet Pan Meal ideas post.

Mini Mickey Mouse Jingle Bell Ornaments


As soon as a hint of winter is in the air the kids and I start to clamor for Christmas. We want to decorate, bake and shop! And we want to do it now! This year we started asking Adam about getting our tree ready in October. He knows us too well and he reminded me that we did this with Halloween and by the time it rolled around we were so over that holiday already.


This year we got our early Christmas fix by making a lot of fun ornaments! There is nothing like giving or receiving a kid made ornament, and these are especially fantastic because they are Mickey Mouse themed!

This post contains affiliate links or sponsored content.

 These are so easy and economical that you can make a dozen of these for $3. To make mini Mickey Mouse Jingle Bell Ornaments you will need:

2 sizes of jingle bells; You will need 2 smaller and one larger bell per ornament
Super Glue
Thin ribbon


Instructions:
Begin by threading a 6" section of thin ribbon thru the loop on the larger of your bells.
Tie a double knot in the end to keep it secure.
Next, glue one of the smaller jingle bells onto the side of the larger bell.


 Now glue the other bell onto the other side.
Allow to dry.


I loved these mini sized Mickey Mouse Jingle Bell Ornaments! They were really fun to make and display and we will absolutely be sharing these with friends this Christmas!

We used hot glue to begin this project because the kids can handle the glue gun, I added a bead of superglue to hold these securely. You can use school glue or hot glue, but I recommend the drop of superglue as a precaution. These are so cute that little hands are going to want to grab and shake them!


Green Button Tree Kid Made Ornaments


Making a handmade ornament with the kids can be a lot of fun for the holiday season! These button trees are so easy to make and adorable for gifting something handmade from the heart this Christmas. Everyone loves a kid made ornament to display on their tree! 


Last weekend I found a great deal on dyed craft sticks! 80 for $1. What a bargain! This inspired us to make a ton of fun craft stick ornaments to share this holiday season. I am going to be bringing them to you, so that you can make something cute with your kids to share with friends and family.


These kid made Christmas ornaments came together in just a few moments. We used hot glue for instant gratification, but you can use white or PVA glue if you have patience!

You will need:
4 craft sticks, I used green.
Buttons
4" of  thin ribbon
3" of thin ribbon
One small bell
Glue

 Make a triangle shape and glue it together.
With your remaining stick, cut it in half. This will be your tree base. Glue it on the bottom.


Glue buttons on to the tree in any pattern you prefer. We used blue and green for this ornament and loved the way it turned out!


Flip the tree over. Thread a small bell on the 4" section of thin ribbon. With the bell in the center, glue it on the tree so that it dangles to the middle section of the tree.

With the other 3" of thin ribbon make the loop for hanging from the tree!

Now your button tree ornament is finished. Hang it from your tree, attach it to a wrapped gift, or share with someone special!


This was a cute and fun project to make with Rolf. We love kid made ornaments and have several other variations of this to show you over the coming weeks. From my family to yours; Happy Holidays!

Easy Cookie Dough Truffles


There is nothing like a truffle to delight my taste buds! A few weeks ago the kids and I were craving something sweet and we decided to try our hand at making some really easy truffles!

These were so simple to make and so fun to share with my 2 little sweeties! I can't wait to share this idea with you so that you can whip up some decadent truffles to share this holiday season!

To make these easy truffles you will need:
 melting chocolate
Cake Mix in your favorite flavor
A stick of butter, melted


Mix your cake mix and melted butter until it is well combined.
Melt your chocolate and pour a touch into the bottom of a silicon mold.
Scoop the cake mixture into the molds then top with more chocolate.
Allow to cool and harden. Then share.


As you can see, we mixed things up a bit! We added chocolate chips to a vanilla cake, we also mixed up a red velvet truffle base and a chocolate fudge one too!


I couldn't give you an opinion on which one was the best, because they were all incredible and dreamy!!

Mumkins

Over the weekend I scored a great deal on mums. They were not in the best shape, but they were $1 for a big bunch! The farmer also had some lopsided pumpkins priced to move, and an idea that I have loved but never got around to trying popped into my head.

Out of my bargain shopping, a mumkin was born.

This was such an easy project! All you need are:
A pumpkin
Some mums
A drill with a 7/16th bit

Simply drill holes into your pumpkin, be generous with your holes!

Snip the mums to be about 2" long, insert them into the holes you drilled.

And there you have a mumkin!


This is a perfect activity for preschoolers. I made one live on the Quirky Mama page with Harper and we had a ton of fun with it! I loved that making a mumkin gave her a chance to work with natural materials and to use her fine motor skills in the process.

The mumkin is a very chic and classy option for Halloween decor without going the route of spooky and scary! I can't wait to make more with the kids!


Easy Cornucopia Snack for Kids

Thanksgiving is near and there is no better way to build excitement for the kids than with a yummy and easy snack like this kid made Cornucopia snack!


This is such an easy snack to make with little kids. My preschooler and first grader had a ton of fun making, sharing and eating this!

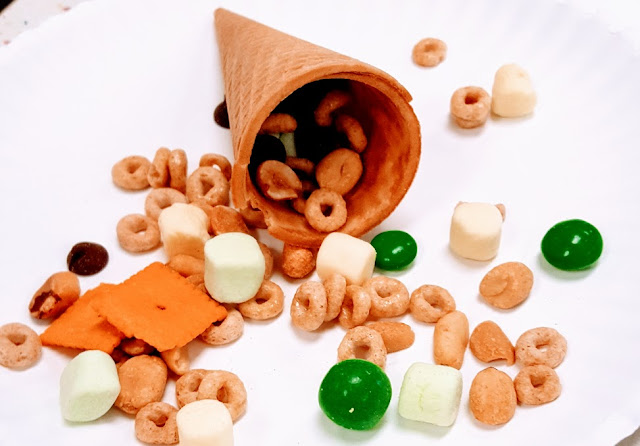
It is as simple as dumping your ingredients in a large bowl and giving it a stir! You can completely customize the ingredients to match your preferences or what you have on hand!

Ingredients:
Unless otherwise specified, use one small box or package of each ingredient
Cheerios
Cheeze Its
Honey Nut Cheerios
Fruit Flavored Mini Marshmallows
Dry Roasted Peanuts
Peanut Butter M&Ms
Craisins
Milk Chocolate M&Ms
Peanut M&Ms
Chocolate Chips
Sugar Waffle Cones

After mixing well scoop the mix into sugar cones and serve!


This stores for 3-5 days in an airtight container or ziploc baggies. We like to substitute Rice or Corn Chex for Cheerios and Reeses Pieces for M&Ms sometimes. No matter what you mix into this Easy Cornucopia Snack, it will be a delicious hit with anyone you share it with!


13 Savory Pumpkin Recipes

Fall is here and I am craving all things pumpkin! Pies, breads and cakes are lovely but there is something amazing about a savory pumpkin dinner! I gathered 13 recipes from my favorite bloggers to share with you. These recipes are completely craveable! I still can't decide which I will make first!


Pumpkin Pasta with Sage and Sausage by Food, Folks and Fun

Bacon and Pumpkin Pasta by Dizzy, Busy and Hungry

Pumpkin Dinner Rolls by Tastes of Lizzy T

Cheesy One Pot Pumpkin Pasta by Domestic Superhero


Beef and Cabbage Dinner in a Pumpkin by Over the Big Moon

Family Dinner in a Pumpkin by Capturing Joy

Vegan Pumpkin Nugget Tacos by Elephantastic Vegan

Pumpkin Chicken Enchiladas by Tatertots & Jello

Pumpkin & Feta Empanadas by Amuse Your Bouche

Spicy Roasted Pumpkin Bread by Om Nom Ally

Pumpkin Sage Scones by Houseful of Handmade

One Pot Pumpkin Mac & Cheese by B Inspired Mama

Pumpkin Chili by Food, Folks and Fun

If you still need a pumpkin fix, check out these yummy pie recipes or these other pumpkin for dinner ideas.

Which of these savory pumpkin recipes will you make first?

Paper Plate Spider Craft

This cute craft is perfect for Halloween, it is easy to make and the results are so cute you will want to display the finished project so everyone can see how creative your little crafter is!


We are big on holidays! We get excited about them all; Easter, Valentine's Day, Memorial Day, of course Halloween is a big one too!

This year we started crafting up Halloween fun maybe a little too early, but we couldn't resist! This is one of the first ones we made and it was so easy and cute!!


This post contains affiliate links.

All you will need is:
A paper plate
A piece of black construction paper
8 googly eyes
A black kwik stik
school glue
Scissors


Paint your paper plate black with a Kwik Stik.
Cut 8 strips of paper for legs and glue them on, 4 to a side
Add 8 eyes
Give your spider a smile and you are done!


Find more of our favorite halloween ideas here
Favorites include

Easy Paper Apple Craft

Every day, my little girls says, "Let's make a craft!" I love her enthusiasm and always encourage activities we can do together. On this particular day, we were anxious to get into some fall themed crafts, and we are always super excited to kick off fall with the harvesting of apples!

This craft was so incredibly fun! It was a bit of a challenge for my almost 4 year old, but we worked together to get it right.


You will need:
A square of heavy white paper {Ours was about 6'' x6''
A piece of green, red or yellow construction paper
School Glue
A tiny strip of brown paper for the stem


To begin we made thin strips of green paper that were 4 inches longer than the square of paper
Next we began folding those strips of green paper so we had 2 folded edges per strip
We glued these on the white paper
Working in a circle we kept gluing both sides of the strips on to the square, being careful to not disturb the other strips of paper
At the end, we added a tiny stem to the top.


We liked this apple craft because it was challenging, a good exercise in patience for both Harp and I. It was also really cute when it was finished! This was a fun craft to follow up with apple slices as a snack!


Easy Apple Tree Stained Glass Window

Cute and easy to make, this kids craft adds a pretty touch to any window, just like stained glass!


We love to craft with contact paper, it is so much fun to use in so many projects! But, one of my favorite uses for it is to make 'Stained Glass' or window decals! These are so cute!

With fall being on the way, our thoughts drift towards the apple orchard almost every weekend. We head out for the time together as a family, harvesting fruit, eating fresh donuts and playing outside. In anticipation of the fun fall weekends that are to come, we made these easy as pie Apple Tree Stained Glass projects.

You will need:
one square of transparent contact paper per decoration
assorted colors of tissue paper, we used green and yellow
one strip of brown construction paper

Lay your contact paper sticky side up
Place your brown paper on the sticky paper to form a trunk
Next cut small circles of yellow or red tissue paper for apples
Place the apple cut outs around the tree
Fill in the leaves using green tissue paper
Leave a few sticky places without paper to easily affix to the window for displaying.


Chicken Salad Recipes to Cluck For

I have been on a chicken salad kick lately. It is an easy lunch, it tastes great, and there are so many economical ways to make it! I guess it is easy to see why I am clucking for chicken salad these days!

I have found some awesome recipes that I can't wait to try, and I know you are going to love them too! I had no idea there were so many yummy ways to make this lunch time staple. I also have a few tips to help you make the best chicken salad!


  • Poached chicken breast is the best option for making chicken salad, but you can use a rotisserie or canned chicken if that makes it easier for you.
  • Allow your chicken to cool, no matter how you cook it! Wait until it is cool to add it to the other ingredients.
  • Cover your chicken salad tightly to keep it fresh while stored in the fridge.


Some of the best chicken salads I have ever made have been on a whim. Made by surveying what ingredients I have on hand and making them work for me. However, these all look superb and I will be modifying my shopping list to make these happen in my lunchtime future!


Which of these sounds best to you? I think they all sound perfectly devourable!


A Day at Malabar Farm with the Kids

A few Sundays ago we decided to re-visit Malabar Farms in Richland County, Ohio. We have been numerous times in the past, but it seems that since the kids were born our visits have grown fewer and further between.

As a Louis Bromfield fan, I love to not only check out the house but also to stroll the scenic, Pleasant Valley farm.  The property has a lot to offer, making it a destination that can appeal to everyone.

When we arrived, we had to visit the playground area. The kids were entertained by the large tractor, slide, and swings. After a few moments of leg stretching and playing, we took a walk to the barn, where we petted cats, cooed over baby goats and checked out some lazy cows.


From there we admired the house, from outside.


We strolled to the Pugh Cabin and continued back to the cave formation.  The walk was ideal on a late Sunday afternoon as traffic was minimal. As a parent, I truly appreciate a walk in the woods, so this was one of my favorite parts of the adventure.


The kids were tired upon arrival of the gift shop. We chatted up the lobby bird, strolled the shop and picked up a snack of fudge.

Snack excluded, this was a completely free adventure. They do not charge admission to visit the grounds of Malabar farm, but the house tour does hold a fee.


If you go, plan to drive to the top of nearby Mount Geez for a breathtaking view of Plesant Valley. Stop by the cemetery on the farm to pay your respects to Bromfield, and don't forget to check out famed Pugh cabin from the film, the Shawshank Redemption. You might also want to peek at the infamous Ceely Rose house.


You might also enjoy this guide on activities in the Richland County area for kids.

School Bus Snack

This easy school bus snack is the perfect way to welcome a new school year!

This post contains affiliate links.


Back to school is an exciting time for both kids and parents! This year my youngest is excited to begin her first year at preschool! My oldest, he says he must be most excited about lunch or the bus, he can't decide. I appreciate his honesty.

To take their excitement to a new level, we made a delicious and easy school bus snack to the delight of the kids!

This is so easy you guys! The kids can build these and they will love munching on them too!


Ingredients:
1 to 2 teaspoons of yellow frosting, any kind will do!
2 Nilla Wafers
1 Graham Cracker
4 Rice Chex pieces


Instructions:
Spread the frosting on the graham cracker
Add the Nilla Wafers as the wheels for the bus


Add the Chex cereal pieces as the windows


Enjoy!


This was a fun way to get the kids involved in making their own snacks and we might have played with our food just a little!

Do you have a fun back to school snack idea to share? I would love to hear about it in a comment!


You might also like this fun handprint fish puppet craft.

How to Rock a Hurricane Like a Boss

This most may contain affiliate links.

Hurricane season is here and many of our readers are in the path of the latest storm. While it is a major pain in the hiney to face a tropical storm or a hurricane, have no fear wonderful people. I am going to share a few of my tips to help you handle this hurricane and any others that come your way like a boss in reasonable style and comfort, given the situation.


Stock Up!
Ok, I know the experts are going to say buy things like bottled water and tuna fish, but come on people. Drastic weather calls for comfort. Instead of getting in a fist fight over the last cans of spam on the store shelves, let's get real. No one wants to eat spam in good weather, let alone terrible weather. Buy all of the pop tart's, granola bars, cold cereal and snack cakes you can get your hands on. Buy soda, booze and single serve fruit juice drinks. Buy candy, coffee singles that are like tea bags, and shelf stable milk. Buy the damn doritos and bean dips like there is no tomorrow.

Kiss Your Ice Goodbye
Accept that ice is going to be something you want, but don't have. Do not stand in line at the gas station for an hour for a bag of ice, just will yourself to go without it. I once paid $10 for a bag of ice and got a handful of laffy taffy as my change. Never again. Ice ain't worth $10, no matter how hot it might be outside.

Run, Don't Walk, to the Sporting Good Store
No, I am not crazy. But I am going to give you a tip to help you keep your cool. Buy as many cooling towels as you possibly can. There are these great ones out there by Mission that will make life feel a little cooler in the sweltering temps while you wait on your power and beloved air conditioning to return.

Dust Off the Board Games
In 2004 we lost power for a week during a hurricane, 2 weeks later we lost power for another week during a second hurricane. We played board games with reckless abandon. We battled it out over every game we could get our hands on and somehow we survived a week without electric, air conditioning, television and gasp even our phones as charging them was nearly impossible.

When In Doubt...
Fondue
Get your booty to the hardware store for denatured alcohol right now if you have a fondue set. If not, Get. One. Now. You can heat soup, make ramen noodles and even brew hot coffee if you have a handy dandy fondue set. You will be the envy of your friends and neighbors if they get a whiff of some hot soup, oatmeal or whatever cooking. If they smell your hot coffee, look out  cause you might just become block president or something if you are willing to share. I am not certain, but I would be willing to guess that in a pinch votive candles would heat a fondue pot nicely if you can't get the Denatured Alcohol easily.

What are your pro tips for riding out the storm? Do tell so that everyone can hunker down with minimal annoyances and maximum comfort!

Pie Crust Cookies

If you need a treat in a flash that is low in sugar but packed with buttery flavor, this pie crust cookie recipe is one that you will want to check out!


When I was a kid, sometimes my grandma would bake a pie. That was always nice, but the true treat was her pie crust. After she trimmed her crust to fit her pie plate, she would sprinkle to excess with cinnamon and sugar and bake it up. She called it cracklins and let me tell you, this is the flavor that I reminisce on as an adult.
The only bad part about cracklins was how few and far between they were! 

A few months ago, my kids were begging for treats, so I stood in my kitchen surveying the options. We were low on baking supplies, but my mind wandered back to this simple treat for childhood. I decided I would just make a pie crust and make something fantastic.


While at first, my family was skeptical that pie crust cookies could actually be good, now they beg me to make these at least once a month! The recipe is similar to a shortbread, it is so easy to make that anyone could make these!
Ingredients
2 1/2 cups of flour
1 cup of chilled butter
1/2 teaspoon of salt
1/2 cup of ice water
1/4 cup of sugar
2 teaspoons of cinnamon

Directions:

In a large bowl, combine flour and salt. Cut in butter until mixture resembles coarse crumbs. Stir in water, a tablespoon at a time, until mixture forms a ball.
Roll dough out until it is about 1/8 of an inch thick
Sprinkle with the cinnamon and sugar and slice into chunks, strips, wedges, whatever!
 Bake for about 20 minutes at 350 degrees.


Hungry for more?
Check out this recipe for the kids:
Super soft play dough