Showing posts with label diy. Show all posts

DIY Pencil Pouch for Back to School

In a few weeks, we will begin running over supply lists and stocking up on essential items for the school year. This year, why not DIY a few supplies to save some cash and make your child's supplies stand out from the crowd?

I made a DIY pouch for my son to store his pokemon cards in earlier this week, and I knew that this would also be perfect for storing his pencils and markers during the school year. This was so easy to make! It is a perfect craft for kids of all ages, including teens!

You only need 2 materials for this DIY Pencil Pouch. You can buy them both at Dollar Tree if you don't already have them to make this a super economical craft!

All you need is a zipper seal baggie and printed duct tape. I used one gallon sized bags. As you can see in the video, I folded my baggie about 1/3 of the way up and taped it to hold that way, just to make the pouch a smaller size for smaller hands.


This is so easy to make. You can have it finished in under 5 minutes for a sturdy, handy pouch you can use in so many ways. From storing pencils and pens to holding treasures like Pokemon cards or even makeup!


  • Begin by tearing duct tape to fit the width of the baggie.
  • Layer it from the bottom to the top.
  • Fold the sides over then flip the bag over and continue to layer tape from bottom to top.
  • Then stuff it with the contents of your choice.
  • Now you have a super easy and economical back to school supply that will be a one of a kind!


You might also enjoy this post on how to save money on back to school clothes

How to Make Popcorn in the Microwave

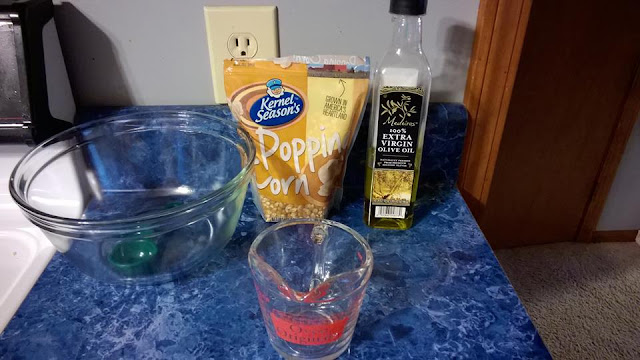
Popcorn is a great snack option, but the prepacked varieties are loaded with fat, salt and calories. I figured out how to pop my own healthy and tasty popcorn in the microwave. You are going to love how easy it is to make fresh popcorn, not to mention how economical it is too!


Ingredients
1 teaspoon of Olive Oil
1/4 cup of popcorn kernels


a medium size glass bowl
A plate that can cover the glass bowl


Directions
Add olive oil and popcorn to the glass bowl.
Cover it with a plate and microwave it for 2 -3.5 minutes
Remove from microwave when the popping slows to one pop every 2 seconds.
Enjoy!


Easy DIY Puzzles for Preschoolers

We love puzzles, but it seems like my kids lose a lot of the pieces in a short amount of time. When I learned about making our own puzzles a while ago, we were hooked. If a piece gets lost it is not an issue as we can make a whole new puzzle for pennies!

This is such an easy project you are going to wonder why you have never made these with your kids before!  It requires basic supplies and only a few moments of time to create. There is no prep time to speak of, and best of all your kids can make these on their own!


All you need to make puzzles are:
Clear tape
Classic Washable Markers
Craft Sticks


First, tape the craft sticks together.


Then draw a design on the opposite side.


Color in the background.


Peel the tape off of the back and scatter the sticks. And there you have an Easy Puzzle for toddlers and preschoolers. If you have older children, you might want to check out my idea for an easy DIY photo puzzle

These make a great gift idea for anyone wanting to give a sweet gift for a little one on a tight budget.


Apple Tree Window Cling

Fall days are the perfect time to find inspiration from nature and create fun crafts with the kids. This easy DIY window decal comes together within a few moments and adds a colorful touch to your windows. The kids will love displaying their artwork for the world to see!


This is such a simple project you guys! For $2 you can make a dozen or more window decals to add a festive fall touch to your windows! Best of all, this imaginative craft is perfect for the kids!

To make an apple tree window cling you will need:
Transparent contact paper, cut to the size you wish to work with. We used a 6'x4" section.
Tissue Paper Squares in dark green and yellow
One strip of brown construction paper
Scissors


First peel the backing off of the contact paper and lay it sticky side up. Add a strip of brown paper for the tree trunk.


Cut several circles from your yellow tissue paper, place around the tree trunk.


Next lay your squares of green tissue paper over the yellow dots, forming the leaves of the tree. 


Finally, find a window that gets a lot of sun and smooth the sticky side to the window. It will peel off without mess or residue whenever you are ready to take it down.


I love this craft for kids because it introduces them to a sticky texture to work with, and manipulating the paper into the right placements is great for fine motor skill development.


You might also enjoy this Fall Tree Silhouette Placemat Craft for kids.


Upcycle Coffee Can Project

I have a big serious love of contact paper! You guys! This stuff is amazing! I have to stop myself when I get on a kick to buy contact paper because I want it ALL! I see different colors and prints and I think about all of the possibilities of projects I could work on.

You might remember that I made a DIY Blanket Box for under my daughter's crib a few months ago. That got me on a contact paper craft craze! Nothing was safe from my stash of contact paper! I created a few decorative containers that can be used for so many things!

I used mine to store markers in, as well as a really cute and simple way to organize kitchen things like wooden spoons and glass straws.

Materials needed to Upcycle a Coffee Can into a decorative storage container:
Contact Paper in your choice of prints.
Scissors
A clean coffee can or two
A utility knife


This project was so easy to do!

First, clean the interior of the coffee can to be sure there are not coffee grounds there!

Next make a measurement on how long and wide to cut your paper based on the size of the can. This is what I love about contact paper... it is so easy to measure, cut and work with!

Peel a small strip of the backing off of the contact paper and place it on your coffee can. Slowly, peel the paper back while smooting the adhesive paper to the surface.


As you cover the can, you are likely to have a little excess around the rims. No biggie, this is so easily remedied! You can use your utility knife to trim around the rims really easily! Just be careful, as those things are crazy sharp!

Everyone that sees my upcycled coffee can says "Where did you get them?" They are really cute, they used to match my kitchen perfectly before our move, and they have been surprisingly easy to keep clean {use a baby wipe}!

This upcycle project really didn't cost me anything to complete as I had materials on hand already, but I would say a thrifty shopper could find contact paper at Dollar Tree and make 4 of these {estimate} for $1.


Do you ever reuse a coffee can? I would love to hear how!

DIY Photo Puzzle

My kids and I are really into crafting right now. On cold, rainy and yucky days like we have been having a lot of in Ohio, there is nothing better than digging into my craft cabinet and pulling out a few projects to entertain us when the weather is keeping us inside.

On one particular day, we ended up with a stack of duplicate photos and I knew that these should be put to good use instead of sitting in a photo box or ending up in the trash. After a few moments of careful consideration, I realized that a few craft sticks and some glue would take these double photos from miscellaneous junk into a treasure for the kids.

We came up with these DIY Photo Puzzles. We had so much fun gluing them together that we made a few to share with Grandparents and Daddy, as well as a stack for the kids to tinker with.

To make a DIY photo puzzle all you need is:

A photo
craft sticks
your favorite adhesive {we used glue sticks}
A utility knife

This project is so easy to make! All you need to do is:

Lay the picture side of the photo down and add glue to the back liberally.


Line up craft sticks across the back on the glued side of the picture.


Press firmly to allow the glue to bond to the craft sticks.

Flip the photo over

This step should be completed by an adult as utility knives are crazy sharp.

Carefully cut the photo between the sticks, continuing until the photo is cut into strips backed with a craft stick.

Allow the glue to dry.

Mix up the pieces and assemble the photo puzzle.

These are so much fun to give to people and they are a great challenge for my preschooler. My toddler finds them too difficult as of now, so we are going to make a few easier ones from cards we received over the 2015 holidays for her.

If you are looking for a last minute DIY gift idea or just a fun surprise for the kids, this one takes about 5 minutes tops to complete and is sure to bring a smile or two! Best of all, you likely have materials on hand to complete this project making it very frugal!


DIY Blanket Box

I had this really great box. I had been holding on to it for several months because I have a cardboard hoarding problem. Ha! It is true, I will say "Ohhh! I am going to make a cardboard bed with that box..." and my husband will nod his head and say "Great idea!" or maybe "Interesting." He is patient and will give me a few days. If the box remains untouched, he sweetly breaks it down and recycles it to keep my hoarding to a minimum.

This box however I had managed to keep stashed out of the way in a closet used for coats. We haven't needed jackets in months now, so no one has been in that closet. Until one day. I saw him open the door. His eyes locked on the box.

He asked "What are you doing with this box?"
I knew my time was limited. It was a great box... I couldn't lose it! My mind went to work and I came up with a great way to use it and make it look pretty too!

From a swifter box to a blanket box in under 5 minutes. This project cost me about 50 cents to complete which makes this not only an upcycle, but also a frugal organization project in one.


I purchased my contact paper for $1 at Dollar General. I have enough to do another box about the same size.

First I unrolled enough paper to cover the top.


I peeled a small section of the paper off of the contact paper to carefully begin applying it to the lid of the box.

Then I did the same for the sides and the bottom.


I took a hard plastic case and smoothed out the bubbles and wrinkles in the contact paper the best I could.

My edges were a touch uneven, but that is okay. I highly doubt anyone is going to inspect my blanket box for perfection.


This box is great for storing baby blankets and it fits perfectly under Harp's crib.

This project only took a few minutes (5) and it created a really useful organizational tool for my daughters room!

DIY Organizer (under $11 and 11 minutes)

Storage space in my home is an issue. We have 2 real closets. One is packed tightly with clothes, dvds and a filing cabinet. The other contains clothes the kids aren't ready to wear size wise, an embarrassing stack of magazines I haven't got around to reading,piles and piles of kids books that won't fit in the bookshelves  and extra diapers. In 2 of our bedrooms we have a shelf with a clothes rack attached to it. (It is not the same as having a closet!)

Now imagine your home with very limited closet space. Where would you store... anything/everything?


I created something that works well with small toys, odds and ends or anything that you might store in a small cubby. I purchased round plastic baskets from Dollar Tree. I went with what they had at the time, but have since seen larger round baskets and mid size square baskets that would work better for this project.

To create one organizer with 10 cubbies you will need:
10 plastic baskets
zip-tie closures
a hole punch


Start with 2 baskets. Line the handles up and secure the baskets together with a zip tie.


Continue adding baskets until you have 4 in a row on the bottom.


Now comes the tricky part. You will need to place your next 3 baskets on top of the 4 that are attached to each other. Get an idea of where you will connect the bottom row of 4 and this new row of 3. You can mark with a permanent marker if this helps. You will take your hole punch and place a hole on the top of the baskets on the bottom row and the bottom of the baskets on the new row. Then attach them with a zip tie.

Repeat with the next row of 2 baskets.

Repeat with the next row of 1 basket.

And this is what you have:


Please excuse my mess. 


To finish this project simply snip the tails of the zip ties.

This organizer was so easy to make. It was completed in under 11 minutes and I spent under $11 to make it.
Use this up against a wall for support.

I made 2 of these. One I use to store baby clothes. This made it so easy for my husband to help with the baby. I have a bin of onesies, pajamas, long sleeve tops, pants, dresses, socks & shoes, headbands and etc, baby blankets and jackets. Now he can see at a glance what the options are without messing up drawers.

The other I use as my own storage solution. Here is an embarrassing confession. I used to have a plastic box intended for under the bed storage of blankets that I just stashed random stuff in. One day I realized I had filled the box up... with basically junk. Samples I got in the mail, nail files, stationary... yeah just junk. Now I have a bin for headbands, a bin for lotion, a bin for stationary and so on.

I had intended to use these to get my son organized. But, I ended up going another route, which you can check out in a future post.