Showing posts sorted by relevance for query craft stick. Sort by date Show all posts

10+ Christmas Tree Ornaments to Make

I have been making a ton of ornaments this year. The kids think it is a lot of fun to get out the glue and the glitter and get creative! Well, let's be honest, I do too! My oldest has been making lots of cute things at school to bring home and share too!


To keep up with the fun of creating at Christmas, I have 10+ ideas to share with you from some of my favorite bloggers! All 10+ of these are easy and adorable! I hope you get a chance to try them, or any of the ornaments I have made live on the Quirky Momma facebook page.


Favorite craft ideas


Felted Wool Christmas Trees

Sparkly Sequin Ornaments

Essential Oil Diffuser Ornaments

Cinnamon Applesauce Ornaments

Stacked Christmas Tree Ornaments

Craft Stick Trees

Pipe Cleaner Beaded Trees

Glitter Clay Trees

Easy Accordion Trees

Noodle Popsicle Stick Trees

Easy Button Tree Ornaments

Live Video Projects


Etched Glass Jars
Candy Cane Wreaths
Popsicle Stick Ornaments
Christmas Houses
Toilet Roll Snowflakes
Washi Tape Cards
Toddler Christmas Tree Crafts
Tree Ornaments

If you have an idea for a Christmas ornament, I hope you will share it in a comment!

minions puppets

This super simple popsicle stick craft brings the fun of the minions to your craft time! These are great for book-markers or as the star of a dramatic play session!


There is nothing like a toy you make yourself! On a rainy day a little imagination can go a very long way. We made these DIY minions puppets on a whim and had so much fun playing with them! I know your kids will like them too! They came together in a few moments time and kept the kids entertained for at least an hour!  

To make this easy Minions Puppet Craft you will need:
craft sticks
Blue and Yellow Paint
Craft Eyes

Instructions:
Paint the bottom half of the craft sticks blue.
Paint the top half yellow.
Add an eye and here you have easy minions puppets!

If you have an idea for handmade puppets for toddlers and preschoolers I would love to hear about it in a comment. 


Green Button Tree Kid Made Ornaments


Making a handmade ornament with the kids can be a lot of fun for the holiday season! These button trees are so easy to make and adorable for gifting something handmade from the heart this Christmas. Everyone loves a kid made ornament to display on their tree! 


Last weekend I found a great deal on dyed craft sticks! 80 for $1. What a bargain! This inspired us to make a ton of fun craft stick ornaments to share this holiday season. I am going to be bringing them to you, so that you can make something cute with your kids to share with friends and family.


These kid made Christmas ornaments came together in just a few moments. We used hot glue for instant gratification, but you can use white or PVA glue if you have patience!

You will need:
4 craft sticks, I used green.
Buttons
4" of  thin ribbon
3" of thin ribbon
One small bell
Glue

 Make a triangle shape and glue it together.
With your remaining stick, cut it in half. This will be your tree base. Glue it on the bottom.


Glue buttons on to the tree in any pattern you prefer. We used blue and green for this ornament and loved the way it turned out!


Flip the tree over. Thread a small bell on the 4" section of thin ribbon. With the bell in the center, glue it on the tree so that it dangles to the middle section of the tree.

With the other 3" of thin ribbon make the loop for hanging from the tree!

Now your button tree ornament is finished. Hang it from your tree, attach it to a wrapped gift, or share with someone special!


This was a cute and fun project to make with Rolf. We love kid made ornaments and have several other variations of this to show you over the coming weeks. From my family to yours; Happy Holidays!

3D Paper Tulip Craft

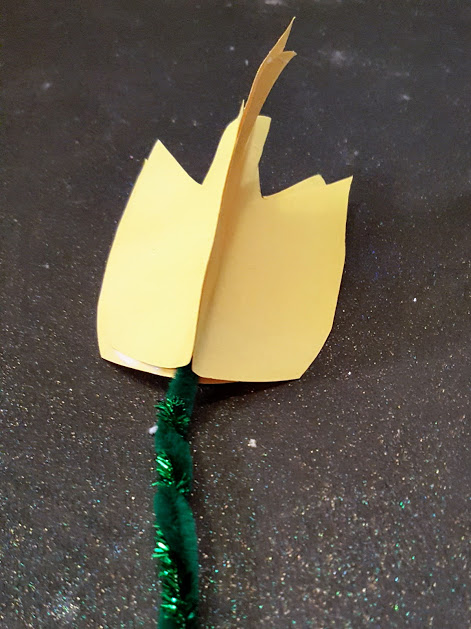
This easy craft is perfect for spring! Requiring simple supplies, this 3 d tulip craft comes together in a matter of moments to create a sweet craft for the kids!


This craft comes together super fast to create a cute 3 d project that is perfect for spring! These tulips are pretty in any color! So, feel free to use a different color than yellow if that is what you like!

We made these on a rainy day to get crafty and pass the time indoors. We shared these with special friends to brighten their day too! How fun right?!
You will need:
3 sheets of yellow paper
school glue
green pipe cleaner
scissors

To begin, fold 3 sheets of paper in half. 
Draw your tulip shape on half of the paper, then cut that
Glue on half on to a second half, then glue the third sheet.
Stick your pipe cleaner in the center of the flower and secure with extra glue.

I think a bouquet of these would be a fun way to add a touch of spring to your decor! Stick them in a jar or vase for flowers that won't wilt!


You might also like these crafts:
Toddler Tulip Art
10 Spring Flower Crafts


Making Sandwiches with Harper {Kids Craft}

A few days ago, Little Miss Harper wanted to help me make lunch. I love her eagerness to help and her interest in learning. But, on this particular day, I wanted to keep her busy and out of the kitchen, as I was in the middle of a project.

I asked her if she wanted to make paper sandwiches while I made lunch, it sounded appealing to her! I had a collection of paper sandwich fixings ready for an occasion like this. I found a yellow glue stick to imitate mustard. Harper was all set to make sandwiches!

To prepare for this activity I had previously cut the following shapes from construction paper

bread shapes  white paper
red circles for tomatoes
squiggly green leaves for lettuce
yellow squares for cheese
brown circles for meat

You will need a glue stick. Red or Yellow is fun with this paper food craft, like ketchup and mustard!


As you can see, this activity is completely basic. Construction paper and glue. I offered Harper ample supplies for building sandwiches. To keep her busy and having a lot of fun!


She began by adding mustard to the bread and adding tomatoes.


Next up was cheese! 


Harper was completely into this craft. She loved making sandwiches. She added layer upon layer, happily crafting while I made lunch!


My kids both love a good paper food craft! If I find myself with a few extra moments and a pack of construction paper I make little craft bags for occasions like this day.  They are always a huge hit with my kids. They have enjoyed making paper cookies, paper pizzas and paper jam sandwiches. These are the best kind of kid food crafts in my opinion because they are virtually mess free and they are really a lot of fun!

Easy Yoda Puppet

May the 4th is right around the corner and Star Wars fans will love this super easy and cute craft to add a little force fun to the special day!


                                        My son Rolf, is the biggest Star Wars fan ever.

He loves to play with Star Wars action figures after school! I wanted to add something fun to his daily Star Wars play and I made something cute and easy to delight him!

This is so easy, all you need are 2 ovals of green paper, a circle of green paper, a popsicle stick, 2 googly eyes and some glue.


Begin by gluing the oval ear shapes to the large circle of paper.

Next glue those onto the craft stick.

Add the eyes and draw on a smile.
There you have an easy Yoda craft puppet!


A is for Alligator Craft

Now that Harper is in preschool, our projects have become intentional. I want to make sure she is getting the support she needs to put all that she is learning to good use! We have been taking our time exploring the alphabet and having a lot of fun doing it too!


Today, I want to share a fun letter A craft with you that comes together in a matter of moments and takes a bite out of craft time and makes letter recognition a lot of fun for preschoolers!

This post includes partner links.

To make the A is for Alligator Craft you will need:

2 x 4" strips of green paper
1 x 2" strip of green paper
2 x 2" strips of white paper
1 googly eye
glue stick
scissors


Directions:

  1. With the 2x 4" strips  and 1 x 2" strip of green paper form your letter A and glue it in place.
  2. Cut teeth shapes in the 2 x 2" strips of white paper. 
  3. Glue the teeth on the legs of the A.
  4. Glue the googly eye on to the top of the letter A.


If you have a fun craft idea for the letter A I would love to hear about it in a comment!


Crafts Where the Quality of Your Water Matters

Water is important not only for your health but also in various processes. In its purest form, there are many uses for distilled water. You can improve water quality through systems like Brita reverse osmosis and use it for various applications. For instance, several crafts require you to use high-quality water. This article discusses some of these crafts in detail. 

Making Homemade Perfume

Perfume making is a craft that needs high-quality water. Instead of using a perfume that everyone else is using, you can make a unique one using different ingredients. Listed below are some of the materials you will need for this craft:

  • Distilled water

  • Fragrance oils, essential oils, flavor, and infused oils such as vanilla extracts

  • Glycerin


Other materials you will need include a decorated glass bottle to store the finished product (preferably colored glass), measuring spoons or cup, a glass jar for mixing the fragrance, wrapping paper or aluminum or wrapping paper, especially when using clear glass bottles, a funnel, dropper, pencil, and paper for writing your recipe. 

Advantages of Homemade Perfumes

There are several advantages of homemade perfumes; here are some of them:

  • They do not contain ingredients grown with toxins, pesticides, or chemicals, leading to environmental damage and skin sensitivity. 

  • By using natural and essential oils to make homemade perfume, you create emotional and physical healing properties such as mood-lifting, relaxing, energy-enhancing, and calming. 

  • Compared to perfumes with synthetic properties, homemade perfumes are not tested on animals. The ingredients in mass-manufactured perfumes include musk and phthalates, which can cause harm to animals. 

  • Non-natural fragrances mask the wearer's skin, while homemade ones create a more individual and personal scent. 

Canning Fresh Produce

This is another craft that needs high-quality water. By preserving food, you encourage certain bacteria to crowd out harmful bacteria. Preserving food also means freezing time to prevent it from going bad. Canning is one of the most reliable methods of preserving food. This method relies on distilled water for the best results, and you can buy distilled water online which makes this a lot easier.
 

The simplest method of canning is water bath canning, where you fill jars with acidic foods such as cucumbers, berries, or tomatoes mixed with vinegar. Cover them in a pan of distilled water until a seal forms under the lid. This process forces air out of the food and then out of the jar, creating a vacuum in the acidic environment. By doing so, the harmful bacteria will not survive. 

Water bath canning can also create several delicious foods such as jellies, jams, pickles, and whole tomatoes. If you have advanced equipment, you can try out pressure canning. Even though this procedure requires specialized equipment and more skills, it can unlock a wide range of flavors and food options. Keep in mind that the success of this process comes down to minor details like the quality of water you are using — always ensure it is distilled! 

Making Cosmetics

Quality water is also needed in making cosmetics. In this craft, water plays a very important role. Given that water can dissolve the highest number of solutes, it can dissolve most ingredients used in making cosmetic products. This makes distilled water an essential ingredient in making cosmetics, from shaving creams to shampoo.

Even in the mass manufacturing of these products, pure water is needed. This is because the presence of unwanted particles like magnesium and sodium can interfere with the precise and delicate production of cosmetic products. Distilled water doesn't contain any impurities, making it perfect for use in the production of cosmetics. Furthermore, since cosmetic products are mostly used on the skin, pure water is the most reliable, as it does not contain any chemical that can cause irritation.

Making Fun-Shaped Ice Cubes

This craft needs water without any impurities. Distilled water can make shiny and clear ice cubes in less time compared to contaminated water. The process of making ice at home is simple. Start by filling your decorative shapes with distilled water. Then, stick it in a freezer and wait for several hours.

Releasing the ice is not complicated either. Take out the ice shapes from the freezer, twisting or spinning slightly to allow the fun shapes to pop out. This will get you perfect fun shapes ready for consumption! It is important to keep in mind that ice in any form should only be made with distilled water. Anything other than that could result in poor-quality ice or impede on the flavor of your preferred beverage.

Finally

Several crafts use distilled water. This article has discussed some of them and how distilled water is used. You can try out any of these crafts at home!


Shamrock Puppet

St. Patrick's Day is near and I have a really cute and easy shamrock puppet craft for you! 


This is such an easy craft for the little ones! It requires super simple supplies to create a cute way to spread the luck of the Irish!


You will need: 
One sheet of green paper
Glue
Scissors
A green kwik stick

Cut 4 green hearts out of the paper . 
Paint the stick green, it will dry in under 90 seconds if you use Kwik Sticks.
Glue all 4 hearts on to the stick, point in.


We also have a great 3D Shamrock Craft you might enjoy!


Thing 1 and Thing 2 Puppets

Thing 1 and Thing 2 Popsicle stick puppets come together easily with minimal supplies to create an invitation to engage in dramatic play for toddlers and preschoolers!


My 3 year old loves to play with puppets and I love to encourage dramatic play for her developing mind! We made these super simple little puppets which were the perfect size for her small hands. She loved including Thing 1 and Thing 2 in all of her pretend play!


These are so easy. All you need is:
2 Popscile Sticks
Red Paint or Markers
4 googly eyes
a small bit of blue paper
2 small rounds of white paper
a pen or marker
Glue


Instructions:
Paint or color  2/3 of the craft stick red
Cut the blue paper to look like 2 shocks of hair.
Glue the hair on each stick
Give the sticks 2 eyes
Write Thing 1 and Thing 2 on the circles of paper and glue it on the center and you have your easy and fun puppets!


These are perfect for an easy peasy play session or a fun way to celebrate Dr. Seuss's birthday.


Itsy Bitsy Spider Craft

If you spend a lot of time listening to preschool music like I do, you are going to LOVE this easy Itsy Bitsy Spider craft that I made with my kids. This was so easy to assemble and so much fun to make. This is suitable for preschoolers and my 8 year old enjoyed it too... even though that is a baby song.


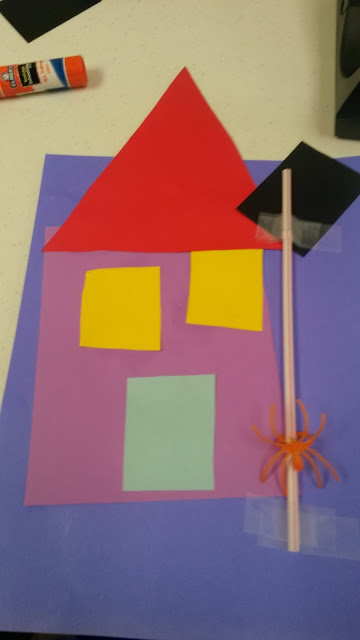
The Itsy Bitsy Spider House

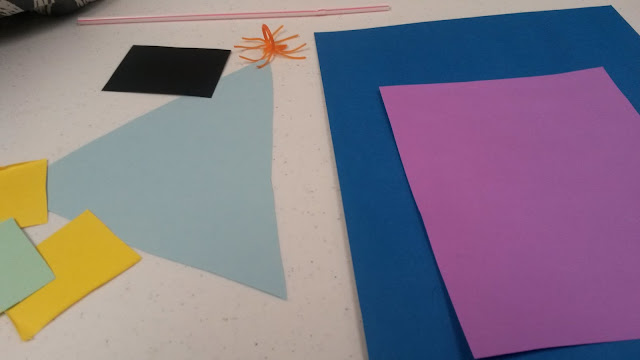
You will need one full sheet of colored paper 
one 4x6 inch square of paper in another color
one triangle in another color (to make a roof)
2 2x2 inch squares of paper that are the same color.
One 2x2 inch square of paper in another color
One 1x3 inch strip of black paper
One Straw
One spider ring
2 strips of tape
Glue Stick


First Glue your 4x6 inch square of paper onto the full sheet.


Then glue on the triangle for the roof, and the 2 squares of paper that are the same color for windows.

Next add your door and your chimney.

Tape your straw to the side of the house on the bottom.
Slide the spider ring onto the straw from the untaped top.
Tape the top of the straw.


You can sing the itsy bitsy spider song with your kids, and have them move the spider up the spout! How cute right?


We had a lot of fun with this super easy Itsy Bitsy Spider Craft. I love that with such simple supplies we were able to create something so entertaining. 

This is not the only craft we have that  makes use of straws . You can give used straws a hot water soak and reuse them too to help reduce waste!
You might also like

Straw Necklaces; bling made for kids, by kids.
Straw Flutes; hey, why not?


Time Out Jar

I first made these calm down jars in 2014. My kids were so small that we used plastic, just in case they were dropped or thrown during a tantrum back then. While the children have grown so much since then, I have made these with them a few times. I have updated the post and included a few new photos for you.


Photo Credit: Sara Lehman.

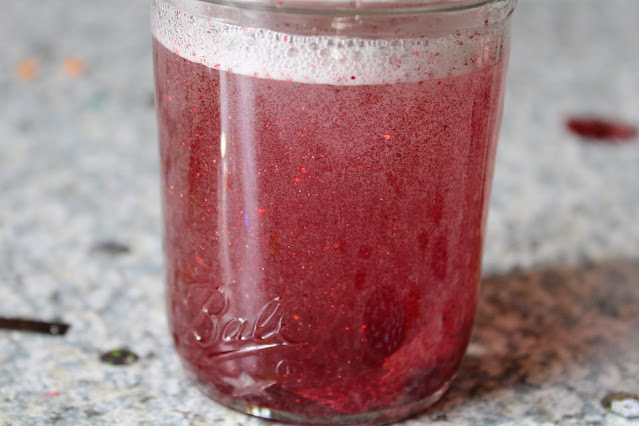
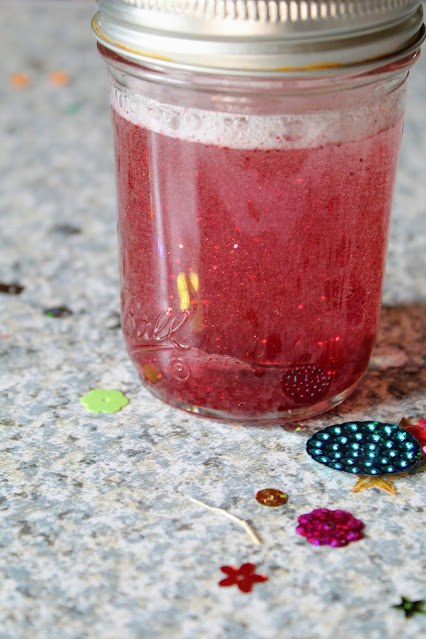
If you need an idea that brings a little more zen and fewer tantrums, let me introduce you to the time out jar. You can call these whatever you like; a meditation jar, a calm down jar, or a time in jar. The idea remains the same, this jar can help your kids take a minute to collect themselves after a meltdown, or offer them a quiet minute for themselves anytime they want it. Plus, the results are pretty and relaxing to watch.


Photo Credit: Sara Lehman.

Make these with a plastic container, like a treehut body scrub container, if you have little kids.
If your kids are older, and would be more likely to use this as a meditation tool, feel free to use a mason jar, or even better, recycle a used food jar, like a pasta sauce container.

Photo Credit: Sara Lehman.


This is an easy craft, that all ages can help with. It is cool enough to get tweens interest, and you can use your favorite colors and whatever glitter you like. We have even added chunky confetti to time out jars.


Photo Credit: Sara Lehman.

Supplies:

1 to 2 tablespoons of glitter glue

Chunky Confetti

Glitter 

A mason jar and lid

1 ¾ water

A craft stick


Photo Credit: Sara Lehman.

Pour the warm water in the container with the glitter glue.

Photo Credit: Sara Lehman.

Add a drop or two of food coloring to the glue and water.

Photo Credit: Sara Lehman.

I lined the lid of the container with glue and firmly sealed the jar.

Photo Credit: Sara Lehman.

And here you have a TIME OUT JAR.


Photo Credit: Sara Lehman


You can find all of my sensory ideas here.
Egypt Sensory Play
Feeding Sharks Sensory Bag


Shiny Happy Pumpkin Craft

I know it is early into the month of September. I get it, it is still summer technically, but you guys... I can't resist making some awesome pumpkin crafts with my kids!

Today, we were ready to jump into the fall theme of things, so we surveyed our craft supplies and made these Shiny Happy Pumpkins! My almost 3 year old loved these large sequins and thought they were beautiful! I have to admit, this is the shiniest fall craft we have ever made, they do look happy too!!


To make a shiny happy pumpkin you will need:
A Paper Plate
White School Glue
Black Construction Paper
Scissors
Large Sequins in Brown, Burgundy and Orange


Apply glue to the paper plate, be generous!


Start filling in the plate with the large sequins. This is a great fine motor activity for kids of all ages! The sequins stick together and working them apart is great for little fingers!


As you fill in your plate, cut eyes and a mouth for your shiny happy pumpkin. With glue apply the facial features to the sequined plate.


And there you have a Shiny Happy Pumpkin!