Showing posts sorted by date for query kids birthday. Sort by relevance Show all posts

Cat in the Hat Pattern Making Sensory Bin

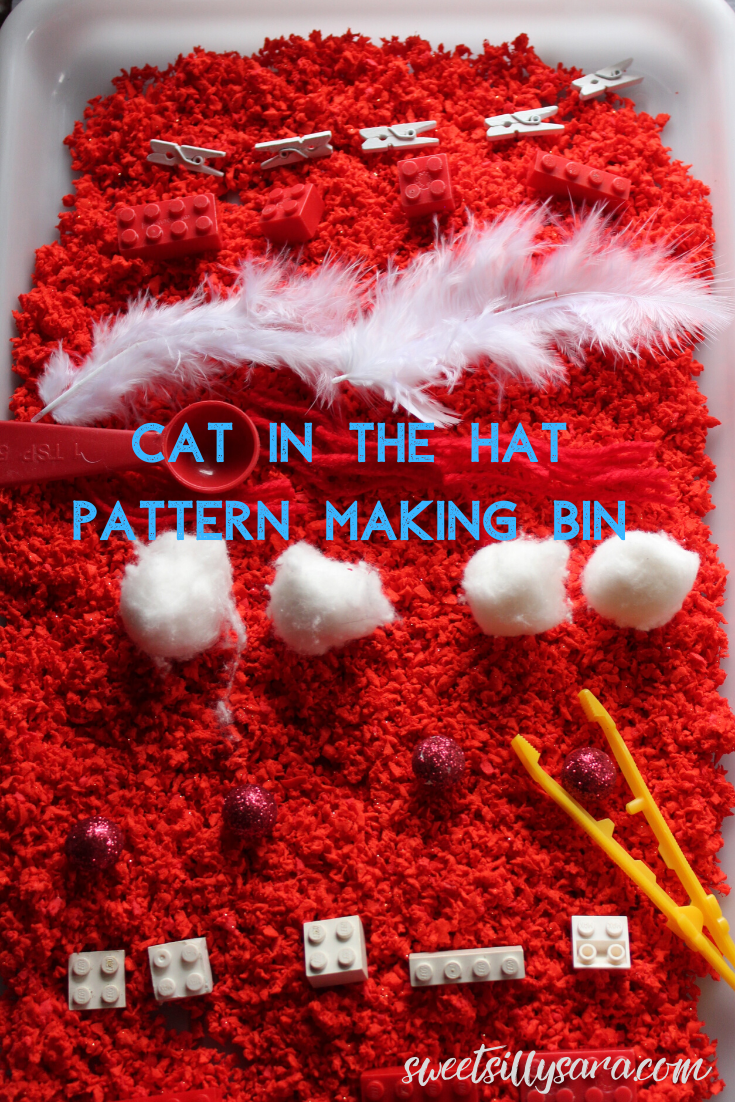
This year in honor of Dr.  Seuss's birthday we made this easy and fun Cat in the Hat Pattern Making sensory bin. This is a fun way to put your puffle to good use and work on pattern making skills which later help kids grasp math concepts.


This post contains affiliate links. 
We love sensory bins, bags and play! Both of my kids still get excited when they see I have a new bin ready to explore. This one was a huge hit because they had been itching to get their hands into pluffle. This is such a fun squishy foam! It is a must have for sensory play!


Supplies:
Assorted red and white items.We used cotton balls, feathers, legos, mini clothespins and glittery Christmas scatter
Measuring spoons, tongs and other fun items to pick up the items in the bin with.
A large tray or a plastic storage bin.


Directions:
Pour pluffle on to a tray or into a storage bin.


Make sure you take a moment to squeeze, form and otherwise take in the pluffle; it is a great sensory play option and adults will enjoy the texture too.

Next, offer your child an assortment of red and white items.


We used tiny clothespins, legos in red and white, feathers, cotton balls, and Christmas scatter that was glittery and red.

Encourage your child to recreate the stripes of the Cat in the Hat's hat.
This is a great opportunity to use fine motor skills with the spoons and tongs. Encourage your child to try placing the items with those tools as well as their fingers.


When play time is over, you can snap a lid on the bin, or put it all back in the pluffle container for future play sessions. Pluffle never dries out!


You can find all of my sensory ideas here.
Favorites include:
Rainbow Rice BinVeggie Garden Sensory Bin


Button Sensory Bag

Sensory Play doesn't have to be complicated or messy! This easy button sensory bag is perfect for keeping little hands busy and eager minds learning. Best of all, it comes together in just a few moments!

Hair Gel Button Sensory Bag
Add caption


Sensory play is awesome for kids. It is fun, and can be as simple or as complicated as you wish. I love to give my kids the tools they need to play, learn, and relax. This button sensory bag is easy to make and can serve several purposes.


The button sensory bag is perfect for quiet reflection time. I made this for Harper on one of those rough days when she needed a chance to unwind. As she got herself together we used this bag for sorting colors and shapes. Manipulating the buttons is awesome for fine motor practice.


                                                          This post contains affiliate links.

Supplies Needed:
A zipper seal sandwich bag
Hair gel


Directions:
Place aout 1/4 cup of hair gel in a zipper seal bag.


Add glitter to the hair gel. I thought blue was a nice touch, but you can use whatever color you like.

Add assorted buttons.

Seal. If your child is young or has "rough hands" You might want to reinforce the edges and opening with duct tape.


Invite your child to explore the bag. Squish it, sort colors, or sort by sizes.

You can find more sensory activities ideas here:
Birthday Cake Sensory Play is always a hit!
Flower Garden Sensory Bins are perfect for rainy days!

Sensory Party in a Bag


Sensory play doesn't have to be complicated or messy to be fun! This sensory party in a bag is the perfect way to engage little hands without a mess, or a lot of complicated supplies.

We love sensory play! When Rolfie was a little boy we discovered the world of sensory bins and have never looked back.

I used to think that sensory play had to be complicated to be fun. After about 7 years of making bins and finding way to engage the senses via play, I realized that sometimes less is more.

This sensory party in a bag is a great example. Sometimes when the kids are overwhelmed by their emotions I like to pull out some basic supplies and create an invitation to unwind.  Summer break can be rough, especially if you are stuck with your sibling all day long. After a day of arguing, I surveyed my craft cabinet and pulled out some simple supplies to create this easy sensory bag. It gave both kids a chance to take a break from each other and get their selves together.


Supplies:
Baby oil gel
A zipper seal bag
Dyed rice
Confetti


Directions:
Pour about 2 tablespoons of baby oil gel into a zipper seal bag.


Add a handful of dyed rice to the bag.
Add some confetti.
Seal.
*If your child has "rough hands" you might wish to reinforce the bag with duct tape along all 4 sides to keep it mess free.*
Invite your child to squish the bag and take a few moments to enjoy the cool sensation of the gel in the bag with the texture of the rice, as well as the visual appeal of the sensory party in a bag.


You can find all of my sensory play ideas here.

Reader favorites include:


Cotton Candy Ice Cream Cones

This easy treat is perfect for sharing with a group of kids! On the hottest day, these tasty ice cream cones won't drip because they are made with cotton candy! Everyone loves these cotton candy ice cream cones!


Harper and I are always getting into something. She loves to bake and is known in our home as the making baking girl. But, between friends, my oven really needs to be cleaned before we bake, and I have no idea how to actually do it... google here I come. But, in the meantime, I can't deny my girl her fun in the kitchen!

This post contains affiliate links.

We had a box of sugar cones and Harper had talked me into a bag of cotton candy recently. Inspiration hit, and this is what we came up with. Cotton Candy Ice Cream Cones. To make them "fancy" we dipped them into chocolate and then into sprinkles.

This is such an easy treat to make. They would be perfect for sharing at a birthday party, or in the classroom for a mess free snack. You can make a dozen of these in under 10 minutes.

Ingredients

1/2 cup of Wilton white candy melts 
1 package of cotton candy
Sprinkles


Instructions

Melt the chocolate in a microwave at 50% power for 30 seconds. Stir and repeat until the chocolate stirs smooth.
Immediately dip your sugar cones in the melted chocolate.


Next dip the cones into sprinkles, allow to dry for about 15 minutes.
Stuff the cones with cotton candy.
Wrap in cellophane or serve immediately.


 More easy recipes and crafts 


Reader favorites include:
Mermaid Tails

Homemade Rice Pudding


Stars and Stripes Bin

Bring a touch of patriotic flair to your sensory activities with this easy to set up Stars and Stripes Bin.
It is fun to play in and gives little hands a chance to design the flag. Make it for the 4th of July, or anytime for hands on play.


A few weeks ago I ran across a bag of white sand in my craft supplies and I wanted to use it before it spilled all over my craft room. I had visions of our rascally kitten Richard finding it and using it like a mini litter box. 

I kept poking around in my supplies and found a bag of glow in the dark starts. Inspiration was born.
This was an easy bin to assemble and both of my kids enjoyed playing in this bin. 


Supplies:
Popcorn kernels
Hand sanitizer
Blue food color
Red paper
Small glow in the dark stars
Paint brush
Plastic bin with lid
Scissors
Zipper seal storage bag.


Directions:

To make blue dyed popcorn:
Place about a 1/2 a cup of unpopped popcorn kernels, 2 generous drops of hand sanitizer and several drops of blue food coloring in a zipper seal food storage bag. 
Shake well.
You can allow the kernels to dry in the bag overnight, or place them on a paper towel to dry for several hours.


To assemble the bin:
Cut a sheet of red paper to fit inside of the bin you plan to use.
Pour white craft sand over the red paper.

In the upper left section, pour the blue dyed popcorn kernels.


Add a paint brush and an assortment of stars.


Invite your child to brush sand away to create the stripes.


Encourage your child to add the stars to the popcorn kernels.


When not in use, replace the lid on the bin for easy storage for future play!

Find more sensory bin ideas here.
Reader favorites include:


veggie garden sensory bin

This veggie garden sensory bin comes together so easily to give little ones a chance to play and get excited about their vegetables while working on fine motor skills.


We have a weekly routine in the summer; every Tuesday and Saturday we head to the farmers market. We buy all of the fresh food we will eat that week, plus a little extra to freeze. I love how the offerings change throughout the season. The kids love the sights, the smells and the baked goods. While they might spend most of their visit to the market pleading for cookies, they always jump in the line for our favorite farmer. Who gets to hold the basket and who gets to pick the produce? We always work it out.

Last week while we were in line for our peppers, onions and radishes, the kids were bickering about the basket and the picking job and inspiration hit. I knew right away that I was going to recreate a garden scene for their enjoyment. If they argued about who got to play first, I will never tell.

Supplies:
  • One pound of dried black beans
  • ½ cup of whole coffee beans
  • Leaves from artificial flowers
  • Assorted play food; tomatoes, lettuce, carrots, strawberries etc
  • Plastic serving tongs
  • Sandbox tools
Directions:

Layer the dry black beans in the box.


Add coffee beans to the mix for a fragrant experience.


Nestle the leaves into the beans (I simply removed the leaves from a few stems of
artificial flowers).


Place the fruits and vegetables in the beans and on the leaves.


Add plastic serving tongs and plastic shovels.


Invite your child to harvest the veggies, to explore the beans and to work on fine motor skills
by picking the veggies and beans up with the tools.


This was so much fun for the kids. Even too cool, 9 year old Rolf got involved and explored this veggie garden sensory bin.


This was fun to smell and touch and it gave Harp a chance to work on her fine motor skills.


When you are all finished playing, you can snap the lid on the bin and store it for playtime in the future.


You can find all of my sensory content here.
Birthday Cake Sensory Bin


How to Dye Oatmeal without Water for Sensory Play

Dyed oats are perfect for sensory bins! You won't believe how easy it is to dye them without any water!


I have made a ton of sensory bins for my kids over the years. We have explored rice, beans, sand and even straws as fillers. I knew I wanted to try something different, and inspiration was as close as my pantry. I pulled out some oatmeal and got busy experimenting.


First, I tried soaking the oats in dyed water. That was a fail. They clumped together and formed a soggy mess. I couldn't dry them out. 

Next, I thought about how we dyed rice, and decided to try that method on oats. The results were perfect. The oats didn't clump together and they are so soft!


To dye oats you will need:


  • One cup of oats 
  • Food coloring of your choice
  • Hand sanitizer
  • One Ziploc bag


Directions:


  • Pour the oats into the bag.
  • Add 7 to 10 drops of food coloring.
  • Add a generous dollop of hand sanitizer to the bag.
  • Seal the bag and shake until all of the oats are coated.
  • Pour the oats on a paper towel or paper plate to dry.


Dyed oats are perfect for sensory play. Stay tuned for bins that use dyed oats.

You can find all of my sensory content here


How To Make Paw Print Cupcakes

My best friend, my original baby, my dog, turned 10 a few weeks ago! To celebrate the day we got both of the dogs their favorite treats! A plain burger from Wendy's and a kiddie sized vanilla frosty... {Don't judge... my kids feed them everything and this is simply the favorite people food among my dogs...} but I couldn't stop there. I am a mom of furry babies and human ones too! My kids get really psyched for a birthday! The dogs are no exception!

This year, my 5-year-old declared that we should "invite everyone over!" to celebrate this awesome day, the birthday of one of our dogs...

Considering half of the everyone he wanted to invite are several hours away from our house, I asked him if we could compromise and have a little party with just us. He looked skeptical... he asked, "What about balloons and presents mom?" I said "Well, Fritz {dog} doesn't really like toys anymore, he is kind of like... a grandpa among dogs. He likes to eat burgers and ice cream on his birthday."

My 5 year old frowned. He said "Can there be cake? No? Maybe grandma should come, she can bring cookies..." I laughed at this. Gotta give the kid credit, he wants a treat too! 

We could have made homemade cupcakes, but you know, I have kids! Time for cupcakes was not planned on that day. I turned to a box mix and a can of icing... no special recipe to mention here. 

But, I do have an idea for decorating any kind of cupcakes! This easy (and cheap!) decoration idea might just leave a paw print on the hearts and tummies of everyone you share one with!


You will need per 12 cupcakes:
36 Junior Mints (you will need 3 per cupcake)
12 mini York Peppermint Patties 

Directions:
Bake Cupcakes according to the package.
Allow to cool completely.
Frost the cupcakes.
Place the York Peppermint Miniatures
near the bottom edge of the cupcake.
Add 3 Junior Mints
to the top of the York Peppermint Patty to make the toes.

Now you have a delicious and minty addition to your cupcakes! This is my favorite cupcake decorating tip! It is so easy to make and they are fun! 

Please do not feed these Paw Print Cupcakes to your dog! Yes, I know I made these for the dogs birthday and I told you that the dog got his favorite people food treats for his birthday- but I truly do not like my dogs to eat a lot of people food. I know, I am a sweet mom and all but I seriously, between friends, I NAG at my kids every day about feeding the dogs. Also, your dog should never have chocolate as a treat. It is very dangerous for the health of any dog!

I hope you liked hearing about my best friends birthday and I hope that you liked our special cupcakes!

You might also enjoy this Snickerdoodle Bundt Cake Recipe!