Showing posts sorted by date for query paper plate. Sort by relevance Show all posts

Pineapple Process Art

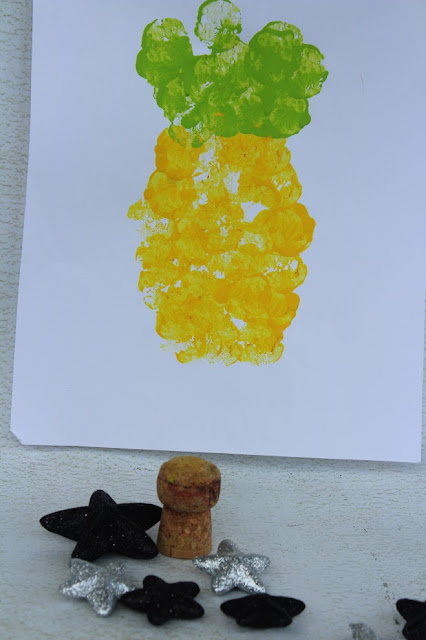
 This pineapple painting project is perfect for little ones. It takes only a moment of set up and it creates such a cute art project! Kids are going to be so proud of their efforts and want to display this project on the fridge door gallery!


Harper and I love to get creative together. We are always crafting, painting or baking something. 
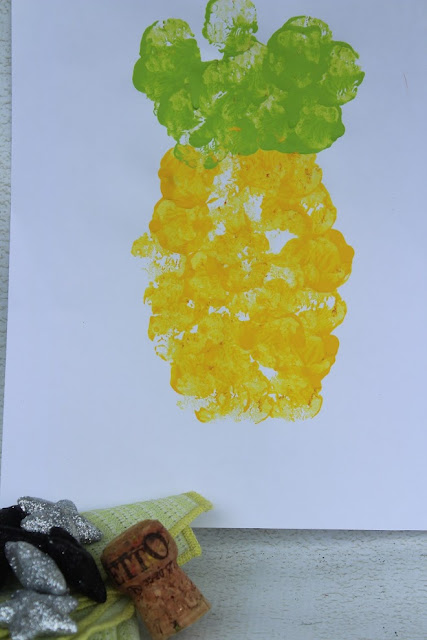
You might remember we made this adorable apple process art with a cork.  Well, we ran across the cork again and decided that it was so fun to paint with it, that we would give it another go. We came up with this cute pineapple art. We love it because it can work for a summer day project, or pull this out around the new year to bring good luck to your space.


Supplies:

Paper Plate

Yellow and Green Paint

A Cork

Copy Paper


Pour a quarter size drop of several shades of yellow and a shade of green onto a paper plate.


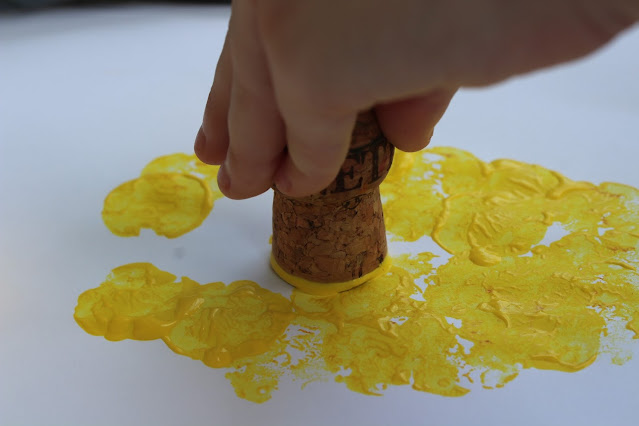
Offer your child the cork and encourage the child to stamp a pineapple shape with the yellow paints.


When the pineapple is shaped encourage the child to form the stem of the pineapple with green paint.


                                                             Allow the art to dry then display.


This is a fun project for summertime, but I also love to make these with the kids in anticipation of new year since the pineapple symbolizes a warm welcome, celebration and hospitality.


You can find more process art ideas here

Basket of fruit process art

Cork and button tree art

If you want to learn more about why process art is important for kids this is a great resource from Messy Little Monster

Christmas Tree Process Art

 This is such a fun way for kids to paint, without using any brushes! It creates a lovely work of art that adds just the right touch of kid made cheer to your space!


My youngest and I love to paint together. We are always thinking of things to paint, without turning to a paint brush. We came up with this adorable process art using only a cork, a pencil eraser, and some paint. This is the perfect seasonal art project for kids.


Supplies:
Paint in green, red, yellow and brown
A pencil with an eraser
A paper plate
A cork
Paper


Directions:
Pour a little squirt of each color of paint on a paper plate.
Offer your child a pencil with an eraser and a cork.
Encourage your child to form the tree shape by stamping in the green paint, then adding one stamp to the paper.
On the next line, make two stamps.
On the third line, stamp 3 times. You get the idea.
After the tree is formed, using the eraser, dip into the other colors of paint, and start decorating the tree.


                     Use whatever colors you like for the ornaments. We used red, blue and yellow.


                                          Next form the tree trunk with brown paint.

                                         Allow to dry and display.

Isn't this such a cute holiday process art idea? Preschoolers and toddlers might enjoy this too!


You can find all of our Christmas crafts here.

Reader favorites include:

Gnome ornaments

Cork and Button Apple Tree Process Art

This cork and button apple tree process art is perfect for preschoolers or kindergartners this fall. It is an easy activity that requires very little prep. 


We love process art, and we love all things fall around here! Harper and I have been hoarding fall decor since we saw the first adorable decorative pumpkin in stores back in July. Rolf is not so quick to jump seasons, but on the first of September, he said "Finally! It is September. Now we can buy all the pumpkins we want without comment." HA! 


Harper and I felt like painting and wanted to start on some fridge decorations for the season. We came up with these adorable cork and button apple trees. They are so worthy of displaying! Plus, they are easy to make!
 

Supplies Needed: 
Paint in Brown and Green
A Wine Cork
A Paper Plate
White Paper
Buttons
Glue


Directions:
Pour a quarter sized drop of both the brown and the green paint onto a paper plate.
Offer your child the cork.
Encourage your child to first stamp the trunk of the tree with the cork.
Then ask your child to give the tree leaves with the green paint.
Allow to dry for about an hour in a warm, sunny place.


When the paint has dried, offer your child the glue and some buttons. We used yellow for this project to make the kind of apples we like. Feel free to use red, green or even a mix if you like. As you can see below we also made one with red buttons, just because we had so much fun the first time.


Encourage your child to spread out the buttons, pressing them onto dots of glue.


Allow the glue time to dry. Then display! This is perfect for refrigerator art!


Are you looking for more awesome apple art projects for kids? 
Here are some favorites:


Basket of Fruit Process Art

Lemon and Limes find a second life after their prime with this easy and fun process art activity! It incorporates an introduction to weaving for small hands with a lot of painting fun. This activity is great for kids of all ages from Toddlers and Preschoolers, to older kids, like Rolf who is 11 now and still had fun with this!


Ok, first, let that sink in. Rolf is 11 now. When I started this blog, he was a baby. Literally, just a baby. And here we are 10 years later. Still sharing, growing and creating. Let's have a big group hug!

Next, isn't this such a cute process art project for kids? I love that the touchy, smelly parts make it super engaging for little hands. If you have been reading for a while now, you know how I feel about sensory play and  projects! (I love them!) Well, I also love to paint with Harper too!  We had a few lemons and limes in the fruit basket that were a little shriveled up and unappetizing so instead of tossing them out, we put them to work in an art project.


 Supplies: 
A lemon and a lime, sliced in half
A paper plate
Glue
Scissors
A brown bag of construction paper
Yellow and green paint

Directions:
Cut the brown paper into thin strips.
Offer your child one strip and encourage the child to glue it to the paper.


As you can see we used 3 vertical strips, then began the under/over process of weaving the horizontal strips.

Keep the weaving simple, you only need 3 vertical and 3 horizontal strips of paper. If your older child is creating this, feel free to encourage a more complicated weave!


Now comes the fun!
Pour a little paint (about a quarter size drop of each color) on a paper plate.


Offer the citrus fruit to the child, allow them to squeeze the juice out and pick at the seeds if they want to. They will want to because it is fun and it smells good! Just have a towel nearby to wipe their hands! When all of the seed picking and fruit squeezing is finished, encourage your child to press the fruit into the paint, and begin filling the woven basket with fruit!


Remind your artist to use all of the fruit and colors!


Allow to dry and display.


This is fun to make in the summer, when we are making loads of lemonade, so maybe save a few lemons after squeezing for an art project? Or pull this out in the winter, when the kids need a break. It is such a sunny little process art project that they are bound to love it!

Flying High In the Sky

This easy to set up sensory bin is perfect for little hands. It is fun to sort thru and play in, and it has a really fun feature for night time play; this Flying High in The Sky Sensory Bin Glows in the DARK!


We have been making sensory bins for about 8 years now.Even though Rolf is a tween and is generally too cool for my projects, even he wanted to get his hands into this one. I used things we had in our craft supplies, but for your convenience I added affiliate links to help you find some of these items that you may not have.


Supplies:
A Storage Bin with a lid
Neon Blue Food Color
A zipper seal baggie
White Rice, Uncooked (2 cups)
Tongs
Glow in the Dark Stars
Cotton Balls


To dye the rice
Place 2 cups of white rice into a zipper seal baggie.
Add 2 tablespoons of non toxic glow in the dark paint (I used art deco brand) and 10 drops of neon blue food color to the baggie.


Seal and shake well.
Pour the rice on a paper towel, paper plate, or something like an old cookie sheet and allow to dry for about 4 hours. You may need to stir halfway through the drying time.

To assemble the bin:
Cut several sections of rainbow ribbon in various lengths from 1 to 3 inches.
Gently "fluff" several cotton balls to resemble clouds.
Pour the dry, dyed rice into the storage bin.


Bury several sections of rainbow ribbon in the rice bin.
Place the remaining rainbow ribbon on the top of the bin.
Bury several plastic glow in the dark stars in the rice bin.
Sprinkle the remaining stars on top of the bin. 
Add fluffy cotton clouds to the bin.
Add the planes and helicopters from the tube of Toobs 


Add a pair of tongs to the bin and invite your child to explore.
The tongs add a challenge to the bin, which is excellent for practicing fine motor skills.


I like to make sensory bins in a container with a lid,so we can snap the lid on it when play time is over and revisit the activity later.  For bins like this that are fun to play with anytime, that comes in handy because my kids want to dig around in this one all the time!


Here is the bin after dark. We LOVE glow in the dark activities


Some of our favorite glow in the dark activities include:
Find more sensory ideas here:

No Tricks Just Treats This Halloween

 Halloween is so close that the kids can almost taste all of that sweet candy they hope to come home with! I knew there would be no better time than now to share some of my favorite Halloween finds from the season with you!

Everything has been out of sorts this year, from the great toilet paper shortage that might keep your house from being TP'ed this season, to the widespread sickness and too much political pressure surrounding the election. This year is the time to go all out with costumes, decorations and treats! Personally, we are going to keep the tricks at a minimum, life has been tricky enough for everyone!

Samples have been provided. Affiliate links may be used.


To kick things off, no matter how last minute it is you can count on Gourmet Gift Baskets to send a great gift to your house, or a special friend. We love the Eat, Drink and Be Scary Bucket of Beer. It has something for everyone in it. A 6 pack of seasonal brews for the adults and a variety of great goodies for the kids. I love the black cauldron style bucket the treats and sips are shipped in. Plus, you can get this at your door in like 2 days time! For under $70, which is nothing to say Boo too!


If you want to bake something wonderful with the kids to share, I highly recommend the pumpkin chocolate chip cookie mix from Lehi Mills. This mix is easy to whip up and creates a really flavorful cookie that the whole family will love. This is a perfect solution for busy families that want to make some memories on a $5 budget.


If your kids aren't going to be doing as much trick or treating this year, why not treat them to some one of a kind zombie fun that will keep going long after Halloween has ended with World of Zombies. Not only are they fun loving toys, but they also have webisodes that kids will love. These are perfectly creepy yet friendly enough for kids of all ages to enjoy. Check out the toys and the show on the World of Zombies site.


Are you looking to make Halloween a little sweeter for the kids, get the bulk packs of Welch's Fruit Snacks for Halloween. You can 110 pouches of tasty fruity treats to hand out to all of the kids in the neighborhood. These are also ideal for families with multiple kids who need to take a treat to school for a classroom party. Order this multi flavor pack in bulk on Amazon for easy treating all season long!


This year, the costumes need to steal the show! Kids have already sacrificed so much this year, that we can't ask them to skip an epic costume! The Ultimate Party Super Store has some incredible option like this Hungry Howler Wolf-man costume for tweens. Retailing at under $30 this is an awesome and toasty costume for kids.


The Ultimate Party Superstore has a ton of options for kids of all interests and age levels. My daughter loves this Justice League Superman costume for girls. I love that they include the girls in the superhero fun! Get this one for under $42.


Gamer girls will delight in the Princess Peach costume. It is so cute for smaller girls and is super affordable at about $25. If you order now you can get the best costumes delivered to your door in time for Halloween!


My kids are both learning from home this year, so I am always looking for ways to sneak a little education into the day when they least expect it. (Hello Xtra Math App...) to keep things interesting and engaging, The Gross Anatomy set from Thames and Kosmos makes learning about the human body a squishy and squealy fun event! Order this fun set for $20.


Aaron's Thinking Putty is the best way to spread glow in the dark fun this year on a budget. For $3 you can get a can of really engaging can of mini thinking putty. This is a great treat to share with kids of all ages.  My kids are big Ghost Busters fans, so the Ectoplasm thinking putty was right up their alley!


If you aren't taking the kids trick or treating for safety this year, why not treat them to a fun camping set from Magformers? These are so much fun to play with and this set is under $40. It will keep the kids entertained all fall long! Grab it at Target for a fun treat the kids will love.


You can find more Halloween fun here:
Reader favorites include: