Showing posts sorted by relevance for query craft. Sort by date Show all posts

15+ Paper Plate Crafts for Kids

If you are looking for easy ways to keep the kids entertained on a cold winter day; this is the place for you! I have found some really fun paper plate craft ideas for kids that are perfect boredom busters! These are all fairly easy, and kids of all ages will have fun with these ideas! Be sure to click thru the links for the tutorials.


BB8 Paper Plate Craft by Attachment Mummy

This paper plate craft is perfect for Star Wars fans! It comes together with basic supplies and includes

a free printable template to make it easy for all skill levels.


Paper Plate Fruit Fans by Family Focus Blog

These fruity fans are the perfect way to beat the summer heat with a craft that kids of all ages can enjoy! 


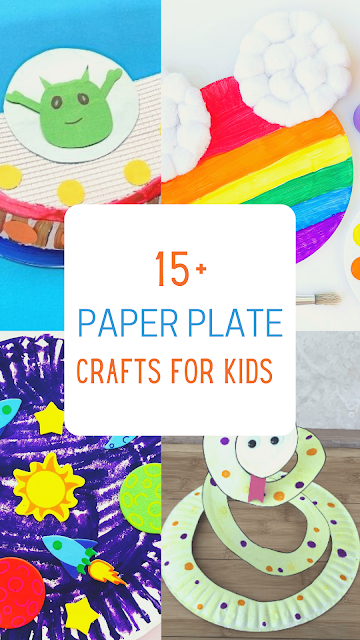
Alien Spaceship Craft by Easy Crafts for Kids

This craft is so cute it is practically out of this world! It all starts with a little imagination and a paper plate.


Mermaid Twirlers by Red Ted Art

These cute little mermaid twirlers are nothing short of adorable and they are bound to make a splash

during craft time!


Yellow Submarine by Lil Tigers

This craft is so creative and gives kids an ocean view like they were diving in a submarine! 


Paper Plate Sunshine Craft by The Soccer Mom

This is the perfect craft for a rainy day! It is bright, colorful and spreads cheer to all who see it!


Space Themed Plates by Glitter on a Dime

Kids who love outer space will be over the moon for this easy paper plate craft that proves that the sky's

the limit to their creativity!


Rainbow Fish Craft by Two Pink Peonies

Pair storytime with a colorful and engaging craft! This rainbow fish craft is perfect for preschoolers!


Paper Plate Woven Bowls by Craftsy Hacksy

This introduction to weaving makes for a great paper plate craft! This is a great craft to make and share

with someone special!


Paper Plate Monkey by Mom Wife Busy Life

This paper plate craft is so cute you might go bananas for it! Kids of all ages will love to make their own

monkeys!


Rainbow Mickey Mouse Craft by Grace Giggles and Naptime

This Mickey Mouse craft is so colorful and cute! Kids are sure to be all cheers for this craft with Mickey

Ears!


Paper Plate Snakes by Mom Brite

This cute and easy craft will slither into your heart! Kids will love making these paper plate snakes!


Paper Plate Animal Masks by Crafts for Toddlers

These masks are so much fun for little kids! They can make a craft then engage in dramatic play for a

really great afternoon!


Snow Globes by Ottawa Mommy Club

These are perfect for kids! A snow globe they can handle with no feat of breaking it, and they are adorable

too!


Eric Carle Inspired Cats by Moms Who Save

This is a visually stunning craft that is perfectly paired with an Eric Carle story! Save this idea for a rainy

day activity for kids of all ages.


You can find more fun paper plate crafts here:
Paper Plate Lions

Paper Plate Witch

Paper Plate Crowns


Paper Plate Crafts for Kids

 Paper plates have always been one of my kids favorite things to craft with. There are so many possibilities for making something fantastic, out of a plain old paper plate! This collection has some really fun ideas for your family to try out. You might not ever look at a pack of plates the same again.


You might notice there are a few of my craft projects listed below. I have been crafting things out of paper plates and Styrofoam bowls since I was a little girl. I can recall my cousin Courtney and I making these super fun flying saucers when we were kids with styrofoam bowls, and it is safe to say, I have been hooked ever since.

Be sure to click through to get the details of all of the projects below.

Paper Plate Lions by Sweet Silly Sara

Grab the paper plates, glue and some pasta to make a really fun little lion craft!


Paper Plate Ladybugs by Crafts by Amanda

These cute little ladybugs are the perfect way to make a spring craft with minimal supplies. Kids of all ages will love this!


Fun Snails by Attachment Mummy

These little snails might inch their way into your heart! They are perfect for an afternoon craft for the little ones!


Paper Plate Witch Craft by Sweet Silly Sara

This friendly witch is the perfect craft project to get kids in the Halloween spirit!


Paper Plate Apples by Mom Brite 

Take a bite out of craft time with this cute apple craft! All you need is a paper plate and a few basic supplies!


Paper Plate Crabs by Mom Wife Busy Life

This paper plate crab craft is nothing short of a pinch of perfect! This is such a cute idea for little hands!


Paper Plate Flowers by Glitter on a Dime

Create a pinkalicious storybook inspired garden of pretty flowers! This a great craft for anytime you need a craft to share!


Paper Plate Pigs by Simply Everyday Mom

Need a cute craft to entertain the kids? This piggy craft is an oinking good time for all!


Mermaid Tail Craft

This easy mermaid craft requires basic supplies and creates a cute craft in under 5 minutes. Your mermaid fans will flip a fin for this easy craft!


My 3 year old has recently discovered the Little Mermaid. Mermaids are a frequent topic of conversation, as are unicorns, kittens, and Minnie Mouse. I had an idea to make a fun little craft with Harper that would keep her day dreams flowing like the tide. We were thrilled with how cute it turned out and how easy it was to make.


I loved this craft for my preschooler because it used her fine motor skills, she got to use her scissor skills and it involved glitter glue! Who doesn't like glitter glue!?


Supplies:
3 craft sticks
1 triangle of construction paper in any color
A heart shape of green or blue construction paper
8-12 circles of blue and green paper
Glitter Glue

Instructions:
Glue the craft sticks into a triangle shape.
Glue the triangle shaped paper onto the craft sticks.
Begin layering the circles of paper on the triangle to form the scales.
Add the heart shaped paper with the point in.


This was such an easy craft that was a lot of fun for my 3 year old!  It was easy, but it offered a little challenge to her with the layering of the scales.

You might also like this glitter rain drop craft.

You can check out the Mermaid Tail video on youtube to see me make this craft.


Leaf Fox Craft


Fall is near and we can't wait to start decorating, crafting and buying pumpkins! This easy and cute leaf family craft is perfect for kids this year and only requires a few supplies!


I saw these craft leaves at Hobby Lobby, and I knew I had to make something with them! I decided on a cute and easy leaf fox craft. This is so easy, it requires cheap supplies and creates something adorable that the kids will love to make and display!

This post contains amazon links. If you make a purchase I earn an advertising fee from amazon.

Supplies:

Glue
Small Black Pom Poms
Craft Leaves


Instructions:

Add 2 craft eyes towards the top of a leaf
Add a black pom pom at the bottom point for a nose.

Repeat as desired.

I thought they ended up looking pretty cute! We made 36 of these for under $3. I LOVE economical crafts for the kids!


If you make this cute and easy leaf fox craft I want to see a picture of your creations! Hop over to facebook and share a photo with me.

You Might Also Like


Easy DIY ipad Mini Stand

This easy diy ipad stand was made with only 3 supplies in just a few moments of time. It is a great tween or teen craft for a rainy day and provides a practical place to place your ipad for hands free viewing!


This was such a simple project! I needed someplace to place my ipad while cooking and
referring to a recipe, so I whipped this up in just about 3 minutes! I wasn't quite sure about how
sturdy it would be, but I was surprised by how sturdy it was, and how well it has held up over 2
weeks time.


Supplies
7 Jumbo Craft Sticks ( 5.86” x .72” )
Washi Tape
Hot Glue Gun


Directions


1) Apply washi tape to one side of 3 craft sticks.

2) Form a letter V with 2 of the washi tape covered craft sticks.


3) Secure the point where the sticks meet with hot glue.

4) Flip the craft sticks over so that you are working with the uncovered side of the sticks and your
point is now facing upwards.

5) Use an uncovered craft stick to attach a “leg” to the top, where the sticks meet.  To do this easily
give a generous dot of hot glue about ¼” below the top, immediately place your craft stick at a very
slight angle. Hold the craft stick in place for about 30 seconds, as the glue dries. This acts as your
base. Test it to make sure the base stands freely.

6) You have 3 remaining craft sticks that are not covered by washi tape; stack and glue these together.

7) Glue the final craft stick, with the washi tape on top of the stack you just made.
This will act as your ledge for holding your ipad.

8)You will glue these stacked sticks one inch from the bottom of the base.
Allow to dry for about a minute before using as an ipad or phone stand.


    Easy DIY iPad stand


    You can check out all of my easy DIY ideas here


    Pizza Craft for Kids

    My kids love to eat, they love to play with pretend food and they love to craft. Hmmm. I wonder where they get this from? I love to eat, pretend to eat play food and I love to craft. These are my kind of kids!

    Every day Roo asks me these 3 questions:
    "Mom, are you making lunch?"
    "Mom, are you making dinner?"
    "Mom, can we make a craft?"
    Miss Thang always offers her 2 cents with "Eat Mom?" "Craft Mom?"

    A few weeks ago I had a package with the cute little crinkly pieces of paper inside it, like the stuff you fill a gift bag with. I was just about to toss it in the trash when inspiration hit. This would be the perfect base for a craft my kids would want to gobble up!

    To start off, I grabbed yellow, white, green and red paper that was left over from another craft we made, I cut simple strips of yellow for cheese. Simple circles for pepperoni, I made little curved green peppers and the hardest shapes was the white mushrooms.

    I cut out quite a few of each. I knew the kids were going to LOVE this craft and I want to be able to repeat it again this winter. The extras I placed in baggies and stashed away for later.


    I offered the kids some of each topping, including those crinkly little strips of red paper. They each got a paper plate.

    To begin we generously applied glue to the plate, then we added our sauce.


    Plate with sauce

    Next we added cheese.

    Cheese Please!

    Then we started to add our toppings. This was a ton of fun for everyone, including me.

    Green Peppers

    The works! See how cute my mushrooms are!


    And there you have it! We made fun pizzas from recycled materials. This was really a simple craft that both the almost 2 year old and the 5 year old enjoyed. You will have to stay tuned as this idea has spawned other pretend food crafts!

    Easy Ribbon and Craft Stick Ornaments

    This easy ribbon tree craft is a fun way to decorate your tree this holiday season. These are easy to make, economical and perfect for sharing with your friends and family!


    This post contains affiliate links. If you click and purchase I make a small commission.

    You can mix and match ribbon colors, or stick with one color, whatever you prefer. I used a thin strip of ribbon that fit perfectly with my chunky crafty sticks.


    Supply List:

    Glue
    Scissors
    A Pencil


    Directions:


    • Line up 4 craft sticks
    • Lightly draw the outline of a tree on the craft sticks, as you can see we simply made slanted lines.
    • Cut the craft sticks per the lines you made.


    • I made a tiny pointy triangle from the scraps of craft sticks for the top of the tree.
    • Cut and glue ribbon to fit the cut craft sticks.

    • Trim the ribbon to fit.
    • Now assemble your tree and glue it on to the remaining craft stick.


    • Cut 6 inches of ribbon and form a loop, glue this to the back to act as an ornament hanger.
    • Allow to dry, then hang from your tree, or share with someone special this holiday season!


    These were so easy to make! Last year I added them to my wrapped gifts to add something extra to the presentation.

    We have so many other fun Christmas ornament crafts you will want to check out. A few of our favorites include:

    Mickey Mouse Jingle Bell Ornaments

    Ribbon Tree Ornaments


    12 Mermaid Craft Tutorials

    If your kids are crazy about mermaids you are going to love these 12 Mermaid Craft Tutorials! From adorable bags to upcycled crayons, this list has so many ideas you will want to make!

    Mermaid craft tutorials

    Spring is here, so my family is day dreaming of the beach, the pool and all of the fun we will have this summer. My daughter wanted to make our mermaid tail craft again last week and we had so much fun with it! I searched some of my favorite blogs and found 12 more ideas for our crafty fun. I know you will love this collection of crafts too!


    Mermaid Shell Necklace by Moms and Crafters

    Ombre Mermaid Tail Crayons by The Crafty Guru

    Mermaid Bath Bombs by Buggy and Buddy

    Easy Mermaid Tail Craft by Stylish Cravings

    Clothespin Mermaid Dolls by Create Craft Cook

    Mermaid Succulent Garden by Creative Green Living

    Mermaid Suncatchers by Sugar, Spice and Glitter

    Paper Plate Mermaid Twirlers by Red Ted Art

    Beach Towel Mermaid Tails by Somewhat Simple

    Mermaid Mailbox Playset by Hello Wonderful

    Mermaid Wall Art by Resin Crafts Blog

    Mermaid Iron On Tote Bag by Sew What Alicia


    You might also want to check out my easy mermaid tail craft for preschoolers.

    You can find all of our easy craft ideas here


    Story Time and a Jam Sandwich Craft

    My kids are too stinking cute. I love their creativity and eagerness to dig into any project and give it their own unique touches. Several times a week Roo will ask to make a craft, similarly several times a week Harper will raid our craft closet and take off with anything she can reach... We now know they like to craft; if you add a good story into the mix it quickly turns from like to love.

    A few weeks ago we checked out The Giant Jam Sandwich by John Vernon Lord. I thought this would be a fun book to check out, it also seemed like a good way to explain wasps to Harper and give Roo a reminder to avoid them!

    I also hoped that a story about a giant jam sandwich and a cute craft would inspire my son to try something new. Something he has been adamant about not trying, jelly and jam!


    In the story, 4000 wasps descend upon a town. They are quite a bother but the townspeople roll up their sleeves and get to work making one giant wasp trap jam sandwich!

    The kids found the book entertaining. Roo was not sold on the idea of jam at all. He said "That's not good. That's sick." He was pretty determined that he wouldn't like jelly, nor jam. 

    Up next we made Jam Sandwiches. My kids go CRAZY for paper food crafts. Like drop everything,  We are making a sandwich!? From paper?! Will there be glue sticks involved?


    Getting ready, supplies needed
    I cut 2 slices of bread shapes in off white paper
    I cut 2 slightly larger slices of bread shapes in brown paper
    I offered my kids red finger paint and paint brushes
    Of course, glue sticks were needed.
    Baby Wipes... You will want these!


    Instructions
    I gave each kid a brown slice of bread and a glue stick
    They smeared glue around the brown paper and topped it with the off white paper
    That was pretty satisfying to the kids. They really like to glue things!
    They were thrilled to see the finger paint and paint brushes!
    I told them to paint the jam on their toast. They agreed this was pretty great. Glue and paint after a story? It couldn't get much better!


    This was a great activity for the kids. They always want to help me cook, so to create their own food craft was a hit. 


    After the story and the craft, I made a peanut butter and jelly for Harper, Roo came in and watched me spreading the glob of jelly around. With a very serious face he told me "That is sick. Bleck. No jelly for me please. I will have honey."

    I love that kid. He is definitely a guy who knows what he wants. 


    You also might enjoy this Paper Cookie Craft idea for preschoolers.


    Rainbow Coaster DIY

    Craft sticks are a great addition to any crafters supplies! There are so many fun ways you can use craft sticks to create! I made this easy set of coasters in just a few moments. These are great for tweens and teens to make! They are fun and functional and make a cool DIY you can gift to a friend or relative!


    This project is super simple. I got literally everything I needed at Dollar Tree to make these. I love economical crafting! To make this DIY  go a little faster I bought the craft sticks that were pre dyed.


    The pack conveniently contained all colors I needed for a rainbow effect. You will need 20 craft sticks to make this project, use 3 of each color!


    Line up your craft sticks in the pattern of a rainbow.
    Then use hot glue to attach 3 sticks running in the opposite direction for supports, just like a pallet would have.


    Repeat and make another one.
    Then you are going to place a craft stick on its side to give the coaster height.


    Carefully glue the stick on the sides then add a line of glue to the top of both side sticks and place the other section on the top.


    This project was featured in a video on facebook. I would love to have you check it out and give it a thumbs up!


    You can find more easy DIY ideas here
    Easy Pencil Pouches

    Find more rainbow craft activities here

    You can also find it on youtube. Subscribe for more fun projects for the family!


    Easy Gnome Christmas Ornaments

    These easy Gnome Christmas ornaments are perfect for crafting with the kids this holiday season.


    We love to make easy crafts with the items we already have on hand. Some of my best ideas and favorite projects have stemmed from the junk drawer and items destined for the trash. These Christmas gnome ornaments are a great example of what you can make with simple stuff you probably already have.


    These are awesome because with a different pattern of paper, or bigger googly eyes, your gnome looks totally different. If you don't have the supplies in the junk drawer or your craft supplies, you can get all of these things from Dollar Tree or even better- improvise!


    Supplies per 1 gnome:

    2 googly craft eyes
    3 craft sticks
    cotton balls
    Red Pom Pom
    Glue
    Brown Bag
    Scrap Book Paper
    Confetti
    Sharpie
    Ribbon


    Directions:

    With the 3 craft sticks glue them together to form a triangle.


    Cut a triangle from the brown bag to fit in the craft stick frame.


    Add a generous amount of glue to the craft sticks and place the bag on top of it.


    Cut a smaller triangle from scrap book paper to form the hat of your gnome.


    Add eyes, a pom pom nose and draw on a mouth with a sharpie.


    Add a chunk of confetti or some type of adornment to the hat.
    Add a row of cotton balls for the beard.


    Flip the gnome over and glue a ribbon to the back.


    Hang your cute and easy gnome Christmas ornaments from your tree or share them with friends and family!


    You can make dozens of these and make them all unique by simply changing the paper of the hats and the size of the pom pom of the nose.


    This is such a fun craft to make with the kids! We loved making and naming our gnome ornaments!


    Find all of our DIY Christmas Ornaments here.