
Showing posts with label crafts. Show all posts
Showing posts with label crafts. Show all posts
10 Heart Crafts for Mom
Valentine's Day is near and I have been crafting up a ton of fun on facebook live for the kids. To keep the fun going for me, I found 10 adorable and awesome heart crafts for myself and I know you Mama's are going to love these cute ideas too!

Which of these ideas is your favorite? I think they are all fantastic!
Color Swirling Milk Experiment
Harper and I love to explore the kitchen when we need crafty inspiration. She is totally my partner in crime when it comes to creativity!

We were looking for a quick activity on a busy day, because even a busy day should have time for fun and exploration when you are 5! We found ourselves in the kitchen, again, to fuel our inspiration.
This is such a fun way to explore kitchen science and how dish soap works! You need only 4 things to make color swirling milk!

Supplies:
- Milk Use Vitamin D or 2% milk,
- Half and half or heavy cream provide even better results if you have it!
- Food Coloring
- Q Tips
- Dish Soap

This post contains affiliate links.
Directions:
- Pour milk into a glass dish
- Add several drops of food coloring to the milk.
- Dip a q tip in dish soap
- Dip the q tip into the milk
- And watch the colors swirl!

Why this works:
Milk has fat in it. The higher the milk fat content, the better this reacts. You can see the power of a concentrated dish soap before your eyes as the dish soap works to break down the fat content of the milk, thus disrupting the splashes of color, causing them to swirl.

What Harp thought:
Harp is a milk drinker, so she was ready to combine early science with her snack. She is intrigued by food coloring, so this was completely up her alley.

As you can see in the photos, she was ready to get hands on with this right away! She was completely intrigued by how the dish soap reacted to the milk. We tried this several times with different colors. We also tried this with skim milk and coffee creamer to see how the dish soap reacted to other milk products
This is a fun way to engage the little ones with kitchen science, and I would highly recommend trying it with your kids sometime soon as it is so simple!

If you like colorful kids activities, you won't want to miss these glow in the dark nightlights.
This glow in the dark necklace is another fun project that my kids loved.
Kid Made Straw Necklaces
Bling; made for kids, by kids!

My kids really like to get crafty. They also like to peek in my jewelry box and beg to wear all of the pretty things! So we set out to see what we could create with things we already had at home. This is what we came up with. Straw Necklaces!
You will need:
*Straws
*Bakers twine or yarn*Glue
*Scissors

Rolf was kind enough to cut the straws for both of the necklaces we made.

We simply added a bead of glue to one side of a straw, then pressed it onto another. Repeat until you are out of straws.

Thread your string, twine or yarn through one straw and tie to make the necklace.
This was a fun craft for both kids. Harp was pleased to have her own "bling" that she made by herself.
Kindness Rocks
Hot Kindness Rocks are a fun way to decorate rocks to hide to share with others!

Harper and I found a kindness rock in the woods one day and we were inspired to make some of our own! This was a fun multi part project for us. As we had to find rocks, decorate them and then hide them!
We found a super special rock that had a chip in it. The chip was in the shape of a heart. We knew this special love rock needed to be placed someplace special. We knew just the place! Preschool! We headed there to hide it in a special spot!

These rocks were fun to make, but truly not kid friendly.
To begin I heated rocks in the oven at 200 degrees for an hour.
When they were hot I melted crayons on them.

After they cooled for several hours we were ready to share them!
Washer Necklaces
This easy DIY washer necklace is perfect for making with kids to wear and share!

My daughter loves to look at my jewelry box and naturally, she asks to borrow all of the pretty things inside. She is 4, so I am not often likely to hand over anything! One day last week she was especially pouty after I declined her request to wear an old locket from the 1950's with photos of my grandparents in it, so I decided we needed to make some fun things she could wear and keep in her own special jewelry box.
I came up with a few basic supplies and a plan! We were going to start with a simple washer necklace.
I gathered:
Yarn
Scissors
A washer
Mod Podge
A Paintbrush
Washi Tape

We began by covering the washer with washi tape. Carefully tearing off the excess and covering the interior edges.

Next we painted the washer with glow in the dark mod podge. Allow it to dry, flip it over and paint the other side too.

Next we looped a section of black yarn to make a necklace.

This was a perfect start to building a jewelry box collection for my preschooler. We will definitely try this again with other patterns of washi tape!
You might also like this easy paper crown craft for preschoolers.
You won't want to miss these glow in the dark, no electric night lights!
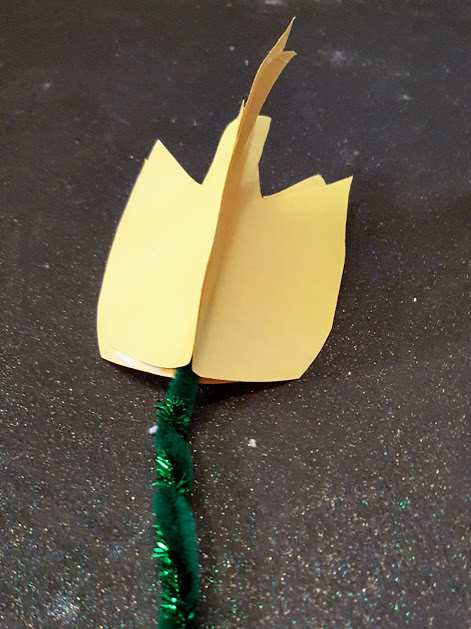
3D Paper Tulip Craft
This easy craft is perfect for spring! Requiring simple supplies, this 3 d tulip craft comes together in a matter of moments to create a sweet craft for the kids!

This craft comes together super fast to create a cute 3 d project that is perfect for spring! These tulips are pretty in any color! So, feel free to use a different color than yellow if that is what you like!

We made these on a rainy day to get crafty and pass the time indoors. We shared these with special friends to brighten their day too! How fun right?!
You will need:
3 sheets of yellow paper
school glue
green pipe cleaner
scissors

To begin, fold 3 sheets of paper in half.
Draw your tulip shape on half of the paper, then cut that
Glue on half on to a second half, then glue the third sheet.
Stick your pipe cleaner in the center of the flower and secure with extra glue.

I think a bouquet of these would be a fun way to add a touch of spring to your decor! Stick them in a jar or vase for flowers that won't wilt!
You might also like these crafts:
Toddler Tulip Art
10 Spring Flower Crafts
Toddler Tulip Craft
This easy toddler tulip craft is perfect for a rainy day! It is easy and adorable and is so much fun for little ones!

We love tulip crafts! There are so many fun ways to create something inspired by spring that can be enjoyed for a long time! There is something super sweet about sharing kid art with loved ones and this one is perfect for that!
This is perfect for preschoolers! Harper loved making these!
You will need:
One sheet of blue paper
One sheet of green paper
One sheet of paper in the color of your choice for the tulip
Glue
Scissors

Cut 3 tear shapes for your tulips.
Cut or tear a thin strip of green for your stem.
Glue the three tear shapes so that the point is lined up to look like petals.
Add the stem.
Shamrock Puppet
St. Patrick's Day is near and I have a really cute and easy shamrock puppet craft for you!

This is such an easy craft for the little ones! It requires super simple supplies to create a cute way to spread the luck of the Irish!

You will need:
One sheet of green paper
Glue
Scissors
A green kwik stick
Cut 4 green hearts out of the paper .
Paint the stick green, it will dry in under 90 seconds if you use Kwik Sticks.
Glue all 4 hearts on to the stick, point in.

We also have a great 3D Shamrock Craft you might enjoy!
A is for Alligator Craft
Now that Harper is in preschool, our projects have become intentional. I want to make sure she is getting the support she needs to put all that she is learning to good use! We have been taking our time exploring the alphabet and having a lot of fun doing it too!
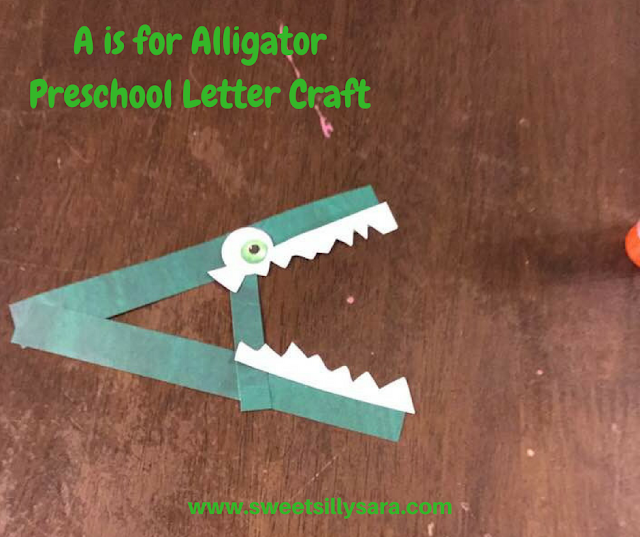
Today, I want to share a fun letter A craft with you that comes together in a matter of moments and takes a bite out of craft time and makes letter recognition a lot of fun for preschoolers!
This post includes partner links.
To make the A is for Alligator Craft you will need:
2 x 4" strips of green paper
1 x 2" strip of green paper
2 x 2" strips of white paper
1 googly eye
glue stick
scissors
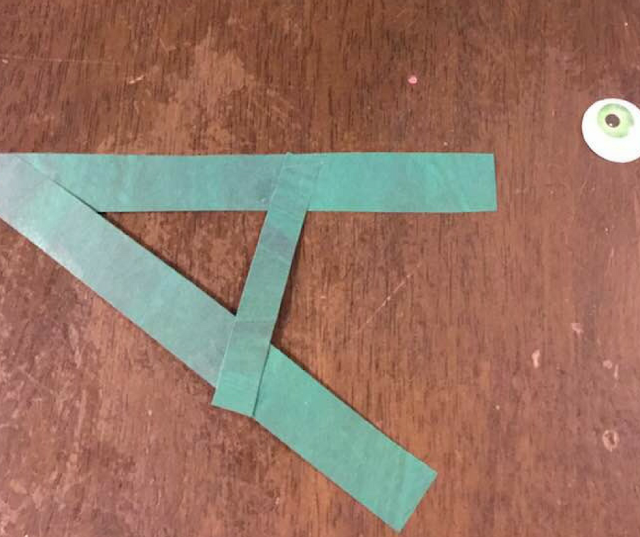
Directions:

If you have a fun craft idea for the letter A I would love to hear about it in a comment!


Today, I want to share a fun letter A craft with you that comes together in a matter of moments and takes a bite out of craft time and makes letter recognition a lot of fun for preschoolers!
This post includes partner links.
To make the A is for Alligator Craft you will need:
2 x 4" strips of green paper
1 x 2" strip of green paper
2 x 2" strips of white paper
1 googly eye
glue stick
scissors

Directions:
- With the 2x 4" strips and 1 x 2" strip of green paper form your letter A and glue it in place.
- Cut teeth shapes in the 2 x 2" strips of white paper.
- Glue the teeth on the legs of the A.
- Glue the googly eye on to the top of the letter A.

If you have a fun craft idea for the letter A I would love to hear about it in a comment!

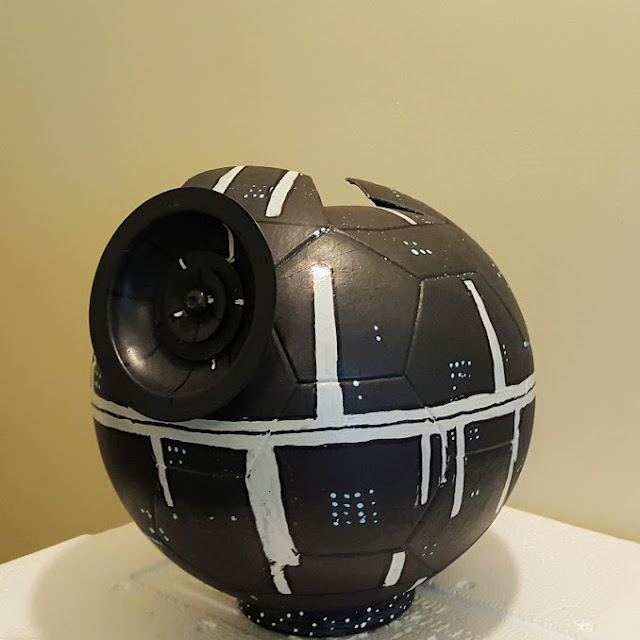
Death Star Valentine Box
This up-cycled Death Star Valentine's Box was made with simple materials to create a fun way to collect cards and then play after the holiday has ended for Jedi's in training. This is a perfect nerdy date idea!


This post contains affiliate links or was sponsored.
When we got the letter about making a Valentine Box with Rolf, my husband giggled maniacally. He had been crossing his fingers that this would be the year Rolf could take a Valentine's box to the party! He had an idea he had been kicking around for quite sometime, and that was to create a Death Star for our little Star Wars Expert that he could continue to use long after Valentine's Day had passed.
To recreate the Death Star, you will need:
an old soccer ball
something round to create the Super Laser Focus Lens black paint
white paint
blue paint
gray paint
a utility knife
mod podge

Directions:
Cut around one hexagon on the soccer ball, making 5 slices to accommodate your hand reaching into the ball.
Paint the ball black, using at least 2 coats.
Add the gray details, based upon your interpretation of the Death Star.
Add the white and blue details also based on your interpretation of the Death Star.
Cover the Death Star with 2 coats of mod podge.
Paint your circular part black, adding whatever details you see fit. Our Super laser Focus Lens is compromised of 3 large washer type parts. Attach this with a screw with a cap on the back if possible.
We used a Noxzema jar lid painted to look like space as a base for this.

Rolf had an out of this world cool Valentine Box, and as a bonus, he can now fit many of his Star Wars action figures in his Death Star for easy storage and enhanced play in a galaxy far far away.
If you liked this easy craft idea, you will dig this cute little yoda puppet too!
You can find all of my crafts here:
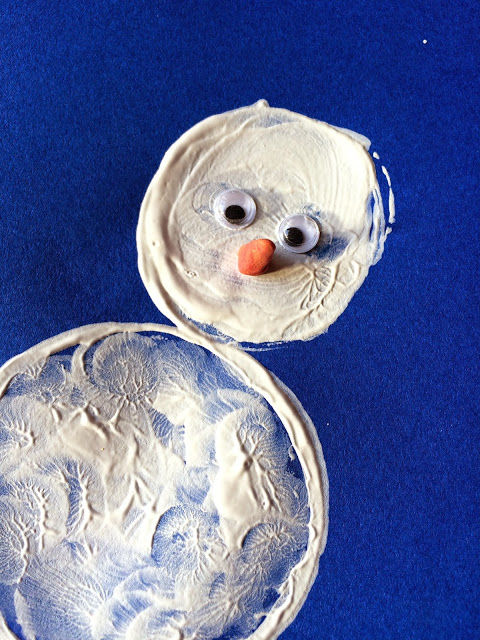
6 Snowman Themed Painting Projects for Kids
We didn't get enough snow to make snowmen last year. We waited with crossed fingers until April rolled around, then we gave up, defeated and longing for a day spent rolling big balls of snow around.
This year, if we don't have ample snow in our own backyard for winter fun, we are at least prepared to craft up some snowman fun! I found 6 Snowman Themed Painting Projects for Kids to keep in my reserve of winter fun and I think you are going to like these ideas too!

Handprint Snowman Preschool Craft
Bubble Wrap Snowman Painting
Snowman Winter Art Project
Snowman Sensory Art with Puffy Paint
Footprint Snowman Craft
Easy Puffy Paint Snowman Project
These ideas are simple enough for small children and creative enough to offer your older kids a chance to create and explore new materials. Which is a win/win! My favorite art supply to introduce to children is Kwik Stix, tempura paint sticks. You can get these through my affiliate link.
Hopefully, we will get the best of both worlds this winter; a chance to whoop it up in the snow and make a ton of snowmen, then come in and warm up with a painting project or two!
If you have a favorite snowman painting project for kids, please leave a comment to share it with us!
You might also like this Paper Cookie Preschool Craft.
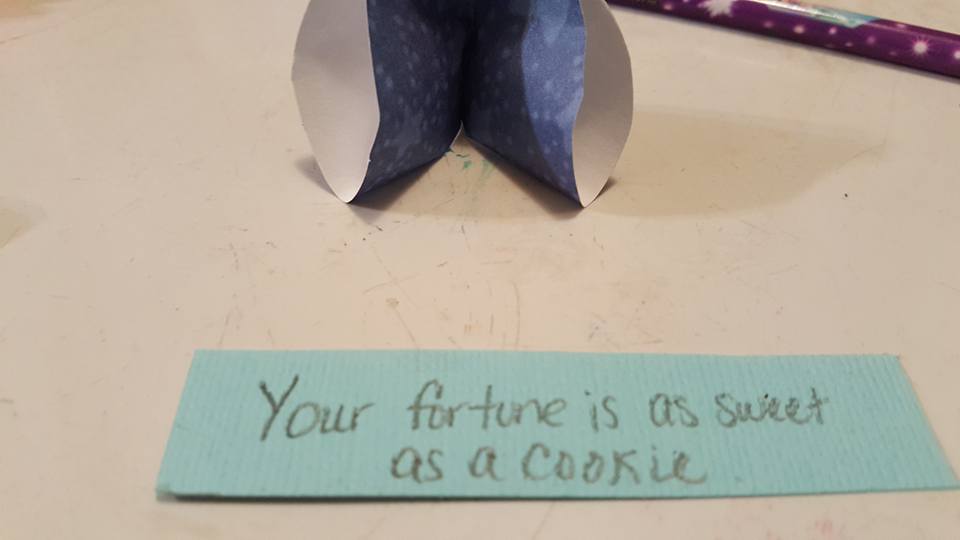
Paper Fortune Cookies for New Year's Eve
New Year's Eve is just a few days away! To make the evening extra fun for the kids, I have been making these cute paper fortune cookies so they can open one on the hour and have fun reading their fortunes to each other!

This is such an easy craft idea!! It can be used for parties, holidays or even as place markers at a dinner party!
All you need is scrapbooking paper
Glue
Scissors
Paper and a Pen
To begin, cut several uniform circles from paper.

Gently fold the paper together, but only make a small crease in the center.
 Unfold the circle, placing it so the crease runs from 9 o’clock to 3 o’clock. Place a small dot of glue at 3 o’clock.

Fold the circle and press the paper onto the glue dot, making a taco shape.

Gently press the crease you made in step 2. Place a glue dot along the folded side of the taco — alongside the crease.

Gently bring the two ends of the 'taco' together. Pinch it together so that the glue dot holds the two halves together.

Add a strip of paper with your fortune inside.
You might also like these yummy pizza ideas for New Year's Eve.


This is such an easy craft idea!! It can be used for parties, holidays or even as place markers at a dinner party!
All you need is scrapbooking paper
Glue
Scissors
Paper and a Pen
To begin, cut several uniform circles from paper.

Gently fold the paper together, but only make a small crease in the center.


Fold the circle and press the paper onto the glue dot, making a taco shape.

Gently press the crease you made in step 2. Place a glue dot along the folded side of the taco — alongside the crease.
Gently bring the two ends of the 'taco' together. Pinch it together so that the glue dot holds the two halves together.

Add a strip of paper with your fortune inside.
You might also like these yummy pizza ideas for New Year's Eve.

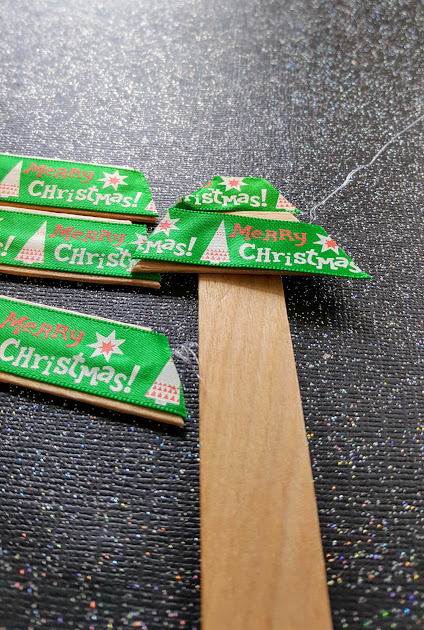
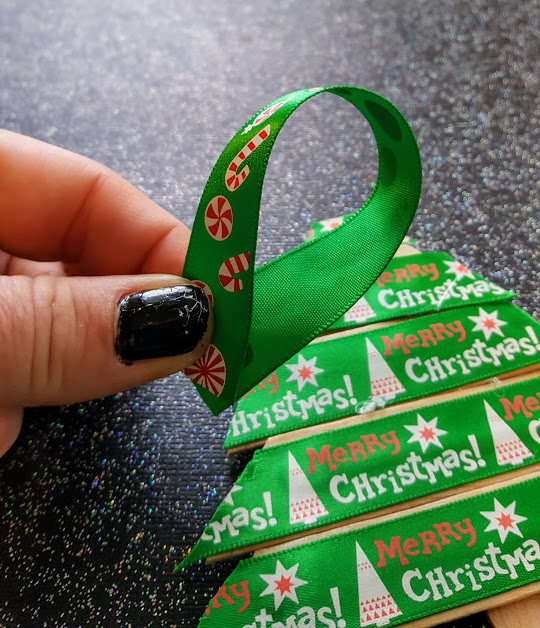
Ribbon Tree Ornament Craft
I am so excited to decorate my trees this year! I have already been playing around with some cute handmade ornament ideas!

Today I have a really economical and adorable DIY ornament that I know you are going to want to make! It costs just about $2 to make a dozen of these! They come together so easily that making a dozen is no problem at all!
This post contains affiliate links or sponsored content.
These are cute for decorating a tree, or adding a little something to a wrapped gift!

To make these ribbon tree ornaments I used:

This is a fun project to do with the older kids, and these are really pretty lovely in their simplicity! I have a short video of the process to share with you. I would love it if you gave it a thumbs up!
I can't wait to hear what you have planned for holiday crafting!
You might also like these cute DIY Mickey Ornaments!

This post contains affiliate links or sponsored content.
These are cute for decorating a tree, or adding a little something to a wrapped gift!

To make these ribbon tree ornaments I used:
- A spool of ribbon I bought at Walmart for 97 cents
- Chunky Craft Sticks
- Glue
- Scissors
- Pencil
Directions:
- Begin by laying 4 craft sticks together, draw the outline of a tree on them.
- Cut the sticks to shape the tree.
- Cut the tiny top triangle from the scraps to avoid wasting a whole craft stick!
- Cut small bits of ribbon to cover the tree shapes. Glue them on and trim.

- Now glue the ribbon covered craft sticks onto one more craft stick.

- After gluing all the sections on to the base craft stick, flip it over and add a small loop of ribbon so that you can hang it!

This is a fun project to do with the older kids, and these are really pretty lovely in their simplicity! I have a short video of the process to share with you. I would love it if you gave it a thumbs up!
I can't wait to hear what you have planned for holiday crafting!
You might also like these cute DIY Mickey Ornaments!
Subscribe to:
Posts (Atom)