Showing posts sorted by date for query craft stick. Sort by relevance Show all posts

Easy Ribbon and Craft Stick Ornaments

This easy ribbon tree craft is a fun way to decorate your tree this holiday season. These are easy to make, economical and perfect for sharing with your friends and family!


This post contains affiliate links. If you click and purchase I make a small commission.

You can mix and match ribbon colors, or stick with one color, whatever you prefer. I used a thin strip of ribbon that fit perfectly with my chunky crafty sticks.


Supply List:

Glue
Scissors
A Pencil


Directions:


  • Line up 4 craft sticks
  • Lightly draw the outline of a tree on the craft sticks, as you can see we simply made slanted lines.
  • Cut the craft sticks per the lines you made.


  • I made a tiny pointy triangle from the scraps of craft sticks for the top of the tree.
  • Cut and glue ribbon to fit the cut craft sticks.

  • Trim the ribbon to fit.
  • Now assemble your tree and glue it on to the remaining craft stick.


  • Cut 6 inches of ribbon and form a loop, glue this to the back to act as an ornament hanger.
  • Allow to dry, then hang from your tree, or share with someone special this holiday season!


These were so easy to make! Last year I added them to my wrapped gifts to add something extra to the presentation.

We have so many other fun Christmas ornament crafts you will want to check out. A few of our favorites include:

Mickey Mouse Jingle Bell Ornaments

Ribbon Tree Ornaments


Easy Ghost Window Cling

Halloween is near, and this cute little ghost will add a touch of fun to your windows without spooking your wallet! This is economical, adorable and easy to make!


We can't get enough Halloween crafts. Both of the kids and I enjoy creating frighteningly fun projects to get us even more excited about any holiday!

We were short on time one afternoon and wanted to make a cute and easy craft. This is what we came up with, a fun ghost for the window! This only took a few moments to complete and we loved it for a few reasons. The kids got to practice their scissor skills, which is an important skill for all kids, and they got to experiment with textures.


You will need {per 1 ghost}
 one square of white paper
4 small circles of black paper
2 slightly larger circles of black paper
A section of contact paper, transparent, to accommodate the size of the ghost you wish to make
Scissors
3 glue dots, school glue etc


Begin by placing your contact paper sticky side up
Add 2 black dots to the contact paper for eyes
Add one larger black circle of paper for a mouth
Cut the white paper to look like a ghost
Add the ghost shape over top of the eyes
Add 2 remaining eyes and mouth to the ghost
Stick it on a window for a spooky fun addition!

And there you have a super economical, fun and easy ghost craft for kids!

Find more Halloween DIYS here
Reader favorites include:
Glam Pumpkin Make Over

Witch Window Cling

It is hard not to get in the spirit of things this Halloween with his hands on witch window cling craft!


This window cling was so much fun to make with the kids. I love that it gives them a chance to use their fine motor skills and practice scissor skills while making something so cute for your windows!

Supplies

Scissors
Clear Transparent Contact Paper
Green, Black, White, Purple Construction Paper
A scrap of pink or red paper


Have the kids tear and cut up the black, green and purple paper into small bits.
Make 2 small circles from a black square of paper.


Cut out small white circles for eyes and a small smile from the red or pink paper.


Begin by placing the small black circles on the contact paper, sticky side up.
Cover those with the white circles for eyes


Next form the nose, mouth and hat of the witch


Begin filling in the face with green bits of paper.


Fill in the remaining areas with purple.

Leave just a few areas uncovered so that the contact paper will stick to your window.


We thought these were really cute. They were fun to make and offered the kids a little challenge as the contact paper is sticky. 

You can find all of my Halloween ideas here.

Paper Plate Witch

Glam Pumpkin Makeover


DIY Barbie Serving Tray

My daughter is really into all things Barbie. So I made her this cute little rustic serving tray for her Dreamhouse play sessions. It took me less than 5 minutes and is pretty cute and you can personalize it if you wish!


We have all but given up on Barbie accessories. My kids lose them, the dog chews them and it seems like a big waste of money. I won't buy any more, but I will DIY some!


 I made this Rustic Barbie Serving Tray happen in moments with 3 supplies. It is pretty cute and it cost me $0 to make.


Supplies

6 small craft sticks 
Scissors
Glue Gun


Directions

Glue 3 craft sticks together
Trim the rounded edges off of 3 craft sticks then glue 2 of them to the longest sides of the base.
Cut the remaining craft stick in half
Glue this to the other ends


 Now you have a rustic serving tray for Barbie and her friends. Can you believe how easy that was?

We are already planning to make a version of this with taller sides to flip over as a coffee table for Barbie. You can paint the serving tray, or cover it with washi tape for a unique look if your daughter isn't into Farmhouse style decor yet.

Find all of my craft stick projects here

Handprint Fish Puppets

Monster Handprint Puppets


Birthday Cake Sensory Bin

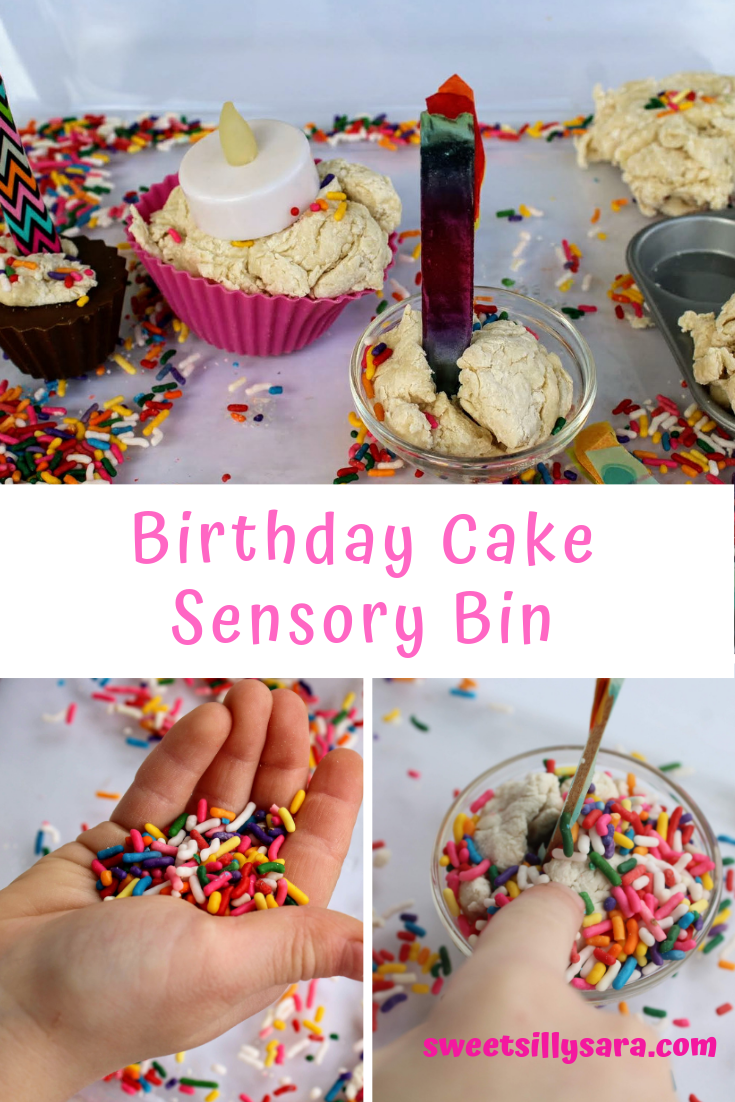
This easy birthday cake sensory bin is perfect for any little aspiring chef! Made with homemade playdough and complete with loads of sprinkles and fake candles, this bin keeps preschoolers happily baking up something good!

birthday cake play doh sensory bin

After many years of mothering, I have learned that it is a good idea to have an activity planned for the afternoon. I usually have something set up for Harp like a paper craft or something she can get creative with, but lately we have been LOVING sensory bins

birthday cake play doh sensory activity


Harper loves to bake, so the idea for this birthday cake sensory bin came around. I thought she would love the chance to play with sprinkles, and I was right. When she came home from preschool, she was ready to get her hands into this bin! I have a feeling your little one will want to do the same should you recreate this project.


This was easy to assemble and super economical. You likely have all of the supplies on hand!

sprinkles in hand


This post contains affiliate links. If you make a purchase I will earn a small commission at no cost to you.

birthday sensory bin


Supplies:
1/2 cup of shampoo (any kind will do, including something from the dollar store!)
 2 tablespoons of water
1 cup of flour
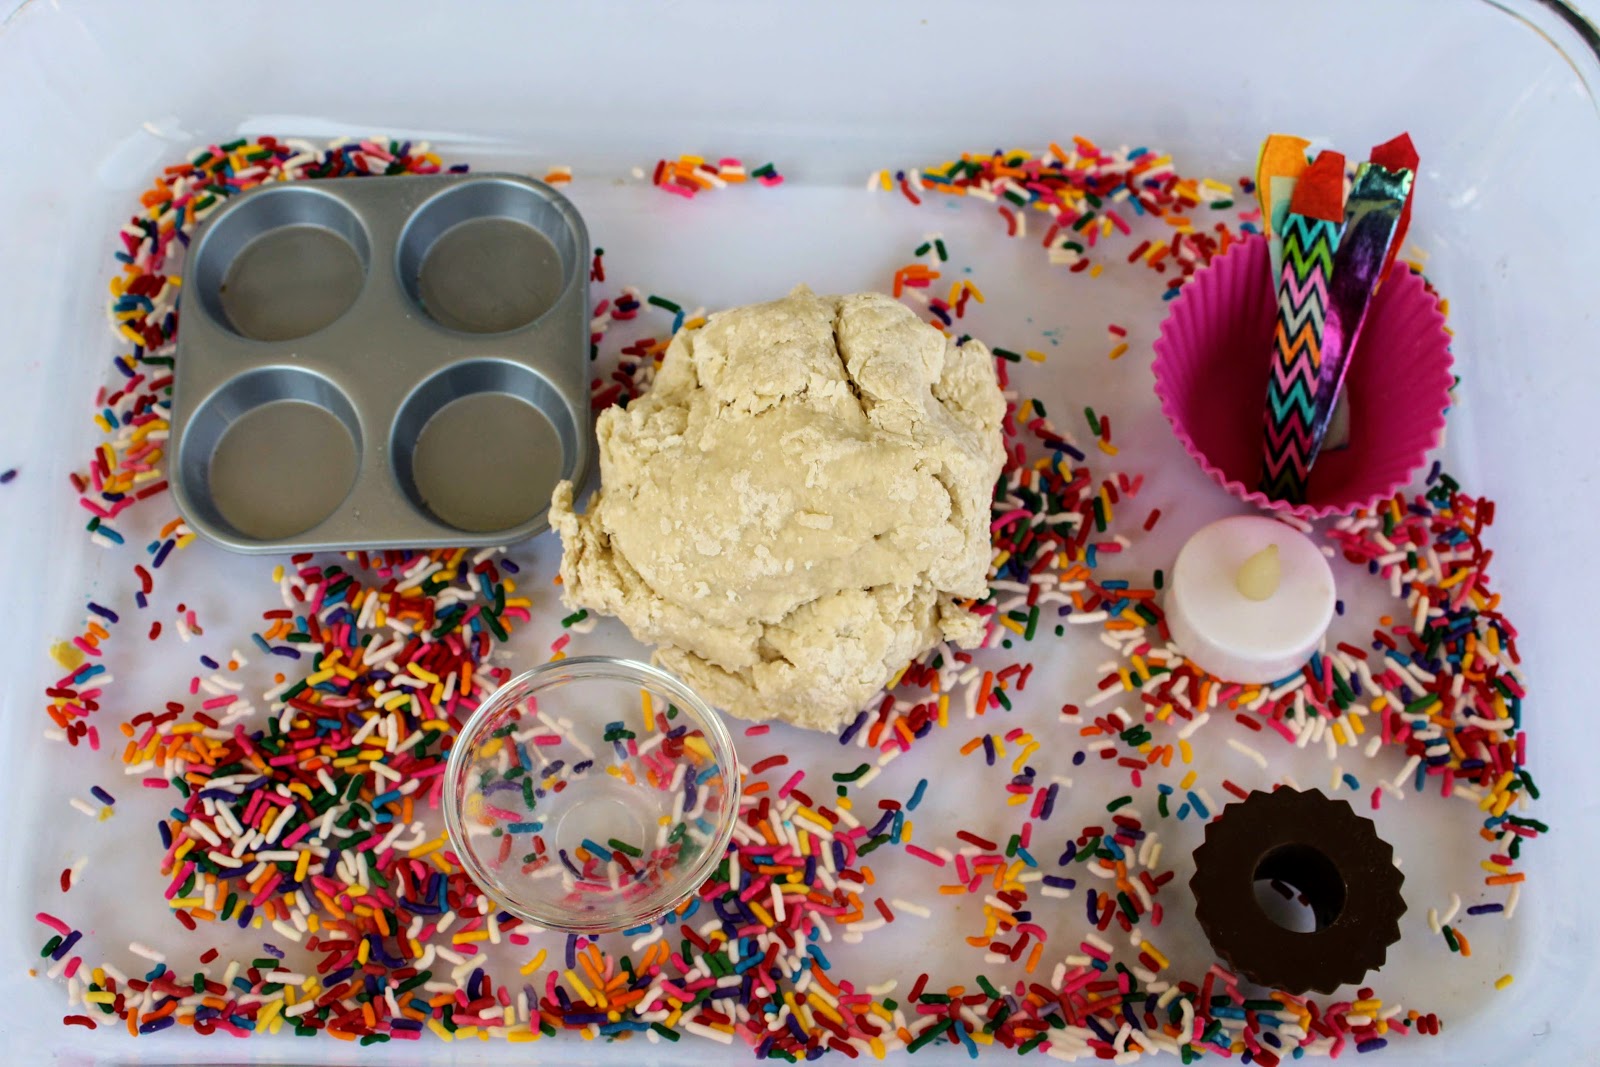
Silicone cupcake molds, small cake pans, small dishes for forming cakes. Your childs play food collection is a great place to find materials to use in this bin.
Washi Tape
A battery operated votive candle
Tissue Paper in orange, yellow or red
A baking dish or a bin with a lid


To make the birthday cake dough:
Add one cup of flour, 2 tablespoons of water and 1/2 cup of shampoo together in a medium bowl. 


Begin to stir, as the ingredients start to bind together, finishing mixing with your hands.
 If the dough feels sticky, you will add a little more flour, no more than 1/4 cup.


Test for stickiness. If the dough is still sticky, add a little more flour and continue to mix until it doesn't stick to your hands.


To make fake candles:
You will need a length of washi tape that can cover a craft stick on both sides.


Allow the tape to slightly overlap the craft stick and place small squares of tissue paper on the top of the stick. I layered orange and yellow tissue paper to resemble a flame.
Fold the tape up to cover the other side of the craft stick.


Trim the edges of the tape on the sides of the craft stick.
Trim your tissue paper to resemble a flame.


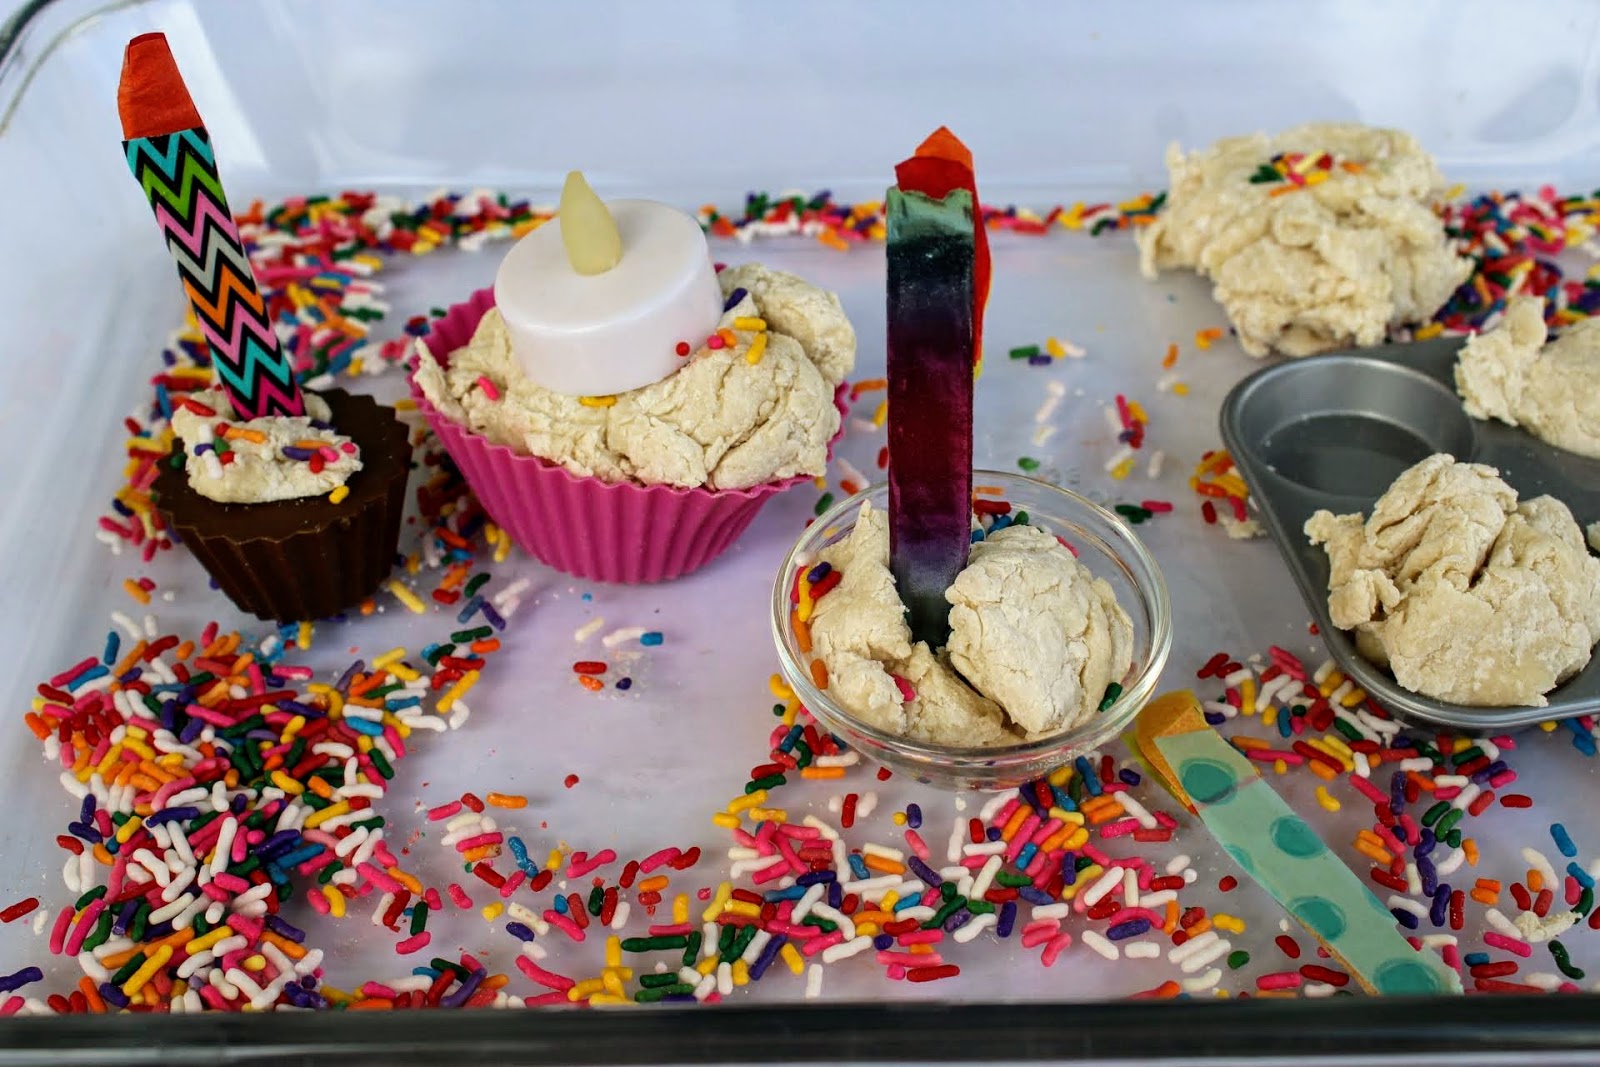
To assemble the birthday cake activity bin:
Pour a bottle of sprinkles in the bottom of the dish or storage container you plan to use.
Add the dough.
Add small dishes like play food dishes, silicone cupcake molds, small baking dishes.
Add the fake candles and a battery operated votive candle, if you have one.


Invite your child to explore the activity. They will form cakes, decorate with sprinkles and add candles to serve birthday cake!

birthday cake sensory play

Rainbow Coaster DIY

Craft sticks are a great addition to any crafters supplies! There are so many fun ways you can use craft sticks to create! I made this easy set of coasters in just a few moments. These are great for tweens and teens to make! They are fun and functional and make a cool DIY you can gift to a friend or relative!


This project is super simple. I got literally everything I needed at Dollar Tree to make these. I love economical crafting! To make this DIY  go a little faster I bought the craft sticks that were pre dyed.


The pack conveniently contained all colors I needed for a rainbow effect. You will need 20 craft sticks to make this project, use 3 of each color!


Line up your craft sticks in the pattern of a rainbow.
Then use hot glue to attach 3 sticks running in the opposite direction for supports, just like a pallet would have.


Repeat and make another one.
Then you are going to place a craft stick on its side to give the coaster height.


Carefully glue the stick on the sides then add a line of glue to the top of both side sticks and place the other section on the top.


This project was featured in a video on facebook. I would love to have you check it out and give it a thumbs up!


You can find more easy DIY ideas here
Easy Pencil Pouches

Find more rainbow craft activities here

You can also find it on youtube. Subscribe for more fun projects for the family!


Easy DIY ipad Mini Stand

This easy diy ipad stand was made with only 3 supplies in just a few moments of time. It is a great tween or teen craft for a rainy day and provides a practical place to place your ipad for hands free viewing!


This was such a simple project! I needed someplace to place my ipad while cooking and
referring to a recipe, so I whipped this up in just about 3 minutes! I wasn't quite sure about how
sturdy it would be, but I was surprised by how sturdy it was, and how well it has held up over 2
weeks time.


Supplies
7 Jumbo Craft Sticks ( 5.86” x .72” )
Washi Tape
Hot Glue Gun


Directions


1) Apply washi tape to one side of 3 craft sticks.

2) Form a letter V with 2 of the washi tape covered craft sticks.


3) Secure the point where the sticks meet with hot glue.

4) Flip the craft sticks over so that you are working with the uncovered side of the sticks and your
point is now facing upwards.

5) Use an uncovered craft stick to attach a “leg” to the top, where the sticks meet.  To do this easily
give a generous dot of hot glue about ¼” below the top, immediately place your craft stick at a very
slight angle. Hold the craft stick in place for about 30 seconds, as the glue dries. This acts as your
base. Test it to make sure the base stands freely.

6) You have 3 remaining craft sticks that are not covered by washi tape; stack and glue these together.

7) Glue the final craft stick, with the washi tape on top of the stack you just made.
This will act as your ledge for holding your ipad.

8)You will glue these stacked sticks one inch from the bottom of the base.
Allow to dry for about a minute before using as an ipad or phone stand.


    Easy DIY iPad stand


    You can check out all of my easy DIY ideas here