Showing posts sorted by date for query craft stick. Sort by relevance Show all posts

Design Your Own Play Doh Ornaments

Kids of all ages are sure to love this Design Your Own Play Doh Ornaments project. It is perfect for holiday crafting and turns out so cute everyone will love to display these!


I am crazy for all things play doh, so naturally I had to make something for Christmas from my favorite craft material. These ornaments are so easy! They will have you saying, who knew you could not only draw on play doh but you can bake it too?!

This post contains affiliate links. Making a purchase means I will earn a small advertising fee, at no cost to you.


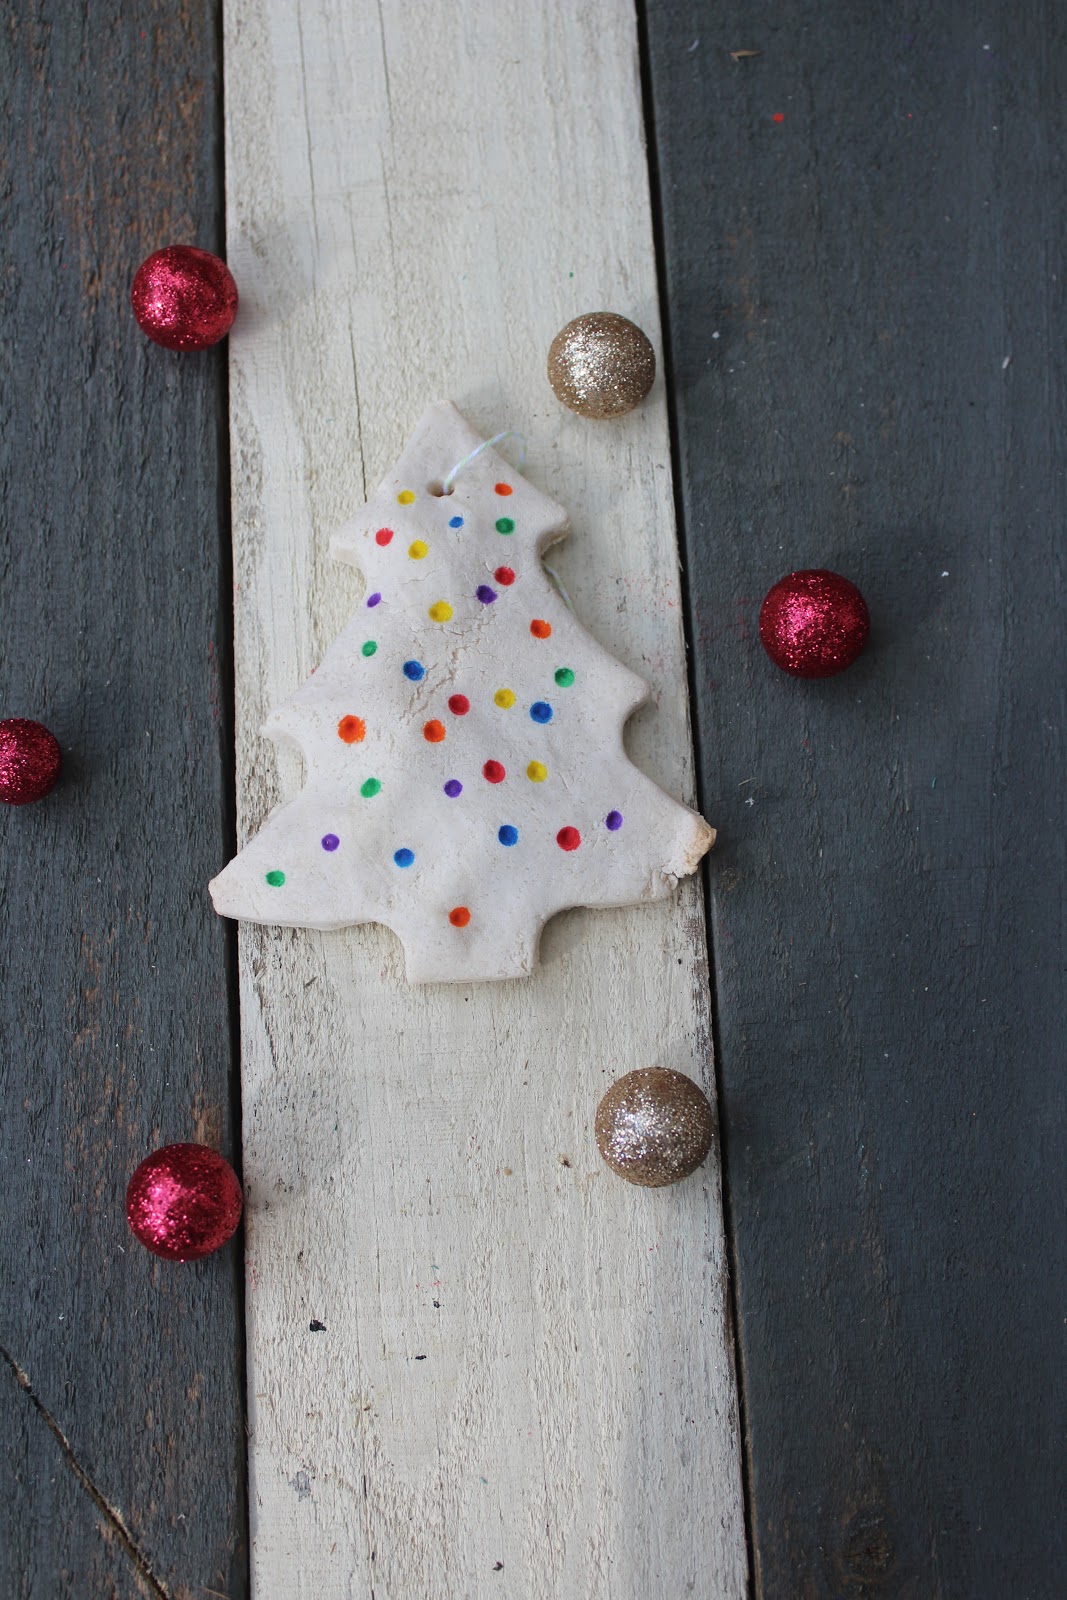
These easy ornaments give kids a chance to design their own addition to the Christmas tree! Made with basic supplies this is the perfect project to do with the kids for minimal mess this holiday. 


You can make your own white play doh, like in my super soft play dough recipe, just leave the food color out, or to make this activity really easy during a generally already packed holiday season, just buy cans of white play doh.


To make these design your own play doh ornaments you will need
Supplies
white play doh
washable markers
cookie cutters
bakers twine
A pen or stick to poke a hole with


Directions
Roll the play doh out to be about 1/8" thick.
With your cookie cutter of choice cut shapes of doh.


Poke a hole in each ornament so that it can be hung after completion. I used an ink pen to make my holes.


Use washable markers to draw on the designs.
Bake at 350 degrees for about 30 minutes.
Allow to cool.
Thread bakers twine through the hole and display on your tree.


Find all of my Christmas crafts here
Reader favorites include:
Button Tree Ornaments
Mickey Mouse Jingle Bell Ornaments


10+ Christmas Tree Ornaments to Make

I have been making a ton of ornaments this year. The kids think it is a lot of fun to get out the glue and the glitter and get creative! Well, let's be honest, I do too! My oldest has been making lots of cute things at school to bring home and share too!


To keep up with the fun of creating at Christmas, I have 10+ ideas to share with you from some of my favorite bloggers! All 10+ of these are easy and adorable! I hope you get a chance to try them, or any of the ornaments I have made live on the Quirky Momma facebook page.


Favorite craft ideas


Felted Wool Christmas Trees

Sparkly Sequin Ornaments

Essential Oil Diffuser Ornaments

Cinnamon Applesauce Ornaments

Stacked Christmas Tree Ornaments

Craft Stick Trees

Pipe Cleaner Beaded Trees

Glitter Clay Trees

Easy Accordion Trees

Noodle Popsicle Stick Trees

Easy Button Tree Ornaments

Live Video Projects


Etched Glass Jars
Candy Cane Wreaths
Popsicle Stick Ornaments
Christmas Houses
Toilet Roll Snowflakes
Washi Tape Cards
Toddler Christmas Tree Crafts
Tree Ornaments

If you have an idea for a Christmas ornament, I hope you will share it in a comment!

Easy Gnome Christmas Ornaments

These easy Gnome Christmas ornaments are perfect for crafting with the kids this holiday season.


We love to make easy crafts with the items we already have on hand. Some of my best ideas and favorite projects have stemmed from the junk drawer and items destined for the trash. These Christmas gnome ornaments are a great example of what you can make with simple stuff you probably already have.


These are awesome because with a different pattern of paper, or bigger googly eyes, your gnome looks totally different. If you don't have the supplies in the junk drawer or your craft supplies, you can get all of these things from Dollar Tree or even better- improvise!


Supplies per 1 gnome:

2 googly craft eyes
3 craft sticks
cotton balls
Red Pom Pom
Glue
Brown Bag
Scrap Book Paper
Confetti
Sharpie
Ribbon


Directions:

With the 3 craft sticks glue them together to form a triangle.


Cut a triangle from the brown bag to fit in the craft stick frame.


Add a generous amount of glue to the craft sticks and place the bag on top of it.


Cut a smaller triangle from scrap book paper to form the hat of your gnome.


Add eyes, a pom pom nose and draw on a mouth with a sharpie.


Add a chunk of confetti or some type of adornment to the hat.
Add a row of cotton balls for the beard.


Flip the gnome over and glue a ribbon to the back.


Hang your cute and easy gnome Christmas ornaments from your tree or share them with friends and family!


You can make dozens of these and make them all unique by simply changing the paper of the hats and the size of the pom pom of the nose.


This is such a fun craft to make with the kids! We loved making and naming our gnome ornaments!


Find all of our DIY Christmas Ornaments here.


Easy Ribbon and Craft Stick Ornaments

This easy ribbon tree craft is a fun way to decorate your tree this holiday season. These are easy to make, economical and perfect for sharing with your friends and family!


This post contains affiliate links. If you click and purchase I make a small commission.

You can mix and match ribbon colors, or stick with one color, whatever you prefer. I used a thin strip of ribbon that fit perfectly with my chunky crafty sticks.


Supply List:

Glue
Scissors
A Pencil


Directions:


  • Line up 4 craft sticks
  • Lightly draw the outline of a tree on the craft sticks, as you can see we simply made slanted lines.
  • Cut the craft sticks per the lines you made.


  • I made a tiny pointy triangle from the scraps of craft sticks for the top of the tree.
  • Cut and glue ribbon to fit the cut craft sticks.

  • Trim the ribbon to fit.
  • Now assemble your tree and glue it on to the remaining craft stick.


  • Cut 6 inches of ribbon and form a loop, glue this to the back to act as an ornament hanger.
  • Allow to dry, then hang from your tree, or share with someone special this holiday season!


These were so easy to make! Last year I added them to my wrapped gifts to add something extra to the presentation.

We have so many other fun Christmas ornament crafts you will want to check out. A few of our favorites include:

Mickey Mouse Jingle Bell Ornaments

Ribbon Tree Ornaments


Easy Ghost Window Cling

Halloween is near, and this cute little ghost will add a touch of fun to your windows without spooking your wallet! This is economical, adorable and easy to make!


We can't get enough Halloween crafts. Both of the kids and I enjoy creating frighteningly fun projects to get us even more excited about any holiday!

We were short on time one afternoon and wanted to make a cute and easy craft. This is what we came up with, a fun ghost for the window! This only took a few moments to complete and we loved it for a few reasons. The kids got to practice their scissor skills, which is an important skill for all kids, and they got to experiment with textures.


You will need {per 1 ghost}
 one square of white paper
4 small circles of black paper
2 slightly larger circles of black paper
A section of contact paper, transparent, to accommodate the size of the ghost you wish to make
Scissors
3 glue dots, school glue etc


Begin by placing your contact paper sticky side up
Add 2 black dots to the contact paper for eyes
Add one larger black circle of paper for a mouth
Cut the white paper to look like a ghost
Add the ghost shape over top of the eyes
Add 2 remaining eyes and mouth to the ghost
Stick it on a window for a spooky fun addition!

And there you have a super economical, fun and easy ghost craft for kids!

Find more Halloween DIYS here
Reader favorites include:
Glam Pumpkin Make Over

Witch Window Cling

It is hard not to get in the spirit of things this Halloween with his hands on witch window cling craft!


This window cling was so much fun to make with the kids. I love that it gives them a chance to use their fine motor skills and practice scissor skills while making something so cute for your windows!

Supplies

Scissors
Clear Transparent Contact Paper
Green, Black, White, Purple Construction Paper
A scrap of pink or red paper


Have the kids tear and cut up the black, green and purple paper into small bits.
Make 2 small circles from a black square of paper.


Cut out small white circles for eyes and a small smile from the red or pink paper.


Begin by placing the small black circles on the contact paper, sticky side up.
Cover those with the white circles for eyes


Next form the nose, mouth and hat of the witch


Begin filling in the face with green bits of paper.


Fill in the remaining areas with purple.

Leave just a few areas uncovered so that the contact paper will stick to your window.


We thought these were really cute. They were fun to make and offered the kids a little challenge as the contact paper is sticky. 

You can find all of my Halloween ideas here.

Paper Plate Witch

Glam Pumpkin Makeover


DIY Barbie Serving Tray

My daughter is really into all things Barbie. So I made her this cute little rustic serving tray for her Dreamhouse play sessions. It took me less than 5 minutes and is pretty cute and you can personalize it if you wish!


We have all but given up on Barbie accessories. My kids lose them, the dog chews them and it seems like a big waste of money. I won't buy any more, but I will DIY some!


 I made this Rustic Barbie Serving Tray happen in moments with 3 supplies. It is pretty cute and it cost me $0 to make.


Supplies

6 small craft sticks 
Scissors
Glue Gun


Directions

Glue 3 craft sticks together
Trim the rounded edges off of 3 craft sticks then glue 2 of them to the longest sides of the base.
Cut the remaining craft stick in half
Glue this to the other ends


 Now you have a rustic serving tray for Barbie and her friends. Can you believe how easy that was?

We are already planning to make a version of this with taller sides to flip over as a coffee table for Barbie. You can paint the serving tray, or cover it with washi tape for a unique look if your daughter isn't into Farmhouse style decor yet.

Find all of my craft stick projects here

Handprint Fish Puppets

Monster Handprint Puppets