Showing posts sorted by date for query craft stick. Sort by relevance Show all posts

Fun and Creative Kids Activity: Stamping Bunches of Grapes Process Art

 Looking for a fun and creative kids activity that is both educational and festive? Look no further than stamping bunches of grapes with pencil erasers and wine corks! This activity is perfect for kids of all ages, and it can be enjoyed indoors or outdoors.


We love to paint with all kinds of things! From wine corks, to dried flower heads, and everything in between. This easy painting project is perfect for kids of all ages. Little ones will love working on a few bunches or grapes, while tweens and teens can create more elaborate works of art.

What is Process Art for Kids

Process art for kids is a type of art where the focus is on the process of creating the art, rather than the finished product. This type of art is often open-ended and allows kids to be creative and expressive. There are many different types of process art that kids can do, such as:

  • Painting
  • Drawing
  • Collage
  • Sculpture
  • Performance art
  • Installation art

Process art is a great way for kids to explore their creativity and to learn about different art materials and techniques. It can also help them to develop their fine motor skills and their problem-solving skills.

Here are some tips for doing process art with kids:

  • Provide a variety of art materials and let kids explore them.
  • Don't be afraid to get messy!
  • Encourage kids to be creative and expressive.
  • Don't judge their art.
  • Celebrate their creativity.

Process art can be a lot of fun for kids. It's a great way for them to express themselves and to learn about art. So get creative and let your kids explore the world of process art!


Supplies:

  • Purple Paint
  • Green Paint
  • A paper plate
  • A pencil eraser
  • A wine cork
  • White paper


Begin by stamping one purple dot, then on the next row, stamp two. Repeat thru 4 to 5 rows of grapes.


Repeat until your paper has plenty of purple bunches of grapes. 


Now grab your wine cork and dip into the green paint.


Fill the blank space in between grapes with green dots for leaves. When you are finished your paper should look like this.


So pretty! Let this dry and display it somewhere in the house. You could stick it on the fridge, but this turns out so cute you might want to frame it.


This is a perfect spring or summer craft for kids of all ages. It is easy, and needs no special supplies. I know you will have fun with this process art project.


Find more fun kids craft ideas here:

Pineapple process art

Cork and Button Apple Trees


Here are some process art for kids ideas:

  • Painting with natural materials: Gather some natural materials, such as leaves, flowers, twigs, and grass. Dip the materials in paint and then stamp them onto paper.
  • Collage: Collect a variety of materials, such as magazines, newspapers, fabric, and yarn. Cut out shapes from the materials and then glue them onto paper to create a collage.
  • Sculpting with playdough: Playdough is a great material for sculpting. Kids can use their imaginations to create anything they want, such as animals, people, or objects.
  • Performance art: Performance art is a type of art that is performed in front of an audience. Kids can create their own performance art pieces, such as dances, songs, or plays.
  • Installation art: Installation art is a type of art that is installed in a specific space. Kids can create their own installation art pieces, such as sculptures, paintings, or photographs.

These are just a few ideas for process art for kids. There are many other possibilities, so get creative and let your kids explore their imaginations!

Crafts Where the Quality of Your Water Matters

Water is important not only for your health but also in various processes. In its purest form, there are many uses for distilled water. You can improve water quality through systems like Brita reverse osmosis and use it for various applications. For instance, several crafts require you to use high-quality water. This article discusses some of these crafts in detail. 

Making Homemade Perfume

Perfume making is a craft that needs high-quality water. Instead of using a perfume that everyone else is using, you can make a unique one using different ingredients. Listed below are some of the materials you will need for this craft:

  • Distilled water

  • Fragrance oils, essential oils, flavor, and infused oils such as vanilla extracts

  • Glycerin


Other materials you will need include a decorated glass bottle to store the finished product (preferably colored glass), measuring spoons or cup, a glass jar for mixing the fragrance, wrapping paper or aluminum or wrapping paper, especially when using clear glass bottles, a funnel, dropper, pencil, and paper for writing your recipe. 

Advantages of Homemade Perfumes

There are several advantages of homemade perfumes; here are some of them:

  • They do not contain ingredients grown with toxins, pesticides, or chemicals, leading to environmental damage and skin sensitivity. 

  • By using natural and essential oils to make homemade perfume, you create emotional and physical healing properties such as mood-lifting, relaxing, energy-enhancing, and calming. 

  • Compared to perfumes with synthetic properties, homemade perfumes are not tested on animals. The ingredients in mass-manufactured perfumes include musk and phthalates, which can cause harm to animals. 

  • Non-natural fragrances mask the wearer's skin, while homemade ones create a more individual and personal scent. 

Canning Fresh Produce

This is another craft that needs high-quality water. By preserving food, you encourage certain bacteria to crowd out harmful bacteria. Preserving food also means freezing time to prevent it from going bad. Canning is one of the most reliable methods of preserving food. This method relies on distilled water for the best results, and you can buy distilled water online which makes this a lot easier.
 

The simplest method of canning is water bath canning, where you fill jars with acidic foods such as cucumbers, berries, or tomatoes mixed with vinegar. Cover them in a pan of distilled water until a seal forms under the lid. This process forces air out of the food and then out of the jar, creating a vacuum in the acidic environment. By doing so, the harmful bacteria will not survive. 

Water bath canning can also create several delicious foods such as jellies, jams, pickles, and whole tomatoes. If you have advanced equipment, you can try out pressure canning. Even though this procedure requires specialized equipment and more skills, it can unlock a wide range of flavors and food options. Keep in mind that the success of this process comes down to minor details like the quality of water you are using — always ensure it is distilled! 

Making Cosmetics

Quality water is also needed in making cosmetics. In this craft, water plays a very important role. Given that water can dissolve the highest number of solutes, it can dissolve most ingredients used in making cosmetic products. This makes distilled water an essential ingredient in making cosmetics, from shaving creams to shampoo.

Even in the mass manufacturing of these products, pure water is needed. This is because the presence of unwanted particles like magnesium and sodium can interfere with the precise and delicate production of cosmetic products. Distilled water doesn't contain any impurities, making it perfect for use in the production of cosmetics. Furthermore, since cosmetic products are mostly used on the skin, pure water is the most reliable, as it does not contain any chemical that can cause irritation.

Making Fun-Shaped Ice Cubes

This craft needs water without any impurities. Distilled water can make shiny and clear ice cubes in less time compared to contaminated water. The process of making ice at home is simple. Start by filling your decorative shapes with distilled water. Then, stick it in a freezer and wait for several hours.

Releasing the ice is not complicated either. Take out the ice shapes from the freezer, twisting or spinning slightly to allow the fun shapes to pop out. This will get you perfect fun shapes ready for consumption! It is important to keep in mind that ice in any form should only be made with distilled water. Anything other than that could result in poor-quality ice or impede on the flavor of your preferred beverage.

Finally

Several crafts use distilled water. This article has discussed some of them and how distilled water is used. You can try out any of these crafts at home!


Fine Motor Counting Activity

This activity is perfect for small hands. It combines counting and fine motor work for a fun, hands on approach to learning. This introduction to math is perfect for preschoolers. Best of all, you can get everything you need to set this up at Dollar Tree.


Little hands love pinching, so this activity is perfect for making math fun while engaging fine motor skills! My kids both loved this early introduction to counting when they were smaller, and I often pull this activity out when we have little guests in our house who need something to do. This is the ultimate boredom buster and will always have a place in my busy bag collection.


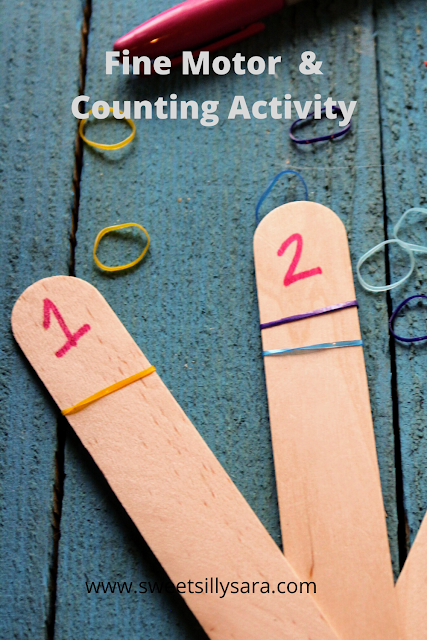
All you need to make this is some tiny clothespins from dollar trees craft section and a few craft sticks. Mark the numbers you are using on the craft sticks and hand the kids some clothespins. Encourage your child to count the clothespins and put them on the craft stick. 

This is one of those activities you will want to supervise, to keep the pins from mouths, noses and ears. 


If you enjoyed this easy activity for kids, you will want to check out some of my other preschool projects.

Fine Motor Counting Activity

This easy activity is perfect for practicing early math while developing fine motor skills.


Before I was a mom, I was a developmental psychology major. In my studies, I was intrigued by sensory and fine motor development then. Now that I am a mom, I love setting up activities for my own kids that give them hands on fun and learning opportunities without spending a ton of money to do it.


This fine motor counting activity is perfect for preschoolers.They can work on their fine motor skills while practicing counting. You might have all the materials at home to do this, making it fuss free and frugal. If not, I have included some affiliate links you can use to get your supplies.

Supplies:
Rainbow Bands
Large Craft Sticks
Sharpies


Directions:
Write numbers on large craft sticks with sharpies.
Use the largest craft sticks you can find to make the activity challenging.
Offer your child small rubber bands, like the rainbow loom style of bands and encourage your child to count the number of bands that need to go on each craft stick and slide that number of bands on to each craft stick.


If you are looking for more fine motor activities for kids, check out these posts:
Unicorn Fine Motor Bin
Play Doh Pre Writing

Glow in the Dark Galaxy Slime


My kids have been begging to make slime for a while now. I finally caved and made a really pretty glow in the dark galaxy slime. This was easy and fun to make. My kids loved it in the daytime, and at night too!


We loved this slime because it can technically be made with stuff you already have. I happened to have glow in the dark powder at home, so I added it. Use whatever glitter or confetti you have to make this easy slime. 

I am including affiliate links below. If you make a purchase it helps to my site up and running via commission paid via advertisers.

Supplies:
1 cup of cornstarch
3/4 cup of water
A craft stick


Directions:

Mix the glow in the dark powder with the cornstarch.


Slowly add the water to the blue cornstarch.


Add a generous amount of extra fine black glitter and silver star confetti.


Begin to mix the slime with the craft stick.


As it begins to clump together begin kneading by hand.


Your slime is ready when it is dry to touch but squishy!


If your slime is too runny add a pinch more cornstarch.


This will glow in the dark if left to 'charge' in the sun. You can also use a black light to really bring out the glow in the dark properties.


You can find all of my kid crafts here.
Reader favorites include:
Green Button Trees

Straw Necklaces


Design Your Own Play Doh Ornaments

Kids of all ages are sure to love this Design Your Own Play Doh Ornaments project. It is perfect for holiday crafting and turns out so cute everyone will love to display these!


I am crazy for all things play doh, so naturally I had to make something for Christmas from my favorite craft material. These ornaments are so easy! They will have you saying, who knew you could not only draw on play doh but you can bake it too?!

This post contains affiliate links. Making a purchase means I will earn a small advertising fee, at no cost to you.


These easy ornaments give kids a chance to design their own addition to the Christmas tree! Made with basic supplies this is the perfect project to do with the kids for minimal mess this holiday. 


You can make your own white play doh, like in my super soft play dough recipe, just leave the food color out, or to make this activity really easy during a generally already packed holiday season, just buy cans of white play doh.


To make these design your own play doh ornaments you will need
Supplies
white play doh
washable markers
cookie cutters
bakers twine
A pen or stick to poke a hole with


Directions
Roll the play doh out to be about 1/8" thick.
With your cookie cutter of choice cut shapes of doh.


Poke a hole in each ornament so that it can be hung after completion. I used an ink pen to make my holes.


Use washable markers to draw on the designs.
Bake at 350 degrees for about 30 minutes.
Allow to cool.
Thread bakers twine through the hole and display on your tree.


Find all of my Christmas crafts here
Reader favorites include:
Button Tree Ornaments
Mickey Mouse Jingle Bell Ornaments


10+ Christmas Tree Ornaments to Make

I have been making a ton of ornaments this year. The kids think it is a lot of fun to get out the glue and the glitter and get creative! Well, let's be honest, I do too! My oldest has been making lots of cute things at school to bring home and share too!


To keep up with the fun of creating at Christmas, I have 10+ ideas to share with you from some of my favorite bloggers! All 10+ of these are easy and adorable! I hope you get a chance to try them, or any of the ornaments I have made live on the Quirky Momma facebook page.


Favorite craft ideas


Felted Wool Christmas Trees

Sparkly Sequin Ornaments

Essential Oil Diffuser Ornaments

Cinnamon Applesauce Ornaments

Stacked Christmas Tree Ornaments

Craft Stick Trees

Pipe Cleaner Beaded Trees

Glitter Clay Trees

Easy Accordion Trees

Noodle Popsicle Stick Trees

Easy Button Tree Ornaments

Live Video Projects


Etched Glass Jars
Candy Cane Wreaths
Popsicle Stick Ornaments
Christmas Houses
Toilet Roll Snowflakes
Washi Tape Cards
Toddler Christmas Tree Crafts
Tree Ornaments

If you have an idea for a Christmas ornament, I hope you will share it in a comment!

Easy Gnome Christmas Ornaments

These easy Gnome Christmas ornaments are perfect for crafting with the kids this holiday season.


We love to make easy crafts with the items we already have on hand. Some of my best ideas and favorite projects have stemmed from the junk drawer and items destined for the trash. These Christmas gnome ornaments are a great example of what you can make with simple stuff you probably already have.


These are awesome because with a different pattern of paper, or bigger googly eyes, your gnome looks totally different. If you don't have the supplies in the junk drawer or your craft supplies, you can get all of these things from Dollar Tree or even better- improvise!


Supplies per 1 gnome:

2 googly craft eyes
3 craft sticks
cotton balls
Red Pom Pom
Glue
Brown Bag
Scrap Book Paper
Confetti
Sharpie
Ribbon


Directions:

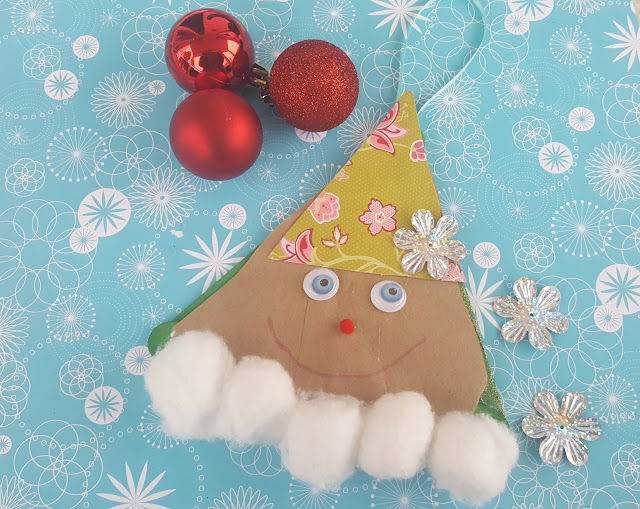
With the 3 craft sticks glue them together to form a triangle.


Cut a triangle from the brown bag to fit in the craft stick frame.


Add a generous amount of glue to the craft sticks and place the bag on top of it.


Cut a smaller triangle from scrap book paper to form the hat of your gnome.


Add eyes, a pom pom nose and draw on a mouth with a sharpie.


Add a chunk of confetti or some type of adornment to the hat.
Add a row of cotton balls for the beard.


Flip the gnome over and glue a ribbon to the back.


Hang your cute and easy gnome Christmas ornaments from your tree or share them with friends and family!


You can make dozens of these and make them all unique by simply changing the paper of the hats and the size of the pom pom of the nose.


This is such a fun craft to make with the kids! We loved making and naming our gnome ornaments!


Find all of our DIY Christmas Ornaments here.


Easy Ribbon and Craft Stick Ornaments

This easy ribbon tree craft is a fun way to decorate your tree this holiday season. These are easy to make, economical and perfect for sharing with your friends and family!


This post contains affiliate links. If you click and purchase I make a small commission.

You can mix and match ribbon colors, or stick with one color, whatever you prefer. I used a thin strip of ribbon that fit perfectly with my chunky crafty sticks.


Supply List:

Glue
Scissors
A Pencil


Directions:


  • Line up 4 craft sticks
  • Lightly draw the outline of a tree on the craft sticks, as you can see we simply made slanted lines.
  • Cut the craft sticks per the lines you made.


  • I made a tiny pointy triangle from the scraps of craft sticks for the top of the tree.
  • Cut and glue ribbon to fit the cut craft sticks.

  • Trim the ribbon to fit.
  • Now assemble your tree and glue it on to the remaining craft stick.


  • Cut 6 inches of ribbon and form a loop, glue this to the back to act as an ornament hanger.
  • Allow to dry, then hang from your tree, or share with someone special this holiday season!


These were so easy to make! Last year I added them to my wrapped gifts to add something extra to the presentation.

We have so many other fun Christmas ornament crafts you will want to check out. A few of our favorites include:

Mickey Mouse Jingle Bell Ornaments

Ribbon Tree Ornaments