Goodnight Kiss Cocktail Recipe

This post contains affiliate links, if you click a link, I could get a peanut! 

Gin is my favorite spirit to drink! I love the flavor that is reminiscent of a Christmas Tree; I love the warm and fuzzy feeling it always gives me! I love to mix it and create new cocktails. Every weekend I mix up something a little different from the weekend before and it dawned on me... why am I not sharing these awesome recipes with you guys?!

This weekend, I made something so fantastic that it earned a name within moments of consuming it! If you like a sour drink, you are going to love the Goodnight Kiss. This drink combines Sparkling Pink Lemonade , concentrated sweetened Lime Juice and gin to bring a delicious drink that will make you pucker up, just like you are ready for a Goodnight Kiss!


Ingredients:
2 shots of extra dry gin
1 ounce of sweetened lime juice concentrate
4 ounces of sparkling pink lemonade
2 orange slices
1 maraschino cherry
1/4 teaspoon of sugar
Ice

Directions:
Place ice to your liking in a glass.
Place the orange slices and maraschino cherry on the ice
Add sweetened lime juice
Add sugar
Give the drink a gentle stir
Add Sparkling Pink Lemonade
Add the gin

This drink is great. It is kind of like those sour then sweet candies for kids. The first few sips, your lips pucker from the lime juice. After a few sips, it becomes sweeter. {Likely from the gin taking hold!} It is a lot of fun to drink!


Do yourself a favor. Resist the urge to eat the fruit right away. Let it soak in some of the gin! After a few moments, eat the fruit for a delicious fruity booze treat! I usually wait until the drink is drunk to nibble the fruit, always saying "This is the way to enjoy gin..."

You might also enjoy this Boozy Slushie recipe!

What is your favorite way to drink gin?

How To Remove Cat Urine From Carpet

There is nothing quite like the smell of cat pee on your carpet to really put a damper on the day. While we don't want to admit it, life with pets leads to a few messes here and there. Cat pee can be such a hard odor to get rid of, especially on carpet! It also seems that once your cat has an accident on the carpet, that spot is going to become a frequent place for future accidents if not treated.

My cat has had several accidents over the years. I have tried several methods to remove the odors and the germs! From specialty products sold in pet stores to natural remedies. I have had a variety of results as you can imagine. It seems that the products that work the best require the most work. Then one day, I had an idea and I tried it... Luckily it worked! I can't wait to share this easy DIY solution to pet odors that not only kills bacteria and germs but also has a pleasant smell!

Best of all- this is a DIY solution for pet odors like cat pee that will only cost you $2 to create. You may already have all of the supplies on hand for a frugal and fast fix to pet accidents!

The first step to take when your pet has an accident is to clean up as much of the urine as possible with paper towels. Blot it up as soon as possible until your paper towel is dry after blotting! This will make the job so much easier.

If you have a newspaper around lay it on top of the area where the accident occurred. The newspaper will absorb some of the odor.


Affiliate links are used!


Next, you need an empty spray bottle and mouthwash.

Pour mouthwash into your clean and empty spray bottle.


Simply spray this over the area that the accident occurred. Spray the area down until it is damp.


And there you have it. A simple DIY Cat Urine Remover that is super easy to make and use. The mouthwash will kill bacteria and leave a pleasant smell. As you can see I used mint, because that is what my local Dollar Tree had in stock.

How do you deal with the mess and smell when an accident happens? 


Snickerdoodle Cake

Today I am sharing one of my favorite recipes with you. Usually, you bake a cake for a special occasion, but in the case of this recipe, the cake becomes the occasion! The recipe was inspired by a classic cookie that just about everyone loves and this cake is just as fantastic. Best of all, this Snickerdoodle Cake is easy to prepare from scratch!


This cake is gorgeous after baking and I always hesitate to cut it into slices for just about a nanosecond! But it smells divine and it has so much flavor that there is no way to not devour it! This picture does not do it justice, really! But, guys, this is the best I have for you as the cake was devoured in a flash! My husband could be heard groaning in delight. My children could not rest at the thought of this cake!

This post contains affiliate links.

Ingredients for Snickerdoodle Cake
2 cups of white sugar
2 1/2 cups of all purpose flour
2 teaspoons of baking powder
1/2 teaspoon of salt
2 teaspoons of cinnamon
1/2 cup of butter flavored shortening {I used Crisco}
2 eggs
1 cup of milk
1 teaspoon of pure vanilla extract

Cake Topping Ingredients
2 tablespoons of white sugar
2 teaspoons of ground cinnamon


Directions
Preheat oven to 375 degrees

Spray a cake pan (13x9 or a bundt pan) with cooking spray

In a medium sized bowl mix the flour, salt, cinammon and baking powder together, set aside

Cream together shortening and sugar until fluffy

Add eggs one at a time, mixing well

Add 1/3 of flour mixture and 1/3 a cup of milk, mixing well and repeating until all ingredients are combined

Pour cake batter into prepared pan

Combine the Cake Topping Ingredients and sprinkle over the batter 

Place in the preheated oven to bake for 35-40 minutes or until baked. 

This cake is incredible with or without frosting! I top it with my Cinnamon Buttercream Frosting. It is a huge hit with everyone that tastes it. The cake is kind of heavy, there is a simple and scrumptious flavor to it, and everyone will ask for your recipe!

What is your favorite kind of cake? I would love to hear about it in a comment!

You might also like this rice pudding recipe


Blueberry Chia Breakfast Bowl

We all know Breakfast is a meal not to be missed, but come on guys! I cannot get excited about eating a bowl of cold cereal from a box for breakfast... now at snack time some cereal is my go-to, but for breakfast? Give me something healthy, delicious and it has to have some visual appeal too!

This Blueberry Chia Breakfast Bowl is the way to go for a start to your day that is almost too pretty to eat and that is so delicious you just might hop out of bed at the thought of it!


Ingredients

  • 2 cups fresh or frozen blueberries
  • 2/3 cup low fat milk
  • 2 tablespoons maple syrup
  • 1 banana, peeled
  • 1/3 cup quick-cooking oatmeal
  • 1/4 cup chia seeds

Instructions

  1. In a blender or food processor combine blueberries, milk, maple syrup and banana; blend until smooth.
  2. Divide mixture among two serving bowls.  Stir in oatmeal and chia seeds.
  3. Refrigerate for 30 minutes to thicken.
Serve with your favorite yogurt and sprinkle with more blueberries
Number of servings (yield): 2

Have you ever had a breakfast bowl like this Blueberry Chia Breakfast Bowl? This one is nothing short of incredible. I love that it is packed full of fruit and oats and that it can even be made the night before for a super easy start to the day!

Thanks to my friends over at the Blueberry Council for inspiring this post!

Upcycle Coffee Can Project

I have a big serious love of contact paper! You guys! This stuff is amazing! I have to stop myself when I get on a kick to buy contact paper because I want it ALL! I see different colors and prints and I think about all of the possibilities of projects I could work on.

You might remember that I made a DIY Blanket Box for under my daughter's crib a few months ago. That got me on a contact paper craft craze! Nothing was safe from my stash of contact paper! I created a few decorative containers that can be used for so many things!

I used mine to store markers in, as well as a really cute and simple way to organize kitchen things like wooden spoons and glass straws.

Materials needed to Upcycle a Coffee Can into a decorative storage container:
Contact Paper in your choice of prints.
Scissors
A clean coffee can or two
A utility knife


This project was so easy to do!

First, clean the interior of the coffee can to be sure there are not coffee grounds there!

Next make a measurement on how long and wide to cut your paper based on the size of the can. This is what I love about contact paper... it is so easy to measure, cut and work with!

Peel a small strip of the backing off of the contact paper and place it on your coffee can. Slowly, peel the paper back while smooting the adhesive paper to the surface.


As you cover the can, you are likely to have a little excess around the rims. No biggie, this is so easily remedied! You can use your utility knife to trim around the rims really easily! Just be careful, as those things are crazy sharp!

Everyone that sees my upcycled coffee can says "Where did you get them?" They are really cute, they used to match my kitchen perfectly before our move, and they have been surprisingly easy to keep clean {use a baby wipe}!

This upcycle project really didn't cost me anything to complete as I had materials on hand already, but I would say a thrifty shopper could find contact paper at Dollar Tree and make 4 of these {estimate} for $1.


Do you ever reuse a coffee can? I would love to hear how!

Paper Cookies A Preschool Food Craft

My kids are so cute! They always want to help in the kitchen! When I do dishes, my daughter Harper will push a chair into the kitchen and climb up to the sink. She will say "I can do this Mom!" or she will want to help make coffee and push all of the buttons. If there is cooking involved my son dashes in, ready to help! I welcome their company in the kitchen 90% of the time. But, as any mom will tell you, there are times when having small kids in the kitchen is not the best idea.

On those rare times, I feel bad to deny their help, so I came up with a few fun food crafts that the kids can make while I am occupied with a complicated recipe.  The first one we did as you might recall was a pizza craft. The kids had so much fun making pizzas! We have made several of these since the post!

Tonight I was frying chicken, a rare thing that I admit, I am not so great at. I didn't want the kids to get splashed with hot oil so I entertained them with a paper cookie craft. It was a huge hit!


This was incredibly easy for the kids to make, the materials were super simple making preparation a breeze for me, and best of all- this craft does not require anything special. Seriously, you are going to have the supplies in your house!


Materials Needed to Make Paper Cookies

Several Brown Paper Bags or brown or yellow construction paper
Glue
Sprinkles
A Paper Plate

Instructions

To begin, cut circle shapes in the brown bags or construction paper as your cookie base.
{I cut about 30 circles at a time so that we can do this craft multiple times}.


Place as many circle cookie shapes as you like on the paper plate.
Drizzle glue onto the circle 'cookies'
Decorate with sprinkles
Allow to dry.

This was so fun for the kids! We will be making these again soon I am sure! Do you like to do paper crafts with your kids? I would love to hear about your favorites!

DIY Photo Puzzle

My kids and I are really into crafting right now. On cold, rainy and yucky days like we have been having a lot of in Ohio, there is nothing better than digging into my craft cabinet and pulling out a few projects to entertain us when the weather is keeping us inside.

On one particular day, we ended up with a stack of duplicate photos and I knew that these should be put to good use instead of sitting in a photo box or ending up in the trash. After a few moments of careful consideration, I realized that a few craft sticks and some glue would take these double photos from miscellaneous junk into a treasure for the kids.

We came up with these DIY Photo Puzzles. We had so much fun gluing them together that we made a few to share with Grandparents and Daddy, as well as a stack for the kids to tinker with.

To make a DIY photo puzzle all you need is:

A photo
craft sticks
your favorite adhesive {we used glue sticks}
A utility knife

This project is so easy to make! All you need to do is:

Lay the picture side of the photo down and add glue to the back liberally.


Line up craft sticks across the back on the glued side of the picture.


Press firmly to allow the glue to bond to the craft sticks.

Flip the photo over

This step should be completed by an adult as utility knives are crazy sharp.

Carefully cut the photo between the sticks, continuing until the photo is cut into strips backed with a craft stick.

Allow the glue to dry.

Mix up the pieces and assemble the photo puzzle.

These are so much fun to give to people and they are a great challenge for my preschooler. My toddler finds them too difficult as of now, so we are going to make a few easier ones from cards we received over the 2015 holidays for her.

If you are looking for a last minute DIY gift idea or just a fun surprise for the kids, this one takes about 5 minutes tops to complete and is sure to bring a smile or two! Best of all, you likely have materials on hand to complete this project making it very frugal!


Taco Pasta Salad

My favorite meals to prepare are the ones that come together quickly, that can be served simply without a lot of fuss, and of course the ones that offer leftovers. My family loves leftovers so I consider myself fortunate! We all love pasta and who doesn't like a great taco? Combining them creates a meal that can be made ahead of time, that can be served without any prep work after a long day, and that will have your family asking for leftovers guaranteed! My favorite thing about this dish is that it is served cold. We have this at least once a month in the summer!


Taco Pasta Salad
Ingredients

1- 16 ounce box of garden rotini cooked al dente and chilled
1 pound of lean ground beef, browned, drained and chilled
1 12 ounce bottle of Catalina Salad Dressing
1 cup of shredded cheddar cheese
1 envelope of mild taco seasoning
1/2 cup of black olives
1 cup of cherry tomatoes
1 medium sweet onion, sliced or diced {your preference}
1 bell pepper, sliced or diced
salsa
sour cream
Nacho Cheese Doritos

Directions
Prepare ground beef with taco seasoning, allow to cool to room temperature then chill
Prepare rotini al dente style, allow to come to room temperature

After the first two steps have been completed, combine the pasta and Catalina Salad Dressing.
Mix well until all pasta has been coated. 
Add cheese
Add the taco meat and stir well, evenly distributing the cheese and meat.

Prepare the fresh vegetables, but place them in individual sealable containers or baggies.

When it is time to serve, start with a bed of Doritos, then spoon the pasta mixture over them.

Top with vegetables, salsa and sour cream to your liking.

This makes a generous amount of Taco Pasta Salad. My family of 2 adults and 2 children will usually have this for 3 meals. I love to add lettuce to mine with lots of onions and olives. My husband loves the peppers and tomatoes, so offering the toppings on the side allows us the opportunity to make it to taste with our veggies. The kids are just thrilled to have a meal with chips in it! Ha! To be honest, that appeals to me too sometimes!

Another favorite recipe that we sometimes serve with this Taco Pasta Salad that is light and crowd pleasing is my Veggie Pizza. Again this is a cold serve recipe and I love how we can get even more fresh veggies into our meal in such a yummy way!

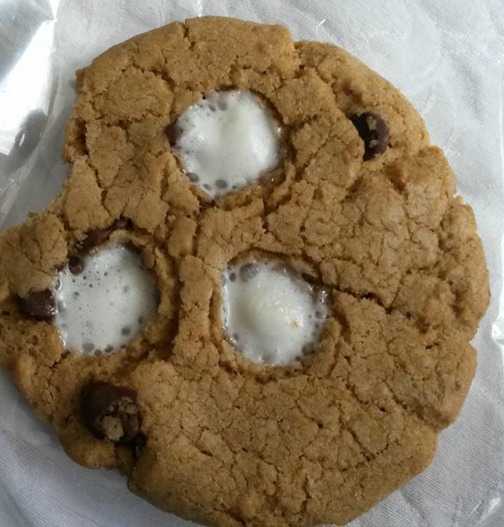
S'mores Cookie Recipe

Last week I had the urge to bake. I browsed through my favorite recipes and had that feeling that I have made all of this stuff a hundred times... I promised Roo I would have cookies for him when he came home from school, so I started browsing recipes I hadn't tried before. I stumbled across this recipe for S'mores Cookies and decided to give it a whirl. I am so glad I did!

These cookies are addictive. They are sweet, have gooey spots and are sure to please even the toughest cookie critic!

So yummy I had to sneak a bite before photographing!

Ingredients

1 ½ cup flour
1 ½ cup finely crushed graham crackers
¼ tsp baking powder
½ lb butter
¾ cup brown sugar
¾ cup white sugar
¼ tsp salt
1 tsp vanilla
2 eggs
2 cups chocolate chips
1¼ cup mini marshmallows

Directions

Put marshmallows and 1/2 of the chocolate chips on a plate and set aside.

Cream the butter and sugars until well combined.

Add eggs and vanilla extract and beat well. 

Stir in  half of the chocolate chips.

Add dry ingredients mix until combined.

Drop two ounce cookies onto ungreased baking sheet and bake in 350 degree oven for seven minutes.

Take cookie sheet out of oven and press three marshmallows and three chocolate chips into each cookie.

Return to oven and bake for an additional two minutes or until marshmallows are melty.

Remove from oven and allow to cool.

These S'mores Cookies were a big hit with my family! My son said "Mommy? You made these?" Like he couldn't believe I tried a new cookie recipe! It was so cute!

These are now going into the group of favorite recipes to bake! I know we will whip up another batch of these very soon! They were incredibly easy to make; the hardest part was pressing the marshmallows and chocolate chips into the cookies during the baking process!

What is your favorite kind of cookie to bake? I would love to hear about it!

DIY Sorting Toy {Fine Motor Activity}

One of the things I love about being a mom is that somehow, my kids think I am magical when I come up with a fun way to play out of the blue. No matter how simple the activity, they are always interested and amazed. I know I complain sometimes about how hard parenting is, but you know, the tough moments are so worth it. Little kids are so fun and so sweetly simple in what it takes to get them interested in learning new skills and practicing their existing ones.


One of our favorite upcycled activities was completely simple to create and both of my kids played with it for hours! If you have toddlers or preschoolers in your home, this DIY Sorting Toy is a must make. It offers kids a simple fine motor activity as well as a chance to practice sorting, counting, differentiating between sizes and identifying  colors.

You will need:
a clean an empty egg carton
assorted pom poms {use different colors and sizes for additional sorting challenges}
Tongs or Tweezers for Children 


As you can see all I did was dump a handful of pom poms into a clean and dry egg carton. I laid a pair of rubber tongs for kids down and let Roo explore this option on his own. 

He sorted and sorted! He worked on his fine motor skills, his colors and sorting by size. 
This was an upcycle project that was super easy to put together and that my kids had a lot of fun learning and playing with!


How We Afford the Holidays Without Credit Card Debit

When I talk to my friends and family about the holidays, the subject of budgeting and credit card debit comes up. No one can ever believe me when I tell them we accumulate $0 credit card debit for holidays and I never spend more than $50 on gifts.

I have had people say things like "That is a flat out lie Sara. The gift you gave us last year cost at least $30!"
They always want to know how I can decorate, gift and give without spending more than $50 out of my own pocket. Today I am going to share the low down with you too.

First, being a family that lives on a budget, events such as back to school, Halloween, Thanksgiving, Christmas, and birthdays are always on my mind! Creative ways to accumulate funds or gifts is a year round project.

I do a variety of things online to add to my kitty.

If I see a great item on clearance I will buy it, but only if I have the extra cash on hand. I don't buy on my debit card or credit card.

At the end of each season I buy the goods I need next year on clearance. I use my stash of gift cards to do this. I buy wrapping paper when it is down to 50 cents a roll or less. Instead of going out and buying decorations, I usually make my own using items that I already have at home. For example, I use Christmas ribbon to decorate not only the tree, but to also add finishing touches to garlands, wreaths, and wrapped gifts. Same with bows, gift tags, bags  etc. Seasonal trinkets are also great to get when they get marked down to 80-90% off. I get stocking stuffers for 20 cents and stash them for the next year. Or I might buy Easter coloring books for 10 cents and stash them too.

Inbox Dollars I spend about 25 minutes a week reading emails, playing games, watching videos and more. I have cashed out several times. It is pretty easy money and you get a $5 sign up just for joining!

I shop Zuilly. I shop here because it is easy to earn credits and they have such super deals. I get really low priced deals here through out the year and add to my "Gift Box".

I use the WalMart Savings Catcher App. I scan each receipt I get from WalMart and accumulate savings on products. I wait to 'cash out' until there is something I need to buy for a holiday.

I have the Shutterfly app, so I watch out for special offers, free prints and more. Photo gifts are always a hit. If you are not using Shutterfly sign up here for FREE Prints!!

I of course watch amazon for deals. I save money on everything! I do tasks on m turk to earn money too. I don't have much time for this, but I would estimate I spend about 30 minutes a week turking and making some spare change on easy tasks.

As a blogger, if I participate in a campaign that pays via a gift card, I save it.

That is how I can afford to celebrate all of the major holidays without dipping into our budget for any extra expenses. I limit us to about $50 for last minute things like batteries.

 How does your family afford the holidays?


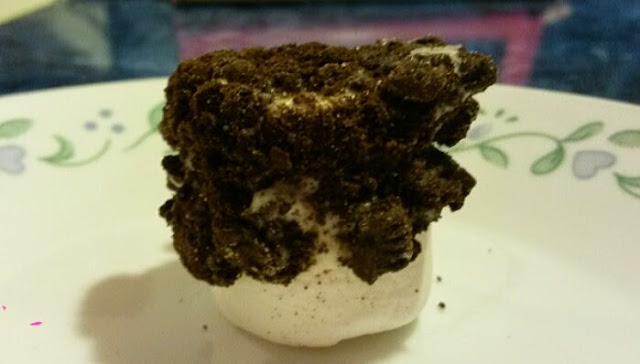
Gourmet Homemade Oreo Marshmallows

It was one of those days, the cupboards were growing bleak, the need to grocery shop was strong, but the interest wasn't there. I knew I could put it off another day. {Face it, shopping with two young children is not fun!}

After whipping up an easy peasy dinner, I knew that dessert was in order too. I had 3 ingredients on hand and this little bit of yum is what I came up with!


To make Oreo Marshmallows you will need:
White Chocolate
Oreos
Marshmallows

First melt your white chocolate in the microwave, stirring every 25 seconds or so until it is smooth.
Crush Oreos, place in a bowl.
Dip your marshmallow into the melted chocolate, immediately dip it into crushed Oreos. 
Set aside for about 25 minutes until the chocolate has set.
Enjoy!


My family loved these! They were soft, sweet and had bits of crunch thanks to the chunks or Oreo cookies. This was an incredibly easy treat to make with a gourmet flavor perfect for kids of all ages!

Do you love gourmet marshmallows? Have you ever made something like this at home?


Millstone Creek Park : Topping the List of Best Ohio Playgrounds

We really love to go to the park and play! My family has a once a week standing date for the park. When my son gets out of school we go to the park and play! Mr. Sweet Silly Sara meets us there when he is off of work. It is probably my kids favorite day of the week. Not only do we love to enjoy the parks in our town, but we also love to get out and look for the best parks and playgrounds that Ohio has to offer.

In August we had to make a trip to Lancaster, Ohio. That is a long drive with young kids. On our way back we made a detour to Westerville, Ohio to Millstone Creek Park. Our kids were so glad to get out, stretch their legs and play with other kids!

This is the most awesome park we have experienced with the kids. As we arrived, we enjoyed a short walk over a boardwalk. My kids were delighted to hear a bullfrog and see it hop into the water. As we arrived at the playground my kids were ready to run!


Harp loves Millstone Creek Park!


 My son really loved the park. He was a blur then entire time we were there. Constant motion! I promise he was there, but no great photos of Roo were taken.

Harp was ready to climb!

 One of the things I loved about this park was there were so many things for kids of all ages and all abilities to do. This is one of the playgrounds that are accessible and fun for kids with special needs such as wheelchairs. Knowing that this area was designed with all kids in mind really sets it apart from others!


The park had a nice sculpture to view and a great slide; that kind of went down a hill into an area of tall grass. This was fun for my adventure seeker son!

My sweet little Harper adored this park. There were so many things for her to do, explore and discover. To see her having so much fun was contagious. My mood immediately lifted upon the first sound of her giggles.


This park was spacious, super clean and really quite lovely. The sound of happy children playing was thick in the air and there was no way to avoid the contagious feeling of a great summer day.


The entire family loved the option of taking the boardwalk or hopping over some stones in a creek to reach the playground. My husband and I had a blast playing this electronic game together. It was a fun way to get moving ourselves while showing our kids you are never to old to play!


Millstone Creek Park was fantastic. It very well may be the best park in Ohio. It is certainly on the top of our list of Best Ohio Playgrounds!

DIY Blanket Box

I had this really great box. I had been holding on to it for several months because I have a cardboard hoarding problem. Ha! It is true, I will say "Ohhh! I am going to make a cardboard bed with that box..." and my husband will nod his head and say "Great idea!" or maybe "Interesting." He is patient and will give me a few days. If the box remains untouched, he sweetly breaks it down and recycles it to keep my hoarding to a minimum.

This box however I had managed to keep stashed out of the way in a closet used for coats. We haven't needed jackets in months now, so no one has been in that closet. Until one day. I saw him open the door. His eyes locked on the box.

He asked "What are you doing with this box?"
I knew my time was limited. It was a great box... I couldn't lose it! My mind went to work and I came up with a great way to use it and make it look pretty too!

From a swifter box to a blanket box in under 5 minutes. This project cost me about 50 cents to complete which makes this not only an upcycle, but also a frugal organization project in one.


I purchased my contact paper for $1 at Dollar General. I have enough to do another box about the same size.

First I unrolled enough paper to cover the top.


I peeled a small section of the paper off of the contact paper to carefully begin applying it to the lid of the box.

Then I did the same for the sides and the bottom.


I took a hard plastic case and smoothed out the bubbles and wrinkles in the contact paper the best I could.

My edges were a touch uneven, but that is okay. I highly doubt anyone is going to inspect my blanket box for perfection.


This box is great for storing baby blankets and it fits perfectly under Harp's crib.

This project only took a few minutes (5) and it created a really useful organizational tool for my daughters room!

Pizza Craft for Kids

My kids love to eat, they love to play with pretend food and they love to craft. Hmmm. I wonder where they get this from? I love to eat, pretend to eat play food and I love to craft. These are my kind of kids!

Every day Roo asks me these 3 questions:
"Mom, are you making lunch?"
"Mom, are you making dinner?"
"Mom, can we make a craft?"
Miss Thang always offers her 2 cents with "Eat Mom?" "Craft Mom?"

A few weeks ago I had a package with the cute little crinkly pieces of paper inside it, like the stuff you fill a gift bag with. I was just about to toss it in the trash when inspiration hit. This would be the perfect base for a craft my kids would want to gobble up!

To start off, I grabbed yellow, white, green and red paper that was left over from another craft we made, I cut simple strips of yellow for cheese. Simple circles for pepperoni, I made little curved green peppers and the hardest shapes was the white mushrooms.

I cut out quite a few of each. I knew the kids were going to LOVE this craft and I want to be able to repeat it again this winter. The extras I placed in baggies and stashed away for later.


I offered the kids some of each topping, including those crinkly little strips of red paper. They each got a paper plate.

To begin we generously applied glue to the plate, then we added our sauce.


Plate with sauce

Next we added cheese.

Cheese Please!

Then we started to add our toppings. This was a ton of fun for everyone, including me.

Green Peppers

The works! See how cute my mushrooms are!


And there you have it! We made fun pizzas from recycled materials. This was really a simple craft that both the almost 2 year old and the 5 year old enjoyed. You will have to stay tuned as this idea has spawned other pretend food crafts!

Fryer Park Offers Kids An Out Of This World Adventure

A few weeks ago, we set out on a mission! Last winter we saw this great park in the Columbus, Ohio area. I was sure I would recall the park! But then 8 months time passed, and I could only remember that there was electronic games on the playground....

Well I knew it existed, but I couldn't remember what part of town it was in, of course I had no clue about the name of the park either. Hubby turned to google and found a park that sounded like it could be it. Fryer Park in Grove City. So, we hopped in the car and headed south to the capital, then off to Grove City.

When we arrived at the park, we walked around the pond, enjoyed the sight of the ducks and made our way over to the park.


The ducks ready for a swim


My kids were amazed with the park. They thought everything from the cave to the playground equipment was fantastic. They were hoping other kids would be there, but that wasn't the case. We had the place to ourselves.

My kids loved the cave!


The park was large, spacious and perfect for kids of a variety of ages!

I loved the plaques for the planets!

I loved being able to set the kids free. They ran, they played, they had a lot of fun!

"The Moon"

There were so many things for the kids to do! They loved exploring the moon, they delighted in climbing thru the cave.

This part of the park is perfect for bigger kids looking for a thrill!


While Fryer Park was not the park we were looking for, it was a great park in the Columbus Ohio area to visit. It was well worth the drive down and we will certainly be hitting this park up again! We visit a lot of parks, it is kind of our thing these days. With that in mind, I will be as bold as to say, Fryer Park is on our top 5 list of Ohio parks and playgrounds, which is quite impressive!

Grove City in general is a charming place. It is a great place to visit with your family for shopping, dining or playing!

30 Days to Move: Day 11 Get Serious About Junk

Okay, this series started with good intentions but obviously, I couldn't keep up in the midst of a move! (Smart idea, bad timing or bad time management... you be the judge.)


On Day 11, I got serious about what I considered junk and what I felt was worth the trouble of packing and moving. I went through our house (everything that wasn't packed and destined to be kept) and started tossing junk into one of two huge boxes.

What is junk?

By my definition junk consists of:

Shoes I haven't worn in at least a year
Clothes that are outgrown or worse for wear
Toys the dogs never play with because they are well... junk!
Toys the kids have outgrown
Kitchen gadgets I never use
Excess plastic bowls with lids
Magazines I will never read due to time


While I was sorting this junk, I made one box the to donate box. This was the box of things someone could use but I felt had no real value.

The second box was yard sale items.

Yes, I know moving is crazy, but having a yard sale is genius when moving. You will reduce the amount of junk you either have to haul to Goodwill or pack and move. Plus, if you do it right you will make a ton of cash and can buy new stuff for your new home!


Traveling With Kids : A Day at the Columbus Zoo and Aquarium

I visited the location in this article as a guest of the Columbus Zoo.

On our first week of summer we traveled to Columbus, Ohio with the kids to experience one of the many fantastic offerings the city has for families. We got a chance to get our walk on, enjoy the sun and see so many breath taking animals all in one spot!

Where was this? If you are following me on Instagram you might have guessed that we visited the Columbus Zoo and Aquarium! If you are not following me there, you should be! I am getting more active there and sharing lots of my adventures!

We visited the Columbus Zoo on a perfect June day. As soon as we arrived and decided on a path, we were able to take in the sights of the Black Rhino enjoying his morning munch.


The mom in me swooned over the swans with the eggs in their nest.


My son and I loved the Camels!


The sheer number of exhibits and animals at the Columbus Zoo and Aquarium makes it well worth the trip to the city,


 The elephants were lovely!

The flamingos made a great group to photograph!


We have visited the Columbus Zoo numerous times over the years. I am never disappointed and I am always very impressed with the continuous effort to make this one of the best places for families to visit for a zoo experience!


This guy stole my daughters heart and attention. She was amazed with him!


I wanted to share a few tips with you to make your next trip to the Columbus Zoo even more enjoyable, if you are traveling with the kids.

Make sure your children wear comfortable shoes. There is a lot of walking and this is a good thing! Kids will get plenty of activity and hopefully sleep wonderfully that night, but folks, do you really want to be carrying a 20+ pound child for several miles?

If your kids are not accustomed to walking very far, take them on a few walks around the block as preparation for the Zoo. 

Pack a few drinks and snacks for the kids to sustain them in between meals and exhibits!

Sunscreen! Enough said!

Bring a pack of travel Baby Wipes. Even if the kids are a bit older these are so handy for freshening up in the summer!

Make sure your phones and cameras are ready for lots of great photo ops!

Grab a map, if the kids are really little, like mine are, decide what exhibits are most important to see and aim for those first, seeing what you can on the way. You never know how much a small child can take in terms of walking in the summer sun.

Take advantage of the play areas for the kids. Give them a break and a chance to let loose. You can rest on a bench and bask in the sound of happy children at play for a little while!


Have you ever visited the Columbus Zoo and Aquarium? If not what is your favorite Zoo?