Capturing Moments with Portrait Innovations


This conversation has been sponsored, but the opinons and views expressed are my own. 

There is one thing my family has neglected since we became a family; portraits. While it was something we wanted to do, having time to do it was always an issue. Life moves pretty fast when you are in the thick of parenting. So fast, that one day I woke up to find those tiny babies were movers and shakers, climbing on the bus and heading off to school and becoming their own people.

That moment of realization, of recognition that these kids aren't going to be kids forever, that there is no time like the present to capture the magic of childhood made me take a step back and reconsider this making time for portraits situation.

We headed into Portrait Innovations and found that really, the process isn't as demanding as I had imagined it would be. It was actually quite fun and not like a task at all.


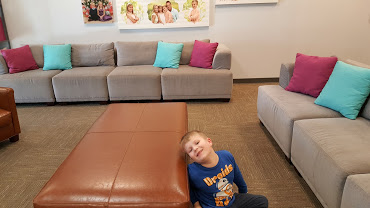
The kids might be growing, but they are ages 3 and 6. Mischief is the middle name at that age, but the people at Portrait Innovations were prepared for that, with Lego tables and kid friendly photographers, my kids were on their best behavior, having fun and saying cheese like a couple of professionals. The studio is very comfortable and inviting.


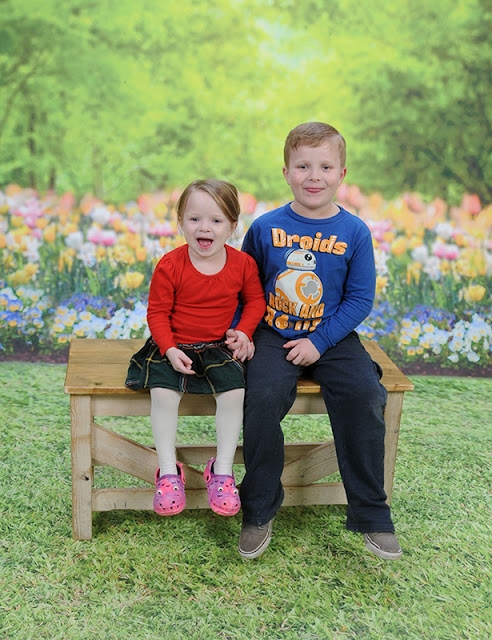
Overall, the process took about 90 minutes. We loved having choices in backgrounds, from holiday-themed to a rustic wood wall, there were so many options for a great family photo that the hardest part was selecting which ones we wanted.

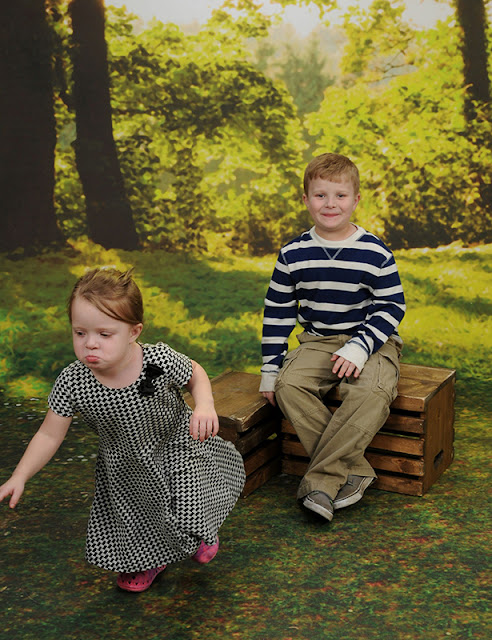
The photographer was great. She was able to capture fantastic shots of my kids, as well as photos that were hilariously candid. She captured this moment which we all had a great laugh about!


We loved that the process was complete in under 2 hours and we went home with an assortment of lovely family photos that we will cherish for years to come. The photos captured our family as we are. We wanted to preserve a moment in time and that is exactly what we accomplished with our photo session at Portrait Innovations.


I loved how many options were available; from canvas prints to coffee mugs and photo greeting cards to assorted sizes, there is no better time to visit a local studio and capture a moment in time with your family.


Portrait Innovations is offering their best spring special ever. The Spring 24 Portrait Package is only $19.99 plus a Free $100 16x20 Canvas with coupon found by clicking this link


Included in the portrait package is 1-10x13 Wall Portrait, 2-8x10s, 4-5x7s, 4-3x5s, 8-2x3s, and 5-5x7 cards, plus a high-resolution CD with your favorite pose. And, you can save 20% on all additional purchases in the studio. Portrait Innovations never charges sitting fees so bring the whole family. Appointments are limited so schedule your appointment today!


If you feel lucky, why not try your luck at winning some cash after getting those portraits taken? Visit the landing page and then share your entry on social media and include the link to your friends and family to vote. The top 20 people that get the most votes will be judged by Portrait Innovations. There will be 5 winners, each receiving $1,000!

Loaded Jalapeno Bites

Better than a Jalapeno Popper, this loaded jalapeno bites recipe comes together in moments and creates a crave-able appetizer or snack the family will love.


Prep time: 5 minutes
Serves: 4


4 jalapeno peppers
2 ounces {1/3 of a package } of cream cheese
2 ounces of shredded cheese of your choice {1/4 of a package}
2 tablesppons of real bacon, chopped into small chunks
Your choice of dip such as blue cheese or ranch


Preheat your oven to 350 degrees
Slice the end off of the jalapeno peppers, clean the seeds from the inside of the pepper by gently slicing around the seeds.
Remove them with a few gentle taps of the side of your knife.
Slice the jalapeno peppers in half, removing any of the remaining seeds, clean up the inside of the pepper.
fill the jalapeno pepper with cream cheese, repeat
Top with shredded cheese and bacon chunks
Place on a cookie sheet and bake for 10 minutes
The cheese will be gooey and hot! Allow these to cool for 2 minutes before serving.
A side of ranch or blue cheese dip will mellow the heat of the jalapeno peppers


How to Make Popcorn in the Microwave

Popcorn is a great snack option, but the prepacked varieties are loaded with fat, salt and calories. I figured out how to pop my own healthy and tasty popcorn in the microwave. You are going to love how easy it is to make fresh popcorn, not to mention how economical it is too!


Ingredients
1 teaspoon of Olive Oil
1/4 cup of popcorn kernels


a medium size glass bowl
A plate that can cover the glass bowl


Directions
Add olive oil and popcorn to the glass bowl.
Cover it with a plate and microwave it for 2 -3.5 minutes
Remove from microwave when the popping slows to one pop every 2 seconds.
Enjoy!


Paper Plate Donut Craft for Kids

Paper Plate Donuts are a fun craft to make with the little ones! We paired this activity with the adorable children's book If You Give a Dog a Donut.


Harper and I love to get crafty together! We often pull out our Kwik Stix and paint together! She loves the freedom of painting without an anxious mom and I love offering her an outlet for her creativity.


We also love to read great stories together! So, on this day, we combined the fun of a craft using Kwik Stix with a favorite book to create paper plate donuts!


This craft is incredibly easy but offers so many options for creative expression in toddlers and preschoolers.
You can have the supplies ready in under 5 minutes for crafty fun with the kids.


Supplies
One Paper Plate per child
Kwik Stix
Pom Poms or small bits of paper to resemble sprinkles
Glue

Cut the center out of your paper plates.
Offer the kids the Kwik Stik, if you don't have any paint sticks, you can use markers or crayons.
After the paint has dried (it only takes 90 seconds) have the kids glue on pom poms or paper bits or sprinkles.

There you have some adorable and easy crafts to pair well with a fun book!

If you are making this craft you might want to grab my free Donut Coloring Page.


Where to Stay in Wayne County

Thank you to the Best Western and Wayne Count Visitors Bureau for hosting our family on this trip!

We have stayed in a number of hotels over the years. Both my husband and I have been bitten by the travel bug and it is not uncommon for us to make a spur of the moment trip.

I consider myself to be well versed in staying in a hotel. I know what to expect in amenities and levels of cleanliness. But,  I have to admit, on a recent trip to Wayne County Ohio, everything I expected in a hotel was to become re-envisioned.


After a long day in the car with two kids, nothing sounded nicer than checking into the Best Western in Wooster and putting my feet up. As we arrived, I went into the lobby only to have to do a double take. The Best Western in Wooster was much nicer than I could have expected. I made my way to the front desk to be greeted by a friendly face who checked me in a speedy fashion and I went out to retrieve my family.

As we made our way in with the luggage rack, the manager greeted us and took us to the room, which to my delight was the executive suite. I honestly had no idea the Best Western offered suites and was thrilled with the idea of spreading out after hours in the car together.

The room was located on the third floor, as we entered the room, I was truly speechless as the room was handsomely appointed, spacious and extremely comfortable. My kids were impressed with the television and ample room to pull out some legos and start building. {experienced travel moms know that a ziploc baggie of legos can make any situation better....}


Mr. Sweet Silly Sara let out a relieved sigh at the sight of the in-room Keurig and assortment of coffee. He later admitted he was prepared to drink gas station coffee for the weekend and was super impressed to have the best in room coffee while at The Best Western.

I was all around impressed. Like I mentioned, I have stayed at all kinds of hotels, but this was by far the most pleasant experience I have had upon arrival. I became touched by the thoughtfulness of the staff at The Best Western in Wooster when a basket of healthy snacks for the kids arrived along with a fantastic bottle of local wine for my husband and I. The staff at this hotel goes above and beyond to make your stay amazing.


The manager stole my heart right away when she offered me a tour of the hotel. Within moments she made me feel like an old friend and the look at the hotel gave me a good idea about the people that own and operate the establishment. They all have one common goal based upon one common interest. A lot of pride goes into The Best Western in Wooster to make each visit as pleasant and comfortable as it could possibly be.

While we were at the hotel we took advantage of the super clean pool. The kids were thrilled to splash around and get some exercise!

We walked around town and had dinner at a nearby restaurant. We took in the sights and stores of downtown Wooster and made our way back to the hotel. It had been a long day filled with fun. The kids easily fell asleep on the couch turned sleeper sofa and they blissfully stayed asleep all night long, as the room as incredibly quiet.

We had breakfast in the well appointed breakfast room. It offered ample seating and choices for the entire family. From waffles and yogurt, to biscuits and gravy or cereal and fruit, they had the bases covered. The breakfast attendant was efficient and sweet. The day began on a fantastic note after a hearty breakfast.

As we explored all that Wayne County had to offer, we made our way back to the hotel several times. The staff smiled and offered friendly greetings and absolutely charmed my children.

When the time came to check out of the hotel, my family had decided that when we make our way back to Wayne County, there is no doubt about it, we want to stay at the Best Western. The staff and the beautiful rooms make it hard to even consider staying somewhere else.

When you make your way to Wayne county to take in the sights of the Amish country, do yourself a favor, get in touch with the Best Western for a taste of luxury accommodations at family friendly prices. The hotel offers a fitness room, small bar, complimentary breakfast and a super clean pool for guests, making this an ideal place to stay with your family.

You might also want to check out our where to eat in Wayne County guide.


Easy Tie Dye Art for Kids

Tie Dye is such a fun concept for kids of all ages. We have been experimenting with different techniques and ways to blend colors without actually dying anything. After-all my kids are only 6 and 3 and are not quite ready for real tie dying!


This method is so easy because you probably already have everything you need on hand to create this fun project with your little ones.

Supplies Needed:
Washable Markers
Coffee Filters
Copy Paper
A spray bottle with water


Directions:
Place a coffee filter on a sheet of copy paper.
Have the kids color all over coffee filters with markers.
Spray the coffee filter with water after it has been colored.
Place another sheet of copy paper on top of the wet coffee filter.
Smooth it with your hand to transfer the marker to the copy paper.
Peel the sheets apart, and viola!
You get 3 lovely works of art in the end!


We have a few cute youtube videos on this technique, if you watch them be sure to give them a thumbs up and hit the subscribe button! You can also find me giving an intro to tie dye on facebook live.


Thing 1 and Thing 2 Puppets

Thing 1 and Thing 2 Popsicle stick puppets come together easily with minimal supplies to create an invitation to engage in dramatic play for toddlers and preschoolers!


My 3 year old loves to play with puppets and I love to encourage dramatic play for her developing mind! We made these super simple little puppets which were the perfect size for her small hands. She loved including Thing 1 and Thing 2 in all of her pretend play!


These are so easy. All you need is:
2 Popscile Sticks
Red Paint or Markers
4 googly eyes
a small bit of blue paper
2 small rounds of white paper
a pen or marker
Glue


Instructions:
Paint or color  2/3 of the craft stick red
Cut the blue paper to look like 2 shocks of hair.
Glue the hair on each stick
Give the sticks 2 eyes
Write Thing 1 and Thing 2 on the circles of paper and glue it on the center and you have your easy and fun puppets!


These are perfect for an easy peasy play session or a fun way to celebrate Dr. Seuss's birthday.


Easy DIY Ladybug Valentine's for Kids with Welch's Fruit Snacks

Valentine's Day embraces all things sweet! From cards to decorations and of course, the treats!

Thanks to Welch's Fruit Snacks for se

This year we are making an effort to offer healthier alternatives to the standard miniature chocolates and hard suckers. Our go to choice was fruit snacks and naturally, we turned to Welch's this year! They have these awesome emoji designs out just in time for Valentine's Day!


Inspired by the warm fuzzy feelings that my children give me when they are happy, I came up with this sweet little handmade Valentine to share with Rolf's classroom at their party next week!

These are so cute and easy to make!


One black sheet of construction paper
One red sheet of construction paper
2 googly eyes
One long section of red ribbon
One pink doily heart
Glue
Scissors
Stickers
Welch's Fruit Snacks


Begin by cutting an oval for the body, a medium size heart for the head and several smaller hearts from the back paper.

Cut 2 smaller ovals and a small red heart from the red paper.

Place the two red ovals on the sides of the black oval for wings.

Cut your heart doily in half. Glue one half on each wing.

Add the black heart to the top of the wings to make a head.

Glue 2 googly eyes on the heart head.

Glue the small red heart for a mouth on the head.

Curl on 3 inch section of ribbon for the antenna.

Decorate the body with the small black hearts and a few fun stickers!

Take the rest of the ribbon and tie it around the body, then affix the fruit snacks to the back of the card.


There you have a sweet and cute candy free Valentine Treat!


Welch's Fruit Snacks are available in these fantastic 28 count packages that are perfect for Valentine treat sharing, or just a tasty after school snack! Have you ever given fruit snacks at a holiday party?


8 Crafts and Recipes to Make for Groundhog Day!

Groundhog Day is a fun way to break up the monotony of winter while offering a healthy dose of optimism! These craft and snack ideas are the perfect way to add a little something special to the day, for the delight of the kids!

These ideas are cute and easy and I know you are going to love them! I can't wait to hear which one is your favorite! I can't go wrong with any of the pudding ideas as my kids are serious pudding fans! HA!


Groundhog Pudding Cups

Groundhog Pancakes

Groundhog Parfait

Quick and Easy Groundhog Pudding Cups

Groundhog Cup Craft

Groundhog Face Craft

Shadow Puppet Play 

Aren't these adorable and easy ideas!? I think we are kind of obligated to make the groundhog face craft because it is crazy cute!

8 Scrumptious Red Velvet Recipes

Red Velvet is one of my favorite flavors. From Red Velvet Cappuccinos to those yummy little Russel Stover Candies that beg to be devoured and of course, we can't forget the cakes! This year I want to make something incredibly sweet to share with my friends and family and naturally, I am leaning towards Red Velvet!

I have 8 awesome sweets to share from some of my favorite blogs, and a one of my own to add into the mix for your easy reference!


Red Velvet Squares with Cream Cheese Filling

Red Velvet Strawberry Parfaits

Red Velvet Cupcakes

Red Velvet Ice Cream

Red Velvet Cookie Bars

Red Velvet Fudge

Red Velvet Oreo Cupcakes

Easy Red Velvet Cookies


One of my favorite Red Velvet Recipes is Blueberry Red Velvet Whoopie Pies. Oh my gosh, these are so good! What is your favorite way to enjoy the flavors of Red Velvet desserts?


The Topiary Park of Columbus

Columbus Ohio is one of our go-to places for family fun. The city has so much to offer to families. From the Columbus Museum of Art to the awesome playgrounds for kids, there is always something to do in Columbus!


A few weeks ago we attended Brick Universe, to the delight of my Lego loving kids. After we had taken the time to play with all kinds of legos and browse the vendors, we decided to take in the Topiary Park of Columbus on Town Street. This is such a lovely little spot in the city. If you have never been, you are really missing out on something amazing.


Giving my kids exposure to art is important to me. Both kids love to sculpt with playdough and they both love to draw. Encouraging their love of the arts keeps them interested in creating! A little-known fact is that as a child, I wanted to be a fashion designer. I often wonder what might have been if only someone told me to keep sketching or had taken me to a fashion week kind of thing...


So, as we arrived at the Park, and found ample parking opportunities, we entered an almost empty park. An elderly man sat reading on a bench. At the other end of the park, a father-son duo conversed quietly. It was nice to be able to allow the kids a little freedom to stretch their legs and observe this living art in their own ways.


The park is one of a kind. It is a gorgeous, green and lush atmosphere with breathtaking flowers, a pristine pond, and these amazing topiaries. It is an interpretation of the painting A Sunday Afternoon on the Isle of La Grand Jatte by Georges Seurat.


The experience is delightful. It offers one the chance to walk amongst the art, a rare occasion in this digital day we live in. The stroll was nothing short of magical for my kids. They have been several times and they never tire of a trip to The Topiary Park of Columbus.

I loved how serene the park was, despite the location in the city. If I were frequently in the downtown area, I could see myself slipping away to the Topiary Park for coffee and contemplation or a dreamy place to pass time with a good book in hand.

Paper Plate Lion Craft

This easy paper plate lion craft requires basic supplies and makes for a roaring good craft for the little ones!


I am an advocate for crafting with kids! I think that with simple supplies you can open up an entire world for the kids. This easy paper plate lion craft is a perfect activity for preschoolers and kindergarteners. It utilizes fine motor skills and it gives kids a chance to explore their own wild side as they give their paper plate lion a personality!


To make this easy craft we used:
Kwik Stik
Uncooked Rotini Noodles
A clean paper plate
school glue
2 googly eyes

Begin by painting the rim of the plate orange
Paint the center of the plate yellow
glue rotini noodles on the rim of the plate to make the mane
Add eyes
Draw on a face with your Kwik Stik


We love to make easy crafts! With 2 kids under the age of 6, I grab every opportunity I can to get crafty with them! Some of you might be familiar with my crafting show on facebook live, where we make a lot of adorable and easy crafts, if not, I hope you will join me on the Quirky Momma facebook page on Monday or Friday nights at 8:30 pm, or Wednesdays at 9 am eastern or 7:30 pm.

Find more paper plate crafts here:

Mason Jar Lasagna

Mason Jar Lasagna is a fun way to easily take a favorite dish picnic style for date night or a family dinner at the park!


There is something about mason jars that make me giddy. They are so incredibly useful; they are cute and come in so many shapes and sizes, and they are perfect for taking delicious things just about anywhere! 

There is also something about lasagna that makes me swoon. The layers, the cheesy dreamy textures, the sauce. Sigh, now that folks, is what dinner is all about the euphoria the mention of a food, like lasagna, can give you!


I brought these 2 favorite things together to create an awesome dish to take along with us, while we enjoyed this unseasonably nice Ohio winter weather! Mason Jar Lasagna keeps warm during the transport, is so easy to eat, where ever and it adds so many amazing layers to the dish that who could resist it?


My recipe is a little better than anyone else's because of my secret ingredient cream sauce, but I am going to share it with you because anything this yummy should be shared with a smile!


Ingredients:
1 pound of Ground Beef, browned
1 jar of your favorite pasta sauce
8 lasagna noodles broken into chunks to fit into a mason jar
2 cups of mozzarella or Italian Cheese
1/2 cup of sliced mushrooms
1 cup of diced onions and green peppers
Secret Cream Sauce {see below}

Directions
Begin layering all ingredients into jars until they are almost full. 
Seal the jars and submerge them in a pot of boiling water for about 10-12 minutes until the noodles are cooked and the layers are thoroughly heated. 
Carefully remove them and wrap them in towels to transport, or pop the lids off and enjoy right away. These jars will stay piping hot for about 25 to 30 minutes!


Secret Recipe Cream Sauce for Lasagna
1 block of cream cheese
2 ounces of milk
garlic powder
Cook over medium heat, stirring frequently, until the cream cheese is completely melted


This is such an easy recipe for a yummy dinner that is packed full of veggies and cheese, not to mention meat and sauce!

Do you have a favorite mason jar recipe? I would love to hear about it!


Let Goldfish Lend a Helping Hand to Family Fun Time


Being a mom means I wear many hats; from the schedule coordinator to the sorter of socks; the head chef and the chief smile officer. I also fill in a lot of supporting roles for my family; I am the activity coordinator we are always up for a creative project on my tour of duty which is otherwise known as being a Mom.

Not long ago, I got to wear a few of those hats I juggle all at the same time. My son came home from school and he felt glum. I assessed the situation and worked up a plan to make him smile while spending time together and having a snack.

We love Goldfish, it is a snack I feel good about offering my growing kids. Not only are they a tasty snack, but they are also baked with real cheese and they are free of artificial flavors and colors! Goldfish are the perfect snack when someone feels blue.

On this day, we went with Goldfish Colors, to brighten the day. Mr. SayCheese was looking a little happier, but I knew we could do better than that. We took snack time to a whole new level and made this fun stop motion video together.


It took a while, we munched many Goldfish as we brainstormed, but when it was finished, my son was smiling, he had snacked in style, and a few encouraging words helped his mood. After all, it was Quality Time, Spent Like a Couple of Bosses!

Guess what you guys?! You can visit this awesome Goldfish Smiles site to get inspired and learn more about the Goldfish Tales Animation Xperience! While you are there, visit the GoldfishTales page to submit your stop motion for a chance to win $5,000!


Salsa Steak Kebabs

The  weather is turning colder, but there is still time to fire up your grill and make something amazing like Salsa Steak Kebabs for dinner!


I don't know much about steak you guys. I really only eat it every few years. Sometimes I feel bad for my husband, who happens to love steak. So, a few weeks ago I made him something yummy, spicy and meaty! He was most pleased with the results and assured me anyone who likes meat will like this recipe!


Ingredients:

bacon pieces
green pepper
onion
steak cut into small rounds
salsa
salsa verde
skewers, presoaked in water
tortilla shells, soft


Directions:
Cut your onion and green pepper into small chunks
Make a few thin slits into your steak rounds, so that the salsa can soak into the meat.
Place salsa verde directly onto the meat, 
Place bacon bits on the salsa then add a chunk of pepper and a chunk of onion, wrap the meat around the veggies and salsa and thread it on to the skewer.
Add a chunk of onion and pepper to the skewer.
Repeat until you run out of veggies and meat.


Grill for 6-8 minutes, flipping half way through. Adjust cooking time to reflect what is recommended for the cut of meat you are using.
Place a skewer on a tortilla shell and slide the kebab off of the skewer.
Top with additional salsa, sour cream or ranch dressing.
Wrap and enjoy.


This was an easy to make and even easier to eat dinner. My husband loved it and has been asking me to make it again with chicken


How do you like to make your steak a little spicier? Tell me about it in a comment.