Showing posts with label kids. Show all posts

Making Sandwiches with Harper {Kids Craft}

A few days ago, Little Miss Harper wanted to help me make lunch. I love her eagerness to help and her interest in learning. But, on this particular day, I wanted to keep her busy and out of the kitchen, as I was in the middle of a project.

I asked her if she wanted to make paper sandwiches while I made lunch, it sounded appealing to her! I had a collection of paper sandwich fixings ready for an occasion like this. I found a yellow glue stick to imitate mustard. Harper was all set to make sandwiches!

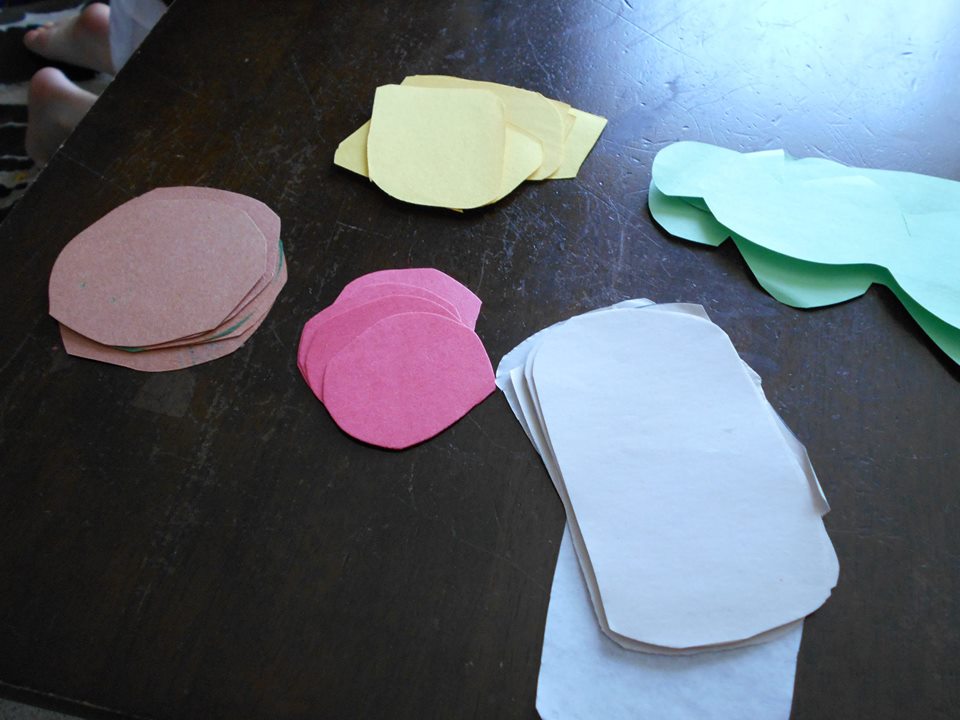
To prepare for this activity I had previously cut the following shapes from construction paper

bread shapes  white paper
red circles for tomatoes
squiggly green leaves for lettuce
yellow squares for cheese
brown circles for meat

You will need a glue stick. Red or Yellow is fun with this paper food craft, like ketchup and mustard!


As you can see, this activity is completely basic. Construction paper and glue. I offered Harper ample supplies for building sandwiches. To keep her busy and having a lot of fun!


She began by adding mustard to the bread and adding tomatoes.


Next up was cheese! 


Harper was completely into this craft. She loved making sandwiches. She added layer upon layer, happily crafting while I made lunch!


My kids both love a good paper food craft! If I find myself with a few extra moments and a pack of construction paper I make little craft bags for occasions like this day.  They are always a huge hit with my kids. They have enjoyed making paper cookies, paper pizzas and paper jam sandwiches. These are the best kind of kid food crafts in my opinion because they are virtually mess free and they are really a lot of fun!

Fun With the Kids: The Rennaissance Teddy Bear concert Series

My family is always looking for something fun to do with the kids! Lucky for us, we live in Ohio! There are so many things to do in this state! From parks and museums; to the Lake {We have some major #LakeErieLove in this family!}; to the events that are ideal for families!

Next weekend on April 3rd we will be heading to the Renaissance in historic downtown Mansfield to see a really adorable performance with Roo and Harper! They are so excited about the Teddy Bear Concert: The Emperors New Clothes. Let me tell you a little more about this performance and why you are going to want to head into Mansfield for the event!


This show is a part of the Mechanics Bank Education Series. It is the perfect way to introduce your kids to theater and live performances. This performance will feature a woodwind trio playing popular and classical selections along with an interactive puppet retelling of the Emperor's New Clothes with actors Maddie Beer and Colton Penwell. My kids are incredibly excited! 

The show begins at 2:30 pm on Sunday, April 3rd. Of course, doors open an hour before the start of the show. If you are worried about price, don't be! This show is incredibly affordable! Tickets start at $10. 

Have you ever taken your kids to a play? How did it go? We have taken Rolf to a few when he was a toddler. He did really well with sitting and watching! Harper has not been to the theater yet, but I anticipate that she is going to love the Teddy Bear Concert! 


Paper Cookies A Preschool Food Craft

My kids are so cute! They always want to help in the kitchen! When I do dishes, my daughter Harper will push a chair into the kitchen and climb up to the sink. She will say "I can do this Mom!" or she will want to help make coffee and push all of the buttons. If there is cooking involved my son dashes in, ready to help! I welcome their company in the kitchen 90% of the time. But, as any mom will tell you, there are times when having small kids in the kitchen is not the best idea.

On those rare times, I feel bad to deny their help, so I came up with a few fun food crafts that the kids can make while I am occupied with a complicated recipe.  The first one we did as you might recall was a pizza craft. The kids had so much fun making pizzas! We have made several of these since the post!

Tonight I was frying chicken, a rare thing that I admit, I am not so great at. I didn't want the kids to get splashed with hot oil so I entertained them with a paper cookie craft. It was a huge hit!


This was incredibly easy for the kids to make, the materials were super simple making preparation a breeze for me, and best of all- this craft does not require anything special. Seriously, you are going to have the supplies in your house!


Materials Needed to Make Paper Cookies

Several Brown Paper Bags or brown or yellow construction paper
Glue
Sprinkles
A Paper Plate

Instructions

To begin, cut circle shapes in the brown bags or construction paper as your cookie base.
{I cut about 30 circles at a time so that we can do this craft multiple times}.


Place as many circle cookie shapes as you like on the paper plate.
Drizzle glue onto the circle 'cookies'
Decorate with sprinkles
Allow to dry.

This was so fun for the kids! We will be making these again soon I am sure! Do you like to do paper crafts with your kids? I would love to hear about your favorites!

DIY Photo Puzzle

My kids and I are really into crafting right now. On cold, rainy and yucky days like we have been having a lot of in Ohio, there is nothing better than digging into my craft cabinet and pulling out a few projects to entertain us when the weather is keeping us inside.

On one particular day, we ended up with a stack of duplicate photos and I knew that these should be put to good use instead of sitting in a photo box or ending up in the trash. After a few moments of careful consideration, I realized that a few craft sticks and some glue would take these double photos from miscellaneous junk into a treasure for the kids.

We came up with these DIY Photo Puzzles. We had so much fun gluing them together that we made a few to share with Grandparents and Daddy, as well as a stack for the kids to tinker with.

To make a DIY photo puzzle all you need is:

A photo
craft sticks
your favorite adhesive {we used glue sticks}
A utility knife

This project is so easy to make! All you need to do is:

Lay the picture side of the photo down and add glue to the back liberally.


Line up craft sticks across the back on the glued side of the picture.


Press firmly to allow the glue to bond to the craft sticks.

Flip the photo over

This step should be completed by an adult as utility knives are crazy sharp.

Carefully cut the photo between the sticks, continuing until the photo is cut into strips backed with a craft stick.

Allow the glue to dry.

Mix up the pieces and assemble the photo puzzle.

These are so much fun to give to people and they are a great challenge for my preschooler. My toddler finds them too difficult as of now, so we are going to make a few easier ones from cards we received over the 2015 holidays for her.

If you are looking for a last minute DIY gift idea or just a fun surprise for the kids, this one takes about 5 minutes tops to complete and is sure to bring a smile or two! Best of all, you likely have materials on hand to complete this project making it very frugal!


Pizza Craft for Kids

My kids love to eat, they love to play with pretend food and they love to craft. Hmmm. I wonder where they get this from? I love to eat, pretend to eat play food and I love to craft. These are my kind of kids!

Every day Roo asks me these 3 questions:
"Mom, are you making lunch?"
"Mom, are you making dinner?"
"Mom, can we make a craft?"
Miss Thang always offers her 2 cents with "Eat Mom?" "Craft Mom?"

A few weeks ago I had a package with the cute little crinkly pieces of paper inside it, like the stuff you fill a gift bag with. I was just about to toss it in the trash when inspiration hit. This would be the perfect base for a craft my kids would want to gobble up!

To start off, I grabbed yellow, white, green and red paper that was left over from another craft we made, I cut simple strips of yellow for cheese. Simple circles for pepperoni, I made little curved green peppers and the hardest shapes was the white mushrooms.

I cut out quite a few of each. I knew the kids were going to LOVE this craft and I want to be able to repeat it again this winter. The extras I placed in baggies and stashed away for later.


I offered the kids some of each topping, including those crinkly little strips of red paper. They each got a paper plate.

To begin we generously applied glue to the plate, then we added our sauce.


Plate with sauce

Next we added cheese.

Cheese Please!

Then we started to add our toppings. This was a ton of fun for everyone, including me.

Green Peppers

The works! See how cute my mushrooms are!


And there you have it! We made fun pizzas from recycled materials. This was really a simple craft that both the almost 2 year old and the 5 year old enjoyed. You will have to stay tuned as this idea has spawned other pretend food crafts!

Traveling With Kids : A Day at the Columbus Zoo and Aquarium

I visited the location in this article as a guest of the Columbus Zoo.

On our first week of summer we traveled to Columbus, Ohio with the kids to experience one of the many fantastic offerings the city has for families. We got a chance to get our walk on, enjoy the sun and see so many breath taking animals all in one spot!

Where was this? If you are following me on Instagram you might have guessed that we visited the Columbus Zoo and Aquarium! If you are not following me there, you should be! I am getting more active there and sharing lots of my adventures!

We visited the Columbus Zoo on a perfect June day. As soon as we arrived and decided on a path, we were able to take in the sights of the Black Rhino enjoying his morning munch.


The mom in me swooned over the swans with the eggs in their nest.


My son and I loved the Camels!


The sheer number of exhibits and animals at the Columbus Zoo and Aquarium makes it well worth the trip to the city,


 The elephants were lovely!

The flamingos made a great group to photograph!


We have visited the Columbus Zoo numerous times over the years. I am never disappointed and I am always very impressed with the continuous effort to make this one of the best places for families to visit for a zoo experience!


This guy stole my daughters heart and attention. She was amazed with him!


I wanted to share a few tips with you to make your next trip to the Columbus Zoo even more enjoyable, if you are traveling with the kids.

Make sure your children wear comfortable shoes. There is a lot of walking and this is a good thing! Kids will get plenty of activity and hopefully sleep wonderfully that night, but folks, do you really want to be carrying a 20+ pound child for several miles?

If your kids are not accustomed to walking very far, take them on a few walks around the block as preparation for the Zoo. 

Pack a few drinks and snacks for the kids to sustain them in between meals and exhibits!

Sunscreen! Enough said!

Bring a pack of travel Baby Wipes. Even if the kids are a bit older these are so handy for freshening up in the summer!

Make sure your phones and cameras are ready for lots of great photo ops!

Grab a map, if the kids are really little, like mine are, decide what exhibits are most important to see and aim for those first, seeing what you can on the way. You never know how much a small child can take in terms of walking in the summer sun.

Take advantage of the play areas for the kids. Give them a break and a chance to let loose. You can rest on a bench and bask in the sound of happy children at play for a little while!


Have you ever visited the Columbus Zoo and Aquarium? If not what is your favorite Zoo?

A Simple Fine Motor Activity

I like to keep Roo learning and developing skills even though he is on summer break. I also like to create tools for learning from items we already have at home.

I had an idea for a super simple fine motor activity that I could make in a matter of minutes. I had no idea how much bot of my kids would enjoy working on such a simple activity with such great fine motor skill practice.

You will need:
Pom Poms
A pair of plastic tongs
An egg carton

Photo Credit: Sara Lehman.

The rest is pretty self explanatory. Put the pom poms in the egg carton, then demonstrate how to pinch and pick up then sort the colors.

As you can see I used smaller pom poms for Roo exclusively so he would really have to work at pinching the pom poms with the tongs.

Harper isn't ready for the tongs yet, but using her fingers to grasp the varying sizes and the fuzzy texture of some compared to the hardness of the smaller pom poms is good for her fine motor development too. I use assorted sizes when working on this activity with her.


Cupcake Liner Crafts

We are always looking for fun crafts to make! When I saw these ideas for cupcake liner crafts the wheels in my head started to spin. These ideas are adorable and easy enough for your toddler or preschooler to make!
I hope this collection inspires you to pull out your cupcake liners and start creating!


Your little princess will love making these Tutu Princesses from Well Nourished Nest.


On a rainy day you might want to try your hand at this Cupcake Liner Rainbow from I Heart Crafty Things.


These Cupcake Liner Butterflies from Crafty Morning might flutter their way into your heart!


If your little one likes Ninjago, don't miss this super cute and simple Ninjago Craft from Love and Marriage Blog.


If your little one loves all things Dino, you can't go wrong with this Cupcake Liner Dinosaur from Frogs, Snails and Puppydog Tails.


Do you have an idea for a fun cupcake liner craft? I would love to hear from you!

Lava Jars {Hands on Science}

Last fall my son and I made a fun project together, we called them lava jars as they were inspired by lava lamps and we had a ton of baby food jars on hand. Harp was emptying out at least 6 a day back then.

I first filled the jar with half water, half baby oil. We added a few drops of food  coloring to the mixture, closed the lids tightly and watched to see what would happen.

We decided that this jar was the ocean based on color and the imagination
of a 4 year old

There was some slight bubbling, but nothing major.

We agreed the jars were neat... but what could we do to make them react differently?


We both liked the color of this jar the best.


We went inside and looked around. We found some antacid tablets and decided to introduce them into the mix to see how the oil/water jar reacted.


We started to notice bubbles forming right away. It definitely simulated a lava lamp!


I made a really short little video demonstration of the reaction of adding the antacid to the oil/water mixture.


My son had fun with this project. It was a fun challenge to see what we could do with common household products, and it was even more fun to engage him in a science project.  We think these would be fun with glow in the dark stuff inside. We hope to try this again in a few months with that idea.

Sushi Sensory Bin

A few weeks ago while shopping at my Kroger I saw these adorable erasers- sushi style- in the clearance section. At 69 cents they were a steal. I couldn't pass them up! My husband said "What are you going to do with them?".

What am I going to do with them? Make a sensory bin of course! A Sushi themed sensory bin sounded like fun to me!

I picked up a bag of long grain white rice, one pound was on sale for $1.09. I used this as my base.


My son was intrigued. He couldn't wait to get his hands in the bin of rice!

Next we added our Sushi Erasers.


Again, Eager Hands were grasping to get involved. Not that I can blame him!

Finally, we finished the bin off with a pair of chopsticks.


And there you have our under $2 sensory bin! It was easy to make and fun for Roo to play with.

I liked that we could enjoy the feeling of rice when we touched the bin, the rice was fun for roo to dig around in. He likes the way it sounds when he picks up a handful and drops it in the bin. The chopsticks are great for his fine motor skill development.

When he grew tired of picking up the erasers with the chopsticks he fed rice to an assortment of dinosaurs. Then he decided to toss handfuls of rice into his barnyard toy for the other animals to eat... and yes, it got messy. But, I went with it! After all this was my big idea of fun and dried rice is pretty easy to sweep up.

Do you engage in sensory play with your kids? I would love to hear about your favorite sensory bins.


In The Sky Sensory Bin

Roo loves waking up to find a new sensory bin waiting on him! I love making something fun for him and knowing he will happily play with this new bin for a few hours. I got a great deal on a Toob from Safari LTD and I couldn't wait to make the In the Sky Sensory Bin.

I started with a base of Easter paper grass stuff and a few cotton balls.

Photo Credit: Sara Lehman.

I pulled the cotton balls apart slightly to fluff them up a bit.

Photo Credit: Sara Lehman.


Gently pull your cotton ball apart until it looks like a fluffy cloud.


Photo Credit: Sara Lehman.

Next add a handful of planes and balloons- or a toob (In the Sky).

Photo Credit: Sara Lehman.

And you have a neat sensory bin for kids that incorporates fun with their senses. The paper Easter grass and the cotton ball clouds offer different textures to feel. The paper grass engages the sense of hearing as it crinkles when touched. The colorful blue base engages the sense of sight with a visually appealing color. The planes open the doors to imaginative play.

Photo Credit: Sara Lehman.

Roo liked this sensory bin. He was amazed at the planes inside and he caught on quickly that the bin was the sky. He excitedly showed me all of the clouds, several planes and the paper grass which he thought was pretty neat stuff. After about an hour of playing planes he smiled and picked out a few dudes and told me it was bubble bath time! The In the Sky Sensory Bin can double as a bubble bath sensory bin in the imagination of a child.

Thanks for reading! I would love to hear about your favorite sensory bin ideas.


5 Minute Cardboard Craft

I might get a little silly about wanting to hoard cardboard, but I seriously see possibilities and an invitation to play when I see cardboard.

My son has toys on top of toys to play with, but I like it when I can inspire his imagination. It is interesting to see how he plays when presented new options.

We had an empty Similac box and I decided it would be a fun to see what I could do with it as a  5 minute project.
Photo Credit: Sara Lehman.

 I started with an empty box.  I carefully opened it up along the seam.

Photo Credit: Sara Lehman.


Then I put it back together, printed side in, brown side out. I tore of the flaps on one side so we had an opening. and I used a few strips of tape to secure the box.


Photo Credit: Sara Lehman.

I grabbed a handful of crayons and asked Roo what he wanted me to make.

Photo Credit: Sara Lehman.

He said "The Library!"

Now, don't you dare laugh at my art work!

Photo Credit: Sara Lehman.

I colored the building red and made simple windows with stick people and books.
He got the hint.


Photo Credit: Sara Lehman.

He stopped playing cars for a moment and kissed his sister. Then he realized I had in fact made the library.

Photo Credit: Sara Lehman.

 He dashed over and got the Mickey Mouse gang and took them to story time. This project took me less than 5 minutes. My son had a blast with his library and he played with it for 2 and a half days. It doubled as school and a garage for cars, then a cave for dinos.

How do you create fun activities with your kids with items you would otherwise throw away or hopefully recycle?

Find more easy kids crafts here: