Showing posts with label crafts. Show all posts

12 Pretty Peacock Projects

Spring is near and we can't wait to visit the Kingwood Center in Mansfield to view the lovely early flowers, stop by the green house and of course, check out their gorgeous peacocks!

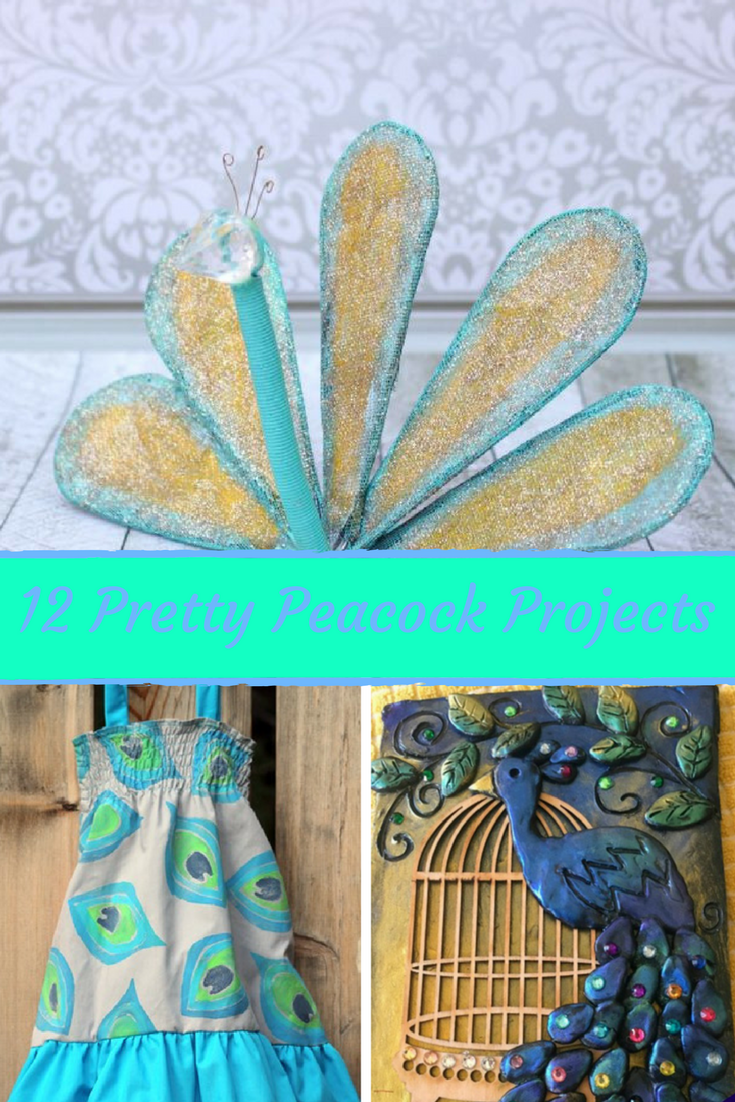
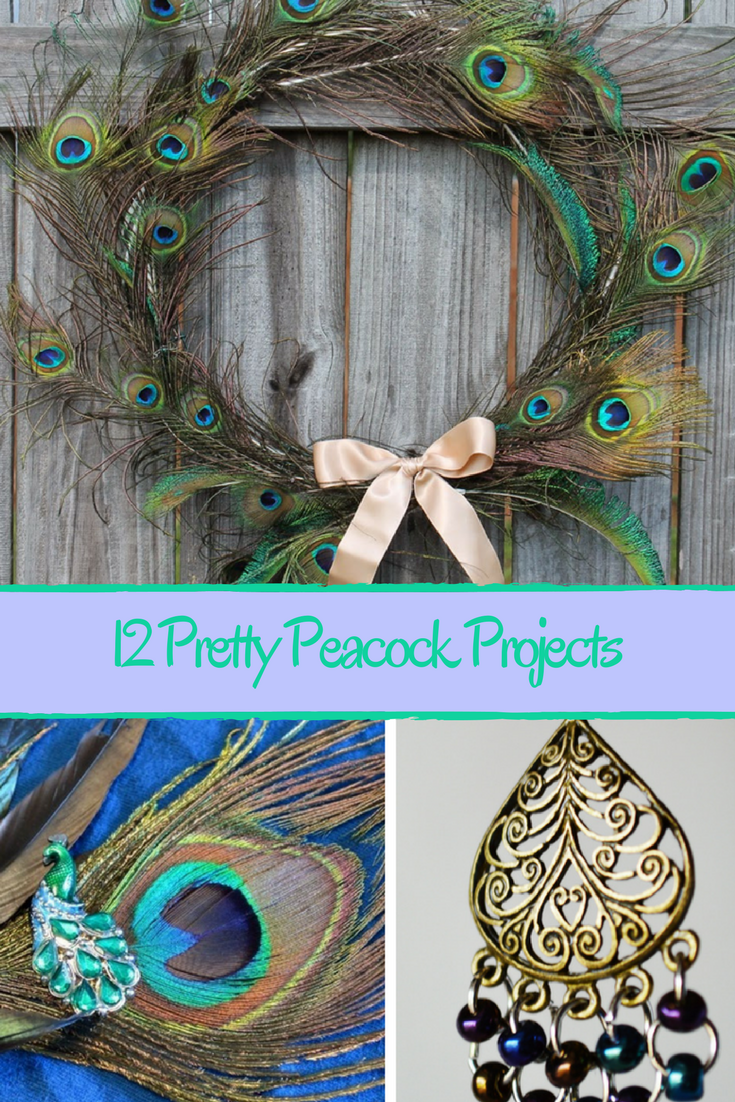
To build on our excitement I thought it would be fun to make a few pretty peacock crafts! I found 12 lovely ideas that I can't wait to share with you. If you like peacocks you are going to want to make a few of these too.


DIY Etched Peacock Cuff Bracelet by Happy hour Projects
Peacock Wreath by Artsy Fartsy Mama
Peacock Soap by Suzy's Sitcom
Peacock Tutu Skirt by Life Sew Savory
Peacock Necklace by Mad in Crafts
Peacock Shoe Clips by Sugar Bee Crafts
Peacock Painted Curtains by Live Laugh Rowe
Peacock Feather Wreath by Doodle Crafts
DIY Peacock Stamped Dress by Twin Dragonfly Designs
Peacock Garden Art by Morena's Corner
DIY Peacock Earrings by Artsy Fartsy Mama
Pretty Peacock Journal by Suzy's Sitcom

peacock crafts


I think the feather wreath is gorgeous! That would add so much color to my doorstep this spring! Which of these 12 pretty peacock projects is your favorite? Leave me a comment to let me know!

You Might Also Like

 Spring Flower Crafts for Kids

Paper Plate Lions


Flower Garden Sensory Bin

Flowers are so much fun for little hands! Harper loves to pick them, plant them and even pull the weeds. I made a fun flower garden sensory bin for her and this super simple bin has not disappointed Harp at all!


Affiliate links are included

Supplies:
Dried black beans
Artificial flowers
Sand toys


Instructions:
Pour the dried black beans into the container.
Add Terracotta Pots and artificial flowers.
Offer a variety of tools to explore the beans with. Plastic serving tongs, sand toys
like shovels and rakes, kitchen spoons and small gardening spades are all fun options for
small hands. I chose items that would fit into the container with the lid for easy clean up and storage.
This is a sensory bin your little ones will want to play with many more times.
With supervision allow your child to explore the beans, the tools and plant the flowers.


    This bin was so simple. But, the best things in life usually are.

    As I put the bin out, Harp was ready to start gardening right away. Rolf heard the beans being poured into a pot and he exclaimed "I love these bins!"


    He naturally wanted to play too. Harper was more than happy to share her flower garden with Rolf.


    The kids loved the sound the beans made when poured into the pots. They also like the smoothness of the beans.


    To make it even more realistic, I later added a drop of rose to a few flowers and jasmine to a few others to add the fun of fragrance to the bin.


    Wen playtime was over it was simple to lay everything in the box and snap the lid on for easy storage. 


    We will definitely be playing with this again! 


    You might also like this In the Sky Sensory Bin.
    Find all of my sensory bin ideas here


    Cupcake Liner Sun Craft

    Preschoolers will love this easy sun craft. It is perfect for spring days! All you need is a few supplies and a little imagination.

    Cupcake Liner Sun Preschool Craft. Easy Sun Craft. Easy Kids Crafts.


    Harp is my crafty girl.She loves to make makeup, is a renowned perfume mixer, and is always drawing something! We had made these lovely perfumes to share that smelled like spring days so we thought we needed to make a few pictures to go with them. 

    Samples were provided for inclusion in this post.

    The perfume kit, you will want to check out independently! This is aimed at older kids, but with close supervision and assistance it was something Harper was well suited for. We got the STMT DIY Signature Scent Kit from the Horizon Group and LOVED it!

    I gathered some easy supplies that you will probably already have at home.

    Supplies

    Yellow cupcake liners
    White cupcake liners
    Markers
    Glue
    Blue Construction Paper


    Directions

    Glue one yellow cupcake liner on a sheet of blue paper.
    Using an orange marker give the yellow cupcake liner rays like the sun.


    Using a white cupcake liner, cut out several puffy cloud shapes.


    Have your preschooler do all of these steps independently. The cutting is good practice!


     Finally give the sun a happy face to welcome spring!

    You can find all of our spring crafts here.
    3D Paper TulipsBird Activities


    7 Rainbow Crafts to Make with the Kids

    Spring is here and that means we have been seeing our share of showers, and rainbows! Let's embrace the weather and savor the beautiful sights to be seen after the storm and make a few cute crafts while we are at it!


    These ideas are so cute yet so simple! They are perfect for kids of a variety of ages and are worth bookmarking for those rainy spring days spent indoors with the kids!

    I am going to try making the rainbow necklaces sometime this spring, and I think my kids would love to try the layered felt magnets. I can't wait to hear which of these rainbow crafts you want to make with the kids first!

    Easy Streamer Rainbows
    Layered Felt Rainbow Magnet
    Paper Plate Rainbow Craft
    Rainbow Mobile
    Rainbow Necklaces
    Rainbow Jars
    DIY Rainbow Bracelet

    Find more rainbow  crafts here

    Sock Roses for Teacher Appreciation Week

    If you are looking for a cute way to give an inexpensive token of appreciation to a special teacher this year, this sock rose craft is the perfect way to gift something fun and functional in a unique way.


    This project is so easy! It comes together in matter of moments and really adds a lot to the presentation of a simple pair of socks! All you need is:

     a pair of socks
     a rubber band
     a 9" section of ribbon 
     and a wooden dowel rod or maybe a pencil for the stem


    Begin by stacking your socks together and folding up the toe section.


    Next, begin rolling from the top. Roll tightly! 

    As you get to the folded top section, keep rolling in, this will be your outer petal.

    As the socks are tightly rolled, secure them with your rubber band. I knotted it, then knotted it again, on the other side for a really snug hold.

    Remove the rubberband.

    Gently insert the pencil or wooden dowel into the "bottom" of the sock roses.


    Make a single sock rose, or a dozen for a fun way to gift a special teacher something different this year as school comes to a close. 


    I added some leftover Easter grass to a mason jar to make the presentation even sweeter!


    These easy DIY photo puzzles are also a great homemade gift idea.


    Rainbow Coaster DIY

    Craft sticks are a great addition to any crafters supplies! There are so many fun ways you can use craft sticks to create! I made this easy set of coasters in just a few moments. These are great for tweens and teens to make! They are fun and functional and make a cool DIY you can gift to a friend or relative!


    This project is super simple. I got literally everything I needed at Dollar Tree to make these. I love economical crafting! To make this DIY  go a little faster I bought the craft sticks that were pre dyed.


    The pack conveniently contained all colors I needed for a rainbow effect. You will need 20 craft sticks to make this project, use 3 of each color!


    Line up your craft sticks in the pattern of a rainbow.
    Then use hot glue to attach 3 sticks running in the opposite direction for supports, just like a pallet would have.


    Repeat and make another one.
    Then you are going to place a craft stick on its side to give the coaster height.


    Carefully glue the stick on the sides then add a line of glue to the top of both side sticks and place the other section on the top.


    This project was featured in a video on facebook. I would love to have you check it out and give it a thumbs up!


    You can find more easy DIY ideas here
    Easy Pencil Pouches

    Find more rainbow craft activities here

    You can also find it on youtube. Subscribe for more fun projects for the family!


    10 Too Cute Tulip Projects


    Tulips are hands down my favorite spring flower. They are lovely and elegant while simple to care for and grow. I love to admire them as they come into bloom and I want to make all of the pretty flower crafts with the kids too! I found 10 too cute tulip projects that I couldn't wait to share with you. You might just want to make them all this spring!


    I love the easy tulip earrings as a sweet gift for a friend and the paper tulips are perfect for making with my almost 8 year old.  We might make a handful of these for his teacher towards the end of the year!


    Forever Tulips by Little Miss Celebration
    Spring Tulip Wreath by Sugar Bee Crafts
    How to Fold Paper Tulips by A Happy Home in Holland
    DIY Tulip Earrings by 30 Minute Crafts
    Tulip Wreath by Designer Trapped
    Yellow Tulip Door Decor by Crafts ala Mode
    3D Paper Tulips by Practically Functional
    5 Minute Door Bouquet by Mad in Crafts
    3D Tulips by Crafting Reality
    Toilet Roll Tulips by Crafts by Amanda

    I can't wait to hear which of these is your favorite tulip craft!
    I have two super easy videos on facebook for tulip crafting with the kids! Check them out here:


    Check out these easy 3d Paper Tulips

    Easy DIY ipad Mini Stand

    This easy diy ipad stand was made with only 3 supplies in just a few moments of time. It is a great tween or teen craft for a rainy day and provides a practical place to place your ipad for hands free viewing!


    This was such a simple project! I needed someplace to place my ipad while cooking and
    referring to a recipe, so I whipped this up in just about 3 minutes! I wasn't quite sure about how
    sturdy it would be, but I was surprised by how sturdy it was, and how well it has held up over 2
    weeks time.


    Supplies
    7 Jumbo Craft Sticks ( 5.86” x .72” )
    Washi Tape
    Hot Glue Gun


    Directions


    1) Apply washi tape to one side of 3 craft sticks.

    2) Form a letter V with 2 of the washi tape covered craft sticks.


    3) Secure the point where the sticks meet with hot glue.

    4) Flip the craft sticks over so that you are working with the uncovered side of the sticks and your
    point is now facing upwards.

    5) Use an uncovered craft stick to attach a “leg” to the top, where the sticks meet.  To do this easily
    give a generous dot of hot glue about ¼” below the top, immediately place your craft stick at a very
    slight angle. Hold the craft stick in place for about 30 seconds, as the glue dries. This acts as your
    base. Test it to make sure the base stands freely.

    6) You have 3 remaining craft sticks that are not covered by washi tape; stack and glue these together.

    7) Glue the final craft stick, with the washi tape on top of the stack you just made.
    This will act as your ledge for holding your ipad.

    8)You will glue these stacked sticks one inch from the bottom of the base.
    Allow to dry for about a minute before using as an ipad or phone stand.


      Easy DIY iPad stand


      You can check out all of my easy DIY ideas here


      Ladybug Craft

      Paper, glue and a few fun craft eyes come together to create a cute ladybug craft your older kids will LOVE to make!


      Partner, sponsored or affiliate links may be included!

      I made these with Rolf, who is 8. We quickly discovered that a hot glue gun is a necessity for creating these!  

      Otherwise, the supplies are quite common, making these perfect for a quick afternoon craft, or a way to make something worth bugging out over on a day that is maybe rainy, or too hot to get out and play! 

      Supplies
      Directions

      • Cut a circle in the size of your choice from the red paper.  With the leftover paper, cut 4 strips that are about 1" longer than the circle you just made. This will be your body.
      • Fold all of the ends of red strips over, then begin gluing them on the red circle. Glue the "tabs" you just created by folding ends. As you can see, I started with one strip going across the circle, then I continued until the strips had formed a shell.
      • Cut an oval-ish shape from the black paper, glue this under the shell you just made to form the head.
      • Add 2 craft eyes to the head.
      • With a marker, carefully add black dots.
      • Allow to dry, and you have a fun 3D Ladybug!


      3d Paper Ladybug

      You might also love this other fun 3D Ladybug that we made a while ago!
      If you are looking for even more buggy fun, we made ladybug valentine cards . Don't forget about our B is for Butterfly craft and coloring page too!

      Darling Daffodil Crafts

      Welcome spring with these darling daffodil crafts! 

      daffodil crafts

      Spring is near and I can think of no better way to welcome it than by crafting up some darling daffodil projects! From upcycles to wreaths, this list has a ton of pretty posey projects to bring a touch of color to your decor!

      K Cup Daffodils

      Toilet Roll Daffodils

      Dollar Store Daffodil Wreath

      Egg Carton Daffodils

      Felt Daffodils

      Cupcake Liner Daffodils

      Paper Daffodil Wreath

      Daffodil Banner

      Magnetic Daffodil Planter

      Which of these darling daffodil projects is your favorite? I truly love all of them and can't wait to make them with the kids!

      You Might Also Like these
      3d TulipsSpring Flower Crafts


      3D Shamrock Craft

      Easy 3d Shamrocks are perfect for St. Patrick's Day crafting with the kids!


      This is such an easy project. All you need are scissors, glue and  paper!


      Begin by Tearing the green paper into small squares. I decided to put the shamrock on a purple background. You can use whatever color you like.


      Cut 6 green hearts from the small squares. Cut at least 2 hearts at a time so they are the same size and easy to match up!


      Fold two in half and match them up. Repeat, creating the shamrock shape.


      Add a little bit of the green scrap paper as a stem.


      And there you have an easy 3d shamrock!

      You can find easy kids crafts here
      Easy Mermaid Tail

      Toddler Tulips


      Presidents Day Patritoc Art Project

      This easy art project is a fun way to engage preschoolers, toddlers and kindergarteners in a patriotic craft for President's Day, Fourth of July or Veteran's Day!


      We had a lot of left over heart cut outs from our Valentine's Day crafts and I wanted to use them up, but I also wanted to make a patriotic craft with the kids for President's Day. This heart flag is what we came up with.

      This craft is so easy and lovely. My 5 year old made this one, and she did a really great job with it too!
      The older your kids are, the more detailed their projects will be. If you are making this with kids a little older than Rolfie and Harp, you could have them cut the correct number of hearts to use in place of stars.


      The supplies for this craft are super basic and you probably have just about everything you will need on hand. We used Kwik Stix in blue to paint the blue square, but you could use markers, crayons or just a small section of blue paper.

      Supplies

      2 sheets of copy paper or white construction paper
      2 sheets of red construction paper
      Scissors
      Glue
      Blue paint, markers of crayons


      Directions

      Create a small blue square on one sheet of copy paper.
      Cut 2 sheets worth of red hearts, then glue lines of red hearts on the paper.
      Cut small white hearts from the extra sheet of white paper and glue them on in the blue square you made earlier.

      Find all of our kids crafts here


      Itsy Bitsy Spider Craft

      If you spend a lot of time listening to preschool music like I do, you are going to LOVE this easy Itsy Bitsy Spider craft that I made with my kids. This was so easy to assemble and so much fun to make. This is suitable for preschoolers and my 8 year old enjoyed it too... even though that is a baby song.


      The Itsy Bitsy Spider House

      You will need one full sheet of colored paper 
      one 4x6 inch square of paper in another color
      one triangle in another color (to make a roof)
      2 2x2 inch squares of paper that are the same color.
      One 2x2 inch square of paper in another color
      One 1x3 inch strip of black paper
      One Straw
      One spider ring
      2 strips of tape
      Glue Stick


      First Glue your 4x6 inch square of paper onto the full sheet.


      Then glue on the triangle for the roof, and the 2 squares of paper that are the same color for windows.

      Next add your door and your chimney.

      Tape your straw to the side of the house on the bottom.
      Slide the spider ring onto the straw from the untaped top.
      Tape the top of the straw.


      You can sing the itsy bitsy spider song with your kids, and have them move the spider up the spout! How cute right?


      We had a lot of fun with this super easy Itsy Bitsy Spider Craft. I love that with such simple supplies we were able to create something so entertaining. 

      This is not the only craft we have that  makes use of straws . You can give used straws a hot water soak and reuse them too to help reduce waste!

      You might also like

      Straw Necklaces; bling made for kids, by kids.
      Straw Flutes; hey, why not?