Showing posts with label crafts. Show all posts

DIY Barbie Serving Tray

My daughter is really into all things Barbie. So I made her this cute little rustic serving tray for her Dreamhouse play sessions. It took me less than 5 minutes and is pretty cute and you can personalize it if you wish!


We have all but given up on Barbie accessories. My kids lose them, the dog chews them and it seems like a big waste of money. I won't buy any more, but I will DIY some!


 I made this Rustic Barbie Serving Tray happen in moments with 3 supplies. It is pretty cute and it cost me $0 to make.


Supplies

6 small craft sticks 
Scissors
Glue Gun


Directions

Glue 3 craft sticks together
Trim the rounded edges off of 3 craft sticks then glue 2 of them to the longest sides of the base.
Cut the remaining craft stick in half
Glue this to the other ends


 Now you have a rustic serving tray for Barbie and her friends. Can you believe how easy that was?

We are already planning to make a version of this with taller sides to flip over as a coffee table for Barbie. You can paint the serving tray, or cover it with washi tape for a unique look if your daughter isn't into Farmhouse style decor yet.

Find all of my craft stick projects here

Handprint Fish Puppets

Monster Handprint Puppets


DIY Superhero Cuffs


My daughter is all about Wonder Woman these days, so we made a cute and easy craft to keep her Superhero dreams coming! 


This is such an easy craft. All you need to make it is duct tape, toilet paper rolls and scissors!


Cut two toilet paper rolls in half.
Then cover them with duck tape in your favorite print. Make sure to fold the edges over to avoid paper cuts and rubbing! 

That is all it takes to make these crazy easy and cute Superhero cuffs for the kids! This is one of my favorite rainy day projects because after craft time ends they can engage in some dramatic play!

You can check out the short video below 


Find more crafts here

Cupcake Liner Crafts are perfect for preschoolers


12 Mermaid Craft Tutorials

If your kids are crazy about mermaids you are going to love these 12 Mermaid Craft Tutorials! From adorable bags to upcycled crayons, this list has so many ideas you will want to make!

Mermaid craft tutorials

Spring is here, so my family is day dreaming of the beach, the pool and all of the fun we will have this summer. My daughter wanted to make our mermaid tail craft again last week and we had so much fun with it! I searched some of my favorite blogs and found 12 more ideas for our crafty fun. I know you will love this collection of crafts too!


Mermaid Shell Necklace by Moms and Crafters

Ombre Mermaid Tail Crayons by The Crafty Guru

Mermaid Bath Bombs by Buggy and Buddy

Easy Mermaid Tail Craft by Stylish Cravings

Clothespin Mermaid Dolls by Create Craft Cook

Mermaid Succulent Garden by Creative Green Living

Mermaid Suncatchers by Sugar, Spice and Glitter

Paper Plate Mermaid Twirlers by Red Ted Art

Beach Towel Mermaid Tails by Somewhat Simple

Mermaid Mailbox Playset by Hello Wonderful

Mermaid Wall Art by Resin Crafts Blog

Mermaid Iron On Tote Bag by Sew What Alicia


You might also want to check out my easy mermaid tail craft for preschoolers.

You can find all of our easy craft ideas here


9 Cards to Make for Father's Day

Father's Day will be here soon and I have 9 fun card ideas that your kids can make for their Dad to let him know they think he is a Super Dad!

Father's Day Cards to DIY

There is no better way to tell someone that you think they are amazing than a handmade card! The detail and sentiment in something made uniquely by you simply cannot be found in a printed card!

That's why I rounded up these 9 card ideas to let Dad know how you feel! He will love these fun-tastic expressions of adoration on his special day, and I bet he will savor them long after Father's Day has passed!


Fingerprint Monkey Card
High Five Card
You're the Vest Card
Tie Card
Fingerprint Golf Ball Card
True Grit Card
Shirt and Tie Card
Dad's Tools Card
Popsicle Card

I have a few ideas that you can use to make Father's Day super special.

  1. Let him sleep in! 
  2. Offer to take over one his chores for the day so he can rest.
  3. Give him a new magazine or book to read while he is relaxing.
  4. Offer him a special treat! 
  5. Tell him that you appreciate his devotion to your family.


Which of these cards do you think your kids would like to make first? My kids think the Vest Card is pretty awesome! We plan to make one soon!

Find all of my fun crafts here

Glowing Night Lights (No Electric!)

These glow in the dark jars are a fun diy to make with the kids. They are perfect for a night light that comes together in one minute or less, with only 2 supplies!


 My son Rolf is 9 now. He is so curious and eager to learn. One night last week it was storming and he was worried about losing power, and how he could sleep in the dark. So we took to the kitchen to whip up some super simple glowing jars which were perfect for a night light!


This post contains affiliate or sponsored links.

I used tonic water and glow in the dark powder to create this jar. It couldn't be easier to make!
If you have a black light fixture, you can skip the glow in the dark powder as tonic water naturally glows under a black light. 

Tonic water contains quinine which absorbs ultraviolet light, causing it to glow.

Directions:
Fill a mason jar with tonic water
Add 1 teaspoon of glow in the dark powder
Stir
Replace the lid.
Allow to charge under a light for a moment and watch it glow!


Find more cool DIY Ideas here

You might also like this easy glow in the dark necklace.

Birthday Cake Sensory Bin

This easy birthday cake sensory bin is perfect for any little aspiring chef! Made with homemade playdough and complete with loads of sprinkles and fake candles, this bin keeps preschoolers happily baking up something good!

birthday cake play doh sensory bin

After many years of mothering, I have learned that it is a good idea to have an activity planned for the afternoon. I usually have something set up for Harp like a paper craft or something she can get creative with, but lately we have been LOVING sensory bins

birthday cake play doh sensory activity


Harper loves to bake, so the idea for this birthday cake sensory bin came around. I thought she would love the chance to play with sprinkles, and I was right. When she came home from preschool, she was ready to get her hands into this bin! I have a feeling your little one will want to do the same should you recreate this project.


This was easy to assemble and super economical. You likely have all of the supplies on hand!

sprinkles in hand


This post contains affiliate links. If you make a purchase I will earn a small commission at no cost to you.

birthday sensory bin


Supplies:
1/2 cup of shampoo (any kind will do, including something from the dollar store!)
 2 tablespoons of water
1 cup of flour
Silicone cupcake molds, small cake pans, small dishes for forming cakes. Your childs play food collection is a great place to find materials to use in this bin.
Washi Tape
A battery operated votive candle
Tissue Paper in orange, yellow or red
A baking dish or a bin with a lid


To make the birthday cake dough:
Add one cup of flour, 2 tablespoons of water and 1/2 cup of shampoo together in a medium bowl. 


Begin to stir, as the ingredients start to bind together, finishing mixing with your hands.
 If the dough feels sticky, you will add a little more flour, no more than 1/4 cup.


Test for stickiness. If the dough is still sticky, add a little more flour and continue to mix until it doesn't stick to your hands.


To make fake candles:
You will need a length of washi tape that can cover a craft stick on both sides.


Allow the tape to slightly overlap the craft stick and place small squares of tissue paper on the top of the stick. I layered orange and yellow tissue paper to resemble a flame.
Fold the tape up to cover the other side of the craft stick.


Trim the edges of the tape on the sides of the craft stick.
Trim your tissue paper to resemble a flame.


To assemble the birthday cake activity bin:
Pour a bottle of sprinkles in the bottom of the dish or storage container you plan to use.
Add the dough.
Add small dishes like play food dishes, silicone cupcake molds, small baking dishes.
Add the fake candles and a battery operated votive candle, if you have one.


Invite your child to explore the activity. They will form cakes, decorate with sprinkles and add candles to serve birthday cake!

birthday cake sensory play

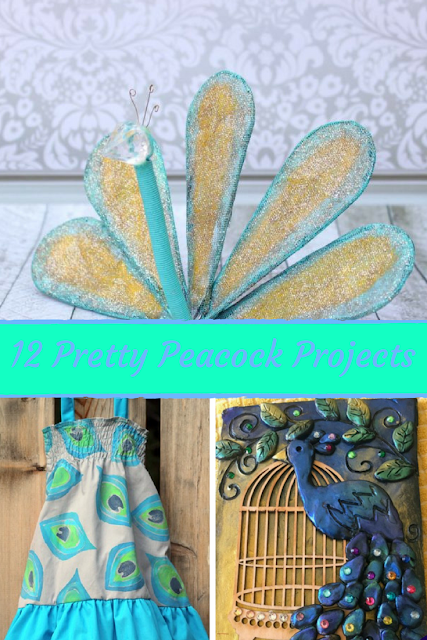
12 Pretty Peacock Projects

Spring is near and we can't wait to visit the Kingwood Center in Mansfield to view the lovely early flowers, stop by the green house and of course, check out their gorgeous peacocks!

To build on our excitement I thought it would be fun to make a few pretty peacock crafts! I found 12 lovely ideas that I can't wait to share with you. If you like peacocks you are going to want to make a few of these too.


DIY Etched Peacock Cuff Bracelet by Happy hour Projects
Peacock Wreath by Artsy Fartsy Mama
Peacock Soap by Suzy's Sitcom
Peacock Tutu Skirt by Life Sew Savory
Peacock Necklace by Mad in Crafts
Peacock Shoe Clips by Sugar Bee Crafts
Peacock Painted Curtains by Live Laugh Rowe
Peacock Feather Wreath by Doodle Crafts
DIY Peacock Stamped Dress by Twin Dragonfly Designs
Peacock Garden Art by Morena's Corner
DIY Peacock Earrings by Artsy Fartsy Mama
Pretty Peacock Journal by Suzy's Sitcom

peacock crafts


I think the feather wreath is gorgeous! That would add so much color to my doorstep this spring! Which of these 12 pretty peacock projects is your favorite? Leave me a comment to let me know!

You Might Also Like

 Spring Flower Crafts for Kids

Paper Plate Lions


Flower Garden Sensory Bin

Flowers are so much fun for little hands! Harper loves to pick them, plant them and even pull the weeds. I made a fun flower garden sensory bin for her and this super simple bin has not disappointed Harp at all!


Affiliate links are included

Supplies:
Dried black beans
Artificial flowers
Sand toys


Instructions:
Pour the dried black beans into the container.
Add Terracotta Pots and artificial flowers.
Offer a variety of tools to explore the beans with. Plastic serving tongs, sand toys
like shovels and rakes, kitchen spoons and small gardening spades are all fun options for
small hands. I chose items that would fit into the container with the lid for easy clean up and storage.
This is a sensory bin your little ones will want to play with many more times.
With supervision allow your child to explore the beans, the tools and plant the flowers.


    This bin was so simple. But, the best things in life usually are.

    As I put the bin out, Harp was ready to start gardening right away. Rolf heard the beans being poured into a pot and he exclaimed "I love these bins!"


    He naturally wanted to play too. Harper was more than happy to share her flower garden with Rolf.


    The kids loved the sound the beans made when poured into the pots. They also like the smoothness of the beans.


    To make it even more realistic, I later added a drop of rose to a few flowers and jasmine to a few others to add the fun of fragrance to the bin.


    Wen playtime was over it was simple to lay everything in the box and snap the lid on for easy storage. 


    We will definitely be playing with this again! 


    You might also like this In the Sky Sensory Bin.
    Find all of my sensory bin ideas here


    Cupcake Liner Sun Craft

    Preschoolers will love this easy sun craft. It is perfect for spring days! All you need is a few supplies and a little imagination.

    Cupcake Liner Sun Preschool Craft. Easy Sun Craft. Easy Kids Crafts.


    Harp is my crafty girl.She loves to make makeup, is a renowned perfume mixer, and is always drawing something! We had made these lovely perfumes to share that smelled like spring days so we thought we needed to make a few pictures to go with them. 

    Samples were provided for inclusion in this post.

    The perfume kit, you will want to check out independently! This is aimed at older kids, but with close supervision and assistance it was something Harper was well suited for. We got the STMT DIY Signature Scent Kit from the Horizon Group and LOVED it!

    I gathered some easy supplies that you will probably already have at home.

    Supplies

    Yellow cupcake liners
    White cupcake liners
    Markers
    Glue
    Blue Construction Paper


    Directions

    Glue one yellow cupcake liner on a sheet of blue paper.
    Using an orange marker give the yellow cupcake liner rays like the sun.


    Using a white cupcake liner, cut out several puffy cloud shapes.


    Have your preschooler do all of these steps independently. The cutting is good practice!


     Finally give the sun a happy face to welcome spring!

    You can find all of our spring crafts here.
    3D Paper TulipsBird Activities


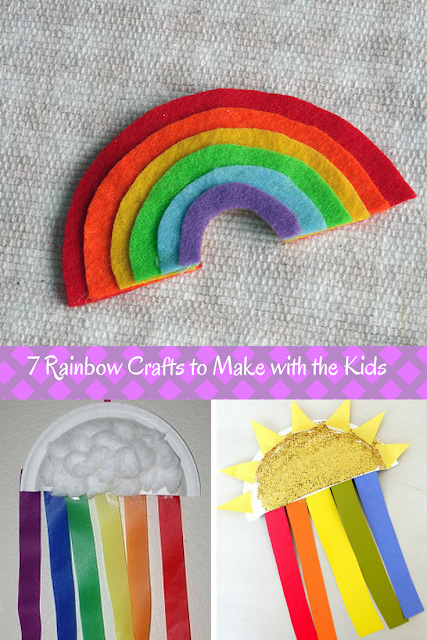
    7 Rainbow Crafts to Make with the Kids

    Spring is here and that means we have been seeing our share of showers, and rainbows! Let's embrace the weather and savor the beautiful sights to be seen after the storm and make a few cute crafts while we are at it!


    These ideas are so cute yet so simple! They are perfect for kids of a variety of ages and are worth bookmarking for those rainy spring days spent indoors with the kids!

    I am going to try making the rainbow necklaces sometime this spring, and I think my kids would love to try the layered felt magnets. I can't wait to hear which of these rainbow crafts you want to make with the kids first!

    Easy Streamer Rainbows
    Layered Felt Rainbow Magnet
    Paper Plate Rainbow Craft
    Rainbow Mobile
    Rainbow Necklaces
    Rainbow Jars
    DIY Rainbow Bracelet

    Find more rainbow  crafts here

    Sock Roses for Teacher Appreciation Week

    If you are looking for a cute way to give an inexpensive token of appreciation to a special teacher this year, this sock rose craft is the perfect way to gift something fun and functional in a unique way.


    This project is so easy! It comes together in matter of moments and really adds a lot to the presentation of a simple pair of socks! All you need is:

     a pair of socks
     a rubber band
     a 9" section of ribbon 
     and a wooden dowel rod or maybe a pencil for the stem


    Begin by stacking your socks together and folding up the toe section.


    Next, begin rolling from the top. Roll tightly! 

    As you get to the folded top section, keep rolling in, this will be your outer petal.

    As the socks are tightly rolled, secure them with your rubber band. I knotted it, then knotted it again, on the other side for a really snug hold.

    Remove the rubberband.

    Gently insert the pencil or wooden dowel into the "bottom" of the sock roses.


    Make a single sock rose, or a dozen for a fun way to gift a special teacher something different this year as school comes to a close. 


    I added some leftover Easter grass to a mason jar to make the presentation even sweeter!


    These easy DIY photo puzzles are also a great homemade gift idea.