Time Out Jar

I first made these calm down jars in 2014. My kids were so small that we used plastic, just in case they were dropped or thrown during a tantrum back then. While the children have grown so much since then, I have made these with them a few times. I have updated the post and included a few new photos for you.
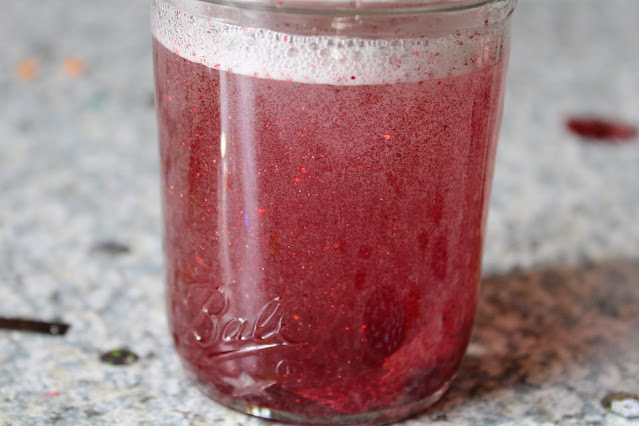

Photo Credit: Sara Lehman.

If you need an idea that brings a little more zen and fewer tantrums, let me introduce you to the time out jar. You can call these whatever you like; a meditation jar, a calm down jar, or a time in jar. The idea remains the same, this jar can help your kids take a minute to collect themselves after a meltdown, or offer them a quiet minute for themselves anytime they want it. Plus, the results are pretty and relaxing to watch.


Photo Credit: Sara Lehman.

Make these with a plastic container, like a treehut body scrub container, if you have little kids.
If your kids are older, and would be more likely to use this as a meditation tool, feel free to use a mason jar, or even better, recycle a used food jar, like a pasta sauce container.
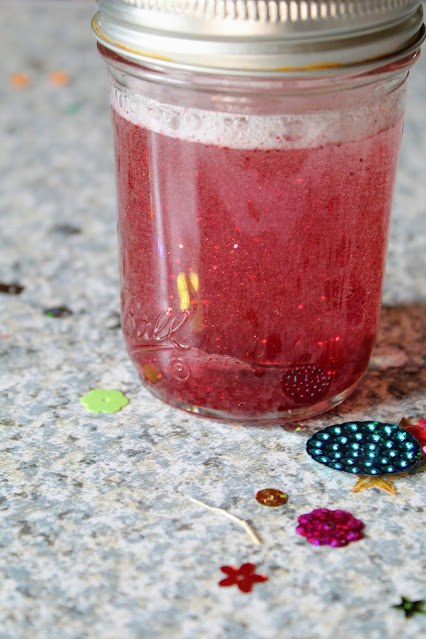
Photo Credit: Sara Lehman.


This is an easy craft, that all ages can help with. It is cool enough to get tweens interest, and you can use your favorite colors and whatever glitter you like. We have even added chunky confetti to time out jars.


Photo Credit: Sara Lehman.

Supplies:

1 to 2 tablespoons of glitter glue

Chunky Confetti

Glitter 

A mason jar and lid

1 ¾ water

A craft stick


Photo Credit: Sara Lehman.

Pour the warm water in the container with the glitter glue.

Photo Credit: Sara Lehman.

Add a drop or two of food coloring to the glue and water.

Photo Credit: Sara Lehman.

I lined the lid of the container with glue and firmly sealed the jar.

Photo Credit: Sara Lehman.

And here you have a TIME OUT JAR.


Photo Credit: Sara Lehman


You can find all of my sensory ideas here.
Egypt Sensory Play
Feeding Sharks Sensory Bag


Making Traffic Lights Preschool Craft


My son and I have a routine. In the morning he has free time, he can play as he like or watch cartoons. He can color or grab a stack of books to look at. While he has free time I work. At 10 a.m. He gets his notice that we will clean the living room together when am finished cleaning the kitchen. 

Roo takes advantage of that notice and plays as hard as he can while I work in the kitchen. If it appears that he is having a especially good time I might dash in to make beds and start a load of laundry so that he can extend his fun.

When the chores have been taken care of Roo and I pick up all of the evidence of his morning fun. 
When the blankets, pillows, toys and books have been put away and the carpet has been vacuumed it is craft time. Harper likes this part of the morning because it is her chance to get on the floor and roll around.


Each week I have 2 planned crafts and I offer Roo the chance to choose the other 3 activities for the week. Last week he told me he wanted to make a "red light". 

Hmmm. That is easy peasy! Even I can manage this one without incident!

To begin the craft we got out the disposable plates I keep in our craft supplies for projects like this one, and 4 sheets of construction paper in red, yellow, green and black. I grabbed a tube of glue and we sat down to create.

I had Roo help me tear the paper into small pieces. I thought this was a good way to work on fine motor skills and develop his pencil grip.


Next I tore the black paper into 2 strips.

I made 3 circles of glue on each paper.


I demonstrated what I wanted Roo to do. Place the little bits of paper onto the glue. At first he wasn't sure why I wanted to keep the colors separate. 

But then he saw what we were doing! How cool! We had 2 "red lights" and he was ready to play. There was no waiting for the glue to dry!

And yes, that is a spider riding a motorcycle on the tracks!

2 "red lights" were not enough. With big blue eyes Roo begged "More Red Lights Please!" So we made another one with bits of paper on one of the plates we had used earlier.

I had a happy little boy who was very interested in daily craft time and who found inspiration in our craft to jump into a serious session of imaginative play. I felt accomplished that we had a smooth craft session, we worked on fine motor skills with a high interest creation. 


I am thinking of a better option for red lights for Roo. Maybe painting them on clothes pins so he could set them up by the train tracks. What do you think? What would you try?

A Clean Home Challenge: Crock Pot Cleaning

I love my crock pot. I use it often! Several times a week I prepare something fantastic in my beloved crock pot. With a new baby I don't know how I would manage to prepare dinner without it. The last time I put my favorite small appliance to use I realized the interior was looking pretty funky and I made a note to clean it.


Now, how does one go about cleaning a crock pot? I saw a lot of suggestions online, from using a general cleaner, to using oxi clean, brillo pads and so on. I thought there had to be a less expensive way to maintain my crock pot so I kept searching. Someone suggested using a baking soda paste and I was anxious to try it. I had a box of baking soda in my pantry and the idea of cleaning without a harsh chemical really appealed to me.

This is what my crock pot looked like before I cleaned it.


I made a paste of 3 tablespoons of baking soda to 1 teaspoon of water.


                     Then I rubbed the paste into the base of the crock pot.

               Let this sit for about 20 minutes, then use a damp rag to wipe the baking soda off.


The baking soda scrubbed much of the dingy baked on mess out of the crock pot easily.

While the crock pot wasn't restored to its brand new splendor, it sure looked a lot better!


If you have very stubborn stains after the baking soda scrub you can apply dish soap to the stubborn baked on spots and let it set overnight. The dish soap will break up the baked on residue and will wipe off easily with a damp towel. My crock pot wasn't that bad so I didn't require this last step, but I feel confident it would work because If I have a baked on mess on any dishes this is the method I use. 

If your crock pot needs a good cleaning, this method will work well for you and it will only cost you pennies.
How do you keep your crock pot clean?

Recycled Heart Shaped Crayons

Over the years my husband and I have created a bucket of crayons. When we find them around the house (which is inevitable when you have little kids and encourage them to create) we toss them into a plastic pail. One day last week I got the pail out and turned to get the cardboard we were going to draw on. My cute little boy giggled and dumped roughly 300 broken crayons on the floor...


Okay. That is just insane. Why is there a pail with that many broken crayons in it? Who wants to use a tiny little crayon? But... I hate to throw away something I can use in another way. Of course, I thought... I could make candles, use the crayons to color the wax, blah blah blah. I don't have time to make hand poured candles. I also don't want to invest a ton of money into reusing broken crayons. So scratch that idea.


The pail went back to the normal spot and I moved on.

A few days later I saw silicone molds at WalMart in heart shapes. I found $3 and some change to be a better investment and a way to use the broken crayons.

I went home and decided oh this is such a super easy idea! Even I can do this without running into a snag!

So I grabbed the pail of crayon mess and thought I would slip the sleeve of the crayon right off and be in business.

Not so, I quickly found out as I was digging at the paper, getting wax under my nails and rethinking the entire thing. What a pain in the butt! {Mr}Adam, darling husband, came to the rescue. He kindly used his pocket knife and helped me to cut the paper so it was easy to peel off.


 After the paper was removed I broke the crayon (if it wasn't already broken) in half.


 I filled the silicon molds to the brim with broken crayons. I went for general color mixture. (All shades of red mixed together, all green, etc.)


 After about 7 minutes in a 350 degree oven they were completely melted.

I could have added a few more broken crayons to make a thicker heart crayon or taken a few away for thinner ones. I liked the ones I made as is.

I allowed the melted crayons to cool completely in the silicon molds. Getting them out of the molds was as easy as could be.


Since this was one project I know I can handle and repeat without any issue I decided to give all 30 that I made to {Mr} Adam, husband extraordinaire, for the classroom Valentines Party.

After my husband stepped in and helped me with the crayon sleeve this project was really easy and fun too. I am planning to find other silicone molds and try different designs.

On a side note, I had 2 odd shaped ice cube trays. One was an ocean them, one an ice tube type. I decided to try these out too.

While it did work, I found the silicone option to be easier. With the ice cube trays I found I had to give them a light spray of cooking spray stuff. Then I had to wipe down the recycled crayons after removing them from the mold to make sure they weren't greasy. (For my time and effort I prefer the silicon trays).

I realize this would have been perfect for a Valentines Day post, but it is really a perfect after Valentines Day craft because you can probably get the silicone molds super cheap on clearance now.

The next batch I make I think I will add one color that is off in each one. I am thinking one blue in a group of green. One red in a group of pink and so on to make the colors unique and fun.

This is the end result.


They were pretty cute and I was thrilled that I made this with next to no drama.

Until next time,
Sweet Silly Sara


Tell Me About It Tuesday #6

tell me about it


Welcome to Tell Me About It Tuesday and Thank you to our hosts                                                             
  

                                                                   Sweet Silly Sara

                                                          
   Woman of Many Roles

Woman of Many Roles


The most popular links from last weeks party was:

How to Make an XO Band Bracelet by Kids Activities Blog.


April's favorite was:
Double Chocolate Brownies by Pretty Scraps

Jacqui's favorite was:

Tiramisu Cheesecake by Live a Sweet Life

                                                             Sara's favorite was


                                  Home Brewed: DIY Vanilla Extract by eightymphmom

Starting this week we have something new to bring to the table for all of you awesome, inspiring chicks that link up with us every week!

Every post linked up will be visited and pinned to our Tell Me About It Tuesday pinterest board. Yay!


Thanks to everyone that linked up at last week's party!

We welcome you to link up your posts! Feel free to share anything except giveaways, etsy shops or anything you are selling.  Please visit a few links and show some love to your fellow bloggers.

Please note by linking up you give the hostesses permission to use your post in round ups and we may feature you or share your post via social media.


Free 2014 Printable Calendar

Remember a few days ago when I mentioned the calendar battle with my son? I caved and gave it to him, he promptly destroyed it. I considered buying another one, but why waste money when I know it will become fair game to my curious preschooler eventually.

Well, instead of buying a new one, I started using this 2014 calender in combination with my birthday checklist printable and my post it notes on a mirror method.

The best part is, I can print this a million times and let my son color on it, point out the numbers and letters and do whatever a 3 year old boy does with paper.


Thanks for dropping by! I hope this printable calendar helps you keep track of your life.

DIY Organizer (under $11 and 11 minutes)

Storage space in my home is an issue. We have 2 real closets. One is packed tightly with clothes, dvds and a filing cabinet. The other contains clothes the kids aren't ready to wear size wise, an embarrassing stack of magazines I haven't got around to reading,piles and piles of kids books that won't fit in the bookshelves  and extra diapers. In 2 of our bedrooms we have a shelf with a clothes rack attached to it. (It is not the same as having a closet!)

Now imagine your home with very limited closet space. Where would you store... anything/everything?


I created something that works well with small toys, odds and ends or anything that you might store in a small cubby. I purchased round plastic baskets from Dollar Tree. I went with what they had at the time, but have since seen larger round baskets and mid size square baskets that would work better for this project.

To create one organizer with 10 cubbies you will need:
10 plastic baskets
zip-tie closures
a hole punch


Start with 2 baskets. Line the handles up and secure the baskets together with a zip tie.


Continue adding baskets until you have 4 in a row on the bottom.


Now comes the tricky part. You will need to place your next 3 baskets on top of the 4 that are attached to each other. Get an idea of where you will connect the bottom row of 4 and this new row of 3. You can mark with a permanent marker if this helps. You will take your hole punch and place a hole on the top of the baskets on the bottom row and the bottom of the baskets on the new row. Then attach them with a zip tie.

Repeat with the next row of 2 baskets.

Repeat with the next row of 1 basket.

And this is what you have:


Please excuse my mess. 


To finish this project simply snip the tails of the zip ties.

This organizer was so easy to make. It was completed in under 11 minutes and I spent under $11 to make it.
Use this up against a wall for support.

I made 2 of these. One I use to store baby clothes. This made it so easy for my husband to help with the baby. I have a bin of onesies, pajamas, long sleeve tops, pants, dresses, socks & shoes, headbands and etc, baby blankets and jackets. Now he can see at a glance what the options are without messing up drawers.

The other I use as my own storage solution. Here is an embarrassing confession. I used to have a plastic box intended for under the bed storage of blankets that I just stashed random stuff in. One day I realized I had filled the box up... with basically junk. Samples I got in the mail, nail files, stationary... yeah just junk. Now I have a bin for headbands, a bin for lotion, a bin for stationary and so on.

I had intended to use these to get my son organized. But, I ended up going another route, which you can check out in a future post.

Water Intake Printable

If getting in shape or living a healthier life is on your list of New Years Resolutions you probably realize how important drinking a lot of water is. But it can be a challenge to drink as much water as is recommended.

I have a great free printable for you that will help you keep track of how much water you are consuming each day.

I didn't realize how little water I have been drinking until I started using this.  After seeing I was only drinking half of the water I should be consuming I am making a great effort to say no to the addictive iced coffees and opt for water instead.

Print: Water Intake Calendar


I hope this printable helps you to make sure you are drinking enough water.

A Clean Home: Problem Area Assessment

We have a small 3 bedroom home. We have a small bedroom which was intended to be Roo's room, but he didn't sleep well in that room... fast forward 3 years. He is still sleeping with his Mommy while Harper's crib is in that room. As much as I hate it, it is also the play room. It is a good thing Harper sleeps like a log and Roo prefers to play in the living room. Mostly toys are stored in Harper's room. We have a bedroom that is larger than the baby's room, but it has an extra bed, our desk, printer, turtle habitat, carpet cleaner, vacuum, dvd collection, spare sheets and blankets... yeah everything stored in there. This is supposed to be a guest bedroom. No guests could sleep in there due to my mess. The last bedroom is the actual bedroom. It is also crammed full of everything. 2 bookcases, a baby swing, a queen size bed. All of the clean laundry I haven't put away yet... and the list goes on.

When I made an assessment of what the most annoying problem areas in our home were I came up with big and small issues to correct.

I tackled the drawer mess if you recall. That was easy enough. The mess that is my children's clothing and toys is another issue altogether.

These photos are mortifying. I am still in shock that the mess had got so far out of hand in a matter of days.

This mess is kids clothes. Sadly, this is not all of the mess. You can't see the clothes that won't even fit on the rack and are hung on the braces for the shelf. You can't see the baby clothes in baskets  or the pile of shoes they have and rarely seem to wear.

I have had 2 declutter sprees in the last month. Yesterday we took a box large (enough to hold an elliptical), a trash bag and a brown shopping bag full of clothes, towels, blankets and etc to Goodwill. We dropped off Beloved Kota the Dinosaur to the elementary school, where he will be in a play. My son loved this toy, but it took up a ton of precious space.

Break a leg Kota in your acting debut this spring..

With Kota and a huge pile of old stuff out of the way, I felt like I could finally get a good feel for what the true problem areas were.... The whole house is a problem area. No way around it.

Toys have taken over the living room again.


And the dining area too.


It only gets worse. I can't bring myself to keep posting these pics...

Another problem area in my house is my laundry room. Not only is the room just ugly, it is always full of stuff. Recycling to drop off, at least 20 pairs of shoes reside in this room, my husband has his plants in the laundry room. There are extra household supplies like toilet paper, laundry detergent, soap and shampoo. The gear for the dogs is in this area... it gets messy really quickly. The worst part is, the laundry room is actually an enclosed porch, therefor you must enter the laundry room which is in a constant state of disarray to enter my home.

My kitchen always needs attention. The breakfast nook is the catch all for everything in the free world. The area under the breakfast counter has been catching a great deal of junk too. There are always dishes ready to spill out of cabinets, the pantry is always messy.

Oh my, this clean home challenge is getting bigger and bigger. What a mess my home is! I hope you will come back tomorrow to find out where I begin and what the result is.


A Clean Home Challenge 2: The Drawer Declutter


It seems like I woke up one morning and found that my serving utensils like spoons, spatulas and ladles had multiplied. They occupied a large drawer in my kitchen and I could no longer get that darned drawer to close... and it had migrated to a second drawer of kitchen mess. This was driving me crazy.


Yeah... it was really out of control.  I found a ton of flat out junk shoved in these drawers. Take Out Silver wear and Straws, note pads, treat bags, notes and half completed grocery lists to name a few.

The only way to really tackle any project is to just dig in to it. So I pulled everything out the drawers. I found kitchen knives that should not have been in these drawers and packaged them for Goodwill. I found measuring cups with the measurements worn off and unreadable. Those went to the Goodwill box as well.  Old spoons were destined to be discarded as well as several spatulas.

When the drawers were empty I disinfected them.

Next I pulled a bean crock out of my cupboards. I have had this item for 11 years or so... I baked in it one time, and used it to store left overs a few times. It was really one of those things that I don't need but don't want to part with. So it takes up cabinet space and is never used.

Realizing the crock is gorgeous I decided it would be better used as a spoon/spatula holder where it could be functional and admired.

The items I opted to keep were a perfect fit in the crock! I have 2 empty drawers now and I can grab whatever spoon or spatula I might need without having to rummage through a messy drawer to find it.


 I was really impressed with the results of this challenge. My kitchen looks better without 2 drawers that won't close. I reduced the amount of clutter in the kitchen drawers and I put a lovely item to use in my kitchen, and I disinfected 2 drawers.

This drawer declutter was a project that needed to be completed maybe 6 weeks ago in all honesty. It only took me about 8 minutes from start to finish and it didn't cost any money to complete.

I have 2 other drawers awaiting a declutter. One holds hand towels and napkins, one holds dishtowels. I am going to reduce my towels/napkins by selecting any that are stained, frayed or in another state of disarray to get rid of.  I hope to reduce the napkins/towels by half. My family should be able to survive with 7 hand towels in the kitchen instead of 15. We don't need 5 sets of cloth napkins for the 4 of us. This will hopefully free up another drawer for a total of 3 drawers to use in another way.

My 3rd Challenge for A Clean Home involves a DIY organizer that will cost you under $11 to complete. If you have kids you won't want to miss it!

I would love to challenge you to clean out a drawer or two in your kitchen. I would be thrilled to have to you leave a comment and tell me about your kitchen drawer declutter project.


A Clean Home Challenge 1 : 50 items

The holidays have come and gone, and while Christmas is a ton of fun for almost everyone, the aftermath of the holidays can be discouraging and overwhelming. After Santa paid a visit to my children and the gifts had been exchanged with friends and family I stood in horror looking at the disaster Christmas left in its wake. New toys and clothes were piled upon old toys and clothes...boxes and bags littered just about every surface. Scraps of paper were scattered here and there. Then we get into the bedrooms, where it was every bit as bad, except figure in that laundry, and random things like a new booster seat, were stashed in those rooms at the last minute before the family arrived to celebrate.


Just a few weeks ago I went on a cleaning spree. If you follow my Dear Weary Mom series you might remember the box of burdens post. I filled a huge box up and took it to Goodwill and Community Action. Despite that massive decluttering, my house needed another overhaul to accommodate Christmas.

When I really thought about it, my house needs another round of decluttering, a deep clean and a massive organizational effort. My family of 4 with 2 dogs resides in a very small house, only about 890 square feet. We have outgrown this house to say the least, but we are trying to stay here for at least 6 months. To last another 6 months in such a small space with a growing family is going to be difficult if I don't find ways to make the space we do have work for us.

With this in mind I have been collecting ideas, sketching plans and making lists of projects that I want to tackle to whip my home into shape.

Each post in the series A Clean Home will feature an inexpensive way you can clean or organize something in your home. The first Challenge I gave to myself was to  select 50 Items from my home to donate to Goodwill. I gave myself 2 days to gather my 50 items.

Among the 50 items I had 6 towels, 2 top sheets, 3 blankets, 5 pairs of socks, 8 toys from my sons room, 2 sleepers of Harper's. 5 kitchen knives, a cheese grater, a reusable bag, a measuring cup, dog grooming products, an outgrown coat and pair of bibs, baby shoes, 3 handbags, 2 clutches, 2 hats, a book, a few magazines, 2 bottles of shampoo I didn't like, a scarf , Christmas lights and a few t shirts. I exceeded my goal of 50 items and filled 2 medium size boxes. I still plan to sort through stuffed animals and pull 5 out for a donation to Goodwill, and I suspect there are a few more towels that won't make the cut for keeping, both bath and hand towels.

Now that I have reduced the amount of clutter in my house it is time to start organizing. I hope you will keep coming back to read more about my challenges in this series. Next time, we will talk about a very messy drawer in my house and how I plan to get it under control.